May 28, 2012

Mini Lemon Poppy Seed Scones

Mini Lemon Poppyseed Scones

Last weekend seemed like the first weekend I spent at my own place in a long time after taking lots of little trips lately.  It felt so nice to get back into a routine of going to the Farmer's Market, doing lots of cooking, shopping for new clothes, and even cleaning!  But though I'm enjoying a routine for now, I know it won't be long before I start craving a vacation again.  It's impossible to sit in a windowless cave of an office five days a week when it's so gorgeous outside!

Fortunately, you can always try to bring the sunshine and happy memories indoors with bright and sunny baked goods, like these adorable mini lemon poppy seed scones that are sure to put a smile on anyone's face!

Mini Lemon Poppyseed Scones

I love anything lemon poppy seed-flavoured.  I love scones (though I try not to eat them too often).  I love anything miniature.  So after the success of my mini toffee scones a little while ago, I decided to make mini lemon poppy seed scones!

When I went to search for a base recipe for lemon poppy seed scones online, I was surprised to find that there weren't very many.  I ended up choosing a recipe from Bon Appetit, who has never steered me wrong before, but I made a few adjustments to the recipe, like significantly increasing the amount of lemon juice and zest, and of course making them into mini-sized scones!

Mini Lemon Poppyseed Scones

These turned out just as good, if not better, than I had hoped!  They were light and fluffy with bursts of crunchy poppy seeds and a bright lemon flavour that's enhanced by the sweet lemon glaze on top.  They're just like little bites of sunshine, and because they're a fraction of the size of regular scones, you don't have to feel too guilty about eating them!

While my scones have long since disappeared, today's sunshine has not so I'm off to go sit outside while the warm weather lasts!

Mini Lemon Poppyseed Scones

Mini Lemon Poppy Seed Scones

Adapted from Bon Appetit, via Epicurious

Makes about 18 mini scones

Ingredients:

For the Scones:
3 cups all-purpose flour
1 cup sugar
3 tablespoons poppy seeds
1 tablespoon baking powder
1 tablespoon lemon zest
1 teaspoon kosher salt
1/2 cup + 2 tablespoons unsalted butter, chilled and cut into small pieces
1 large egg
1/4 cup fresh lemon juice
1/3 cup 10% cream

For the Glaze:
1/4 cup icing sugar
1 tablespoon fresh lemon juice

Directions:

Preheat oven to 375°F.  Line a baking sheet with parchment paper.

In the large bowl of a food processor, mix together the dry ingredients (flour, sugar, poppy seeds, baking powder, lemon zest, and salt), pulsing a few times until combined.  Add butter and pulse until mixture resembles coarse crumbs.  Whisk egg and lemon juice together in a small bowl, then add to the food processor.  Pulse until moist clumps form.  Add the cream, and pulse just until the dough comes together.

Using floured hands, gather the dough into a ball and flatten into a 4x4-inch square on the parchment paper-lined baking sheet.  Cut the square into three even rows and three even columns, forming 9 smaller squares.  Cut each square in half diagonally to form two triangles, making a total of 18 triangles.  (See this post for a similar example of forming mini scones). 

Spread the triangles evenly across the baking sheet, and bake in the preheated oven until scones are golden brown, about 20 minutes.  Transfer to a wire rack to cool.

To make the lemon glaze, whisk together the icing sugar and lemon juice until a pourable glaze forms.  Once scones have cooled, use a spoon to drizzle icing over the scones (or transfer the icing to a ziplock bag, snip off the corner, and squeeze out).  Serve immediately.

May 23, 2012

Things I've been Making and Eating Lately!

You may have noticed that I've been slowing down with my posts on the blog lately because I've been so busy, but that certainly doesn't mean I haven't been enjoying delicious food!  Today I thought it'd be nice to share a few recipes that I've tried recently, along with some meals that I don't have recipes for but wish that I did!

Starting back in April, I made a cake for my dad's birthday that was a big hit: Smitten Kitchen's 
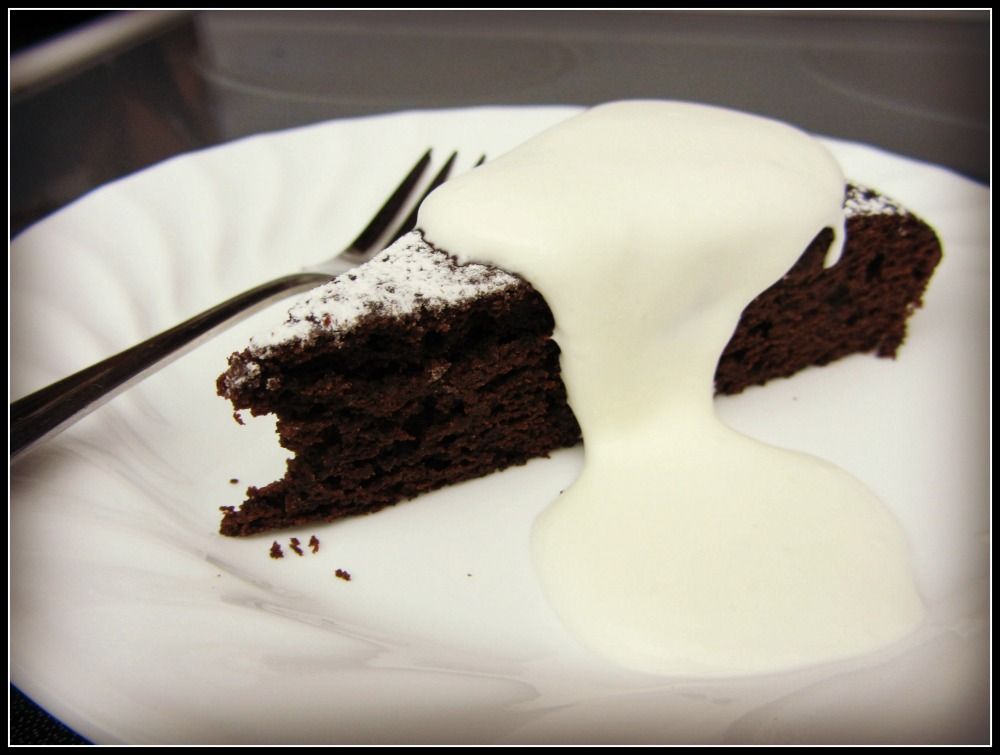
Red Wine Chocolate Cake:

Red Wine Chocolate Cake

I only had time to take a quick picture of my slice of cake before it was devoured, but there are plenty of better pictures of this cake in the original post on Smitten Kitchen (where you'll also find the recipe), or on countless other blogs that will show up in a Google search for this cake - it's really popular!  And for good reason - the cake is a simple chocolate cake with a deep, intense chocolate flavour that's really enhanced by the addition of red wine.  I chose to make it because my dad makes and loves red wine, and also because it was a really easy cake to throw together.  We served it with a simple whipped cream (which as you can tell was a bit melted by the time we served it) and everyone loved it!  I'd highly recommend the recipe if you ever need a quick but elegant chocolate cake with a grown-up flavour.

For my own birthday in April, one of the many foodie gifts I received was a microwave chip maker, and I've been enjoying testing it out lately by making healthy snacks, like these salt and chili dusted sweet potato chips:

Sweet Potato Chips

The kit recommends trying pear and mango chips too, which I can't wait to test!

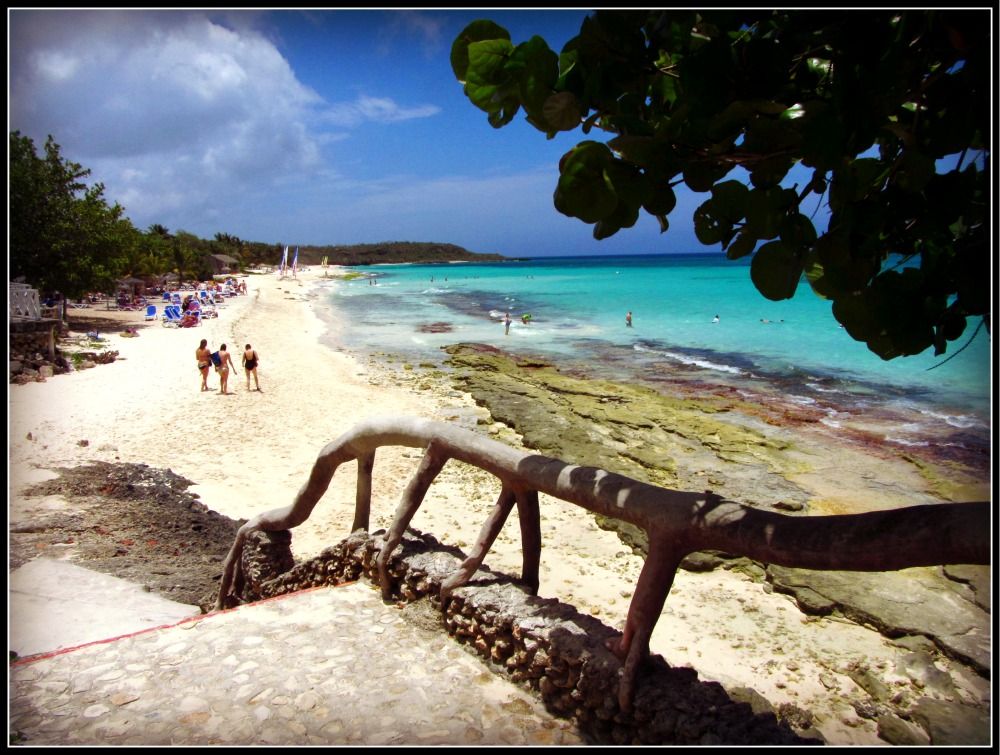
In early May, my boyfriend and I went on a wonderful, relaxing vacation to Cuba!


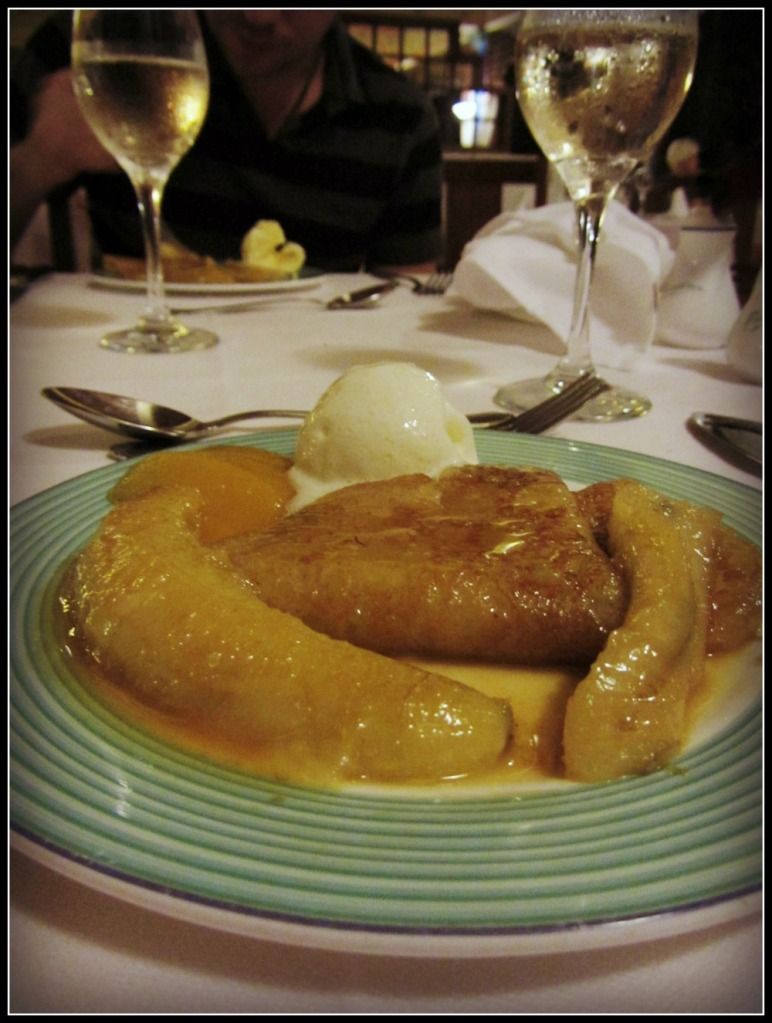
Everyone always talks about how bad the food in Cuba is, but everything I ate was delicious! The theme of the week for me seemed to be flambéed desserts, as I couldn't resist ordering one for every dessert; the whole lighting-your-dessert-on-fire thing just fascinated me!  The picture below is of a dessert I had at the buffet one evening that looks disgusting but I promise was amazing!  The chef flambéed some bananas with rum, then served them with crepes and coconut ice cream.  In the words of Sophia Grace and Rosie, it was SO GOOD!

Flambeed bananas and crepes

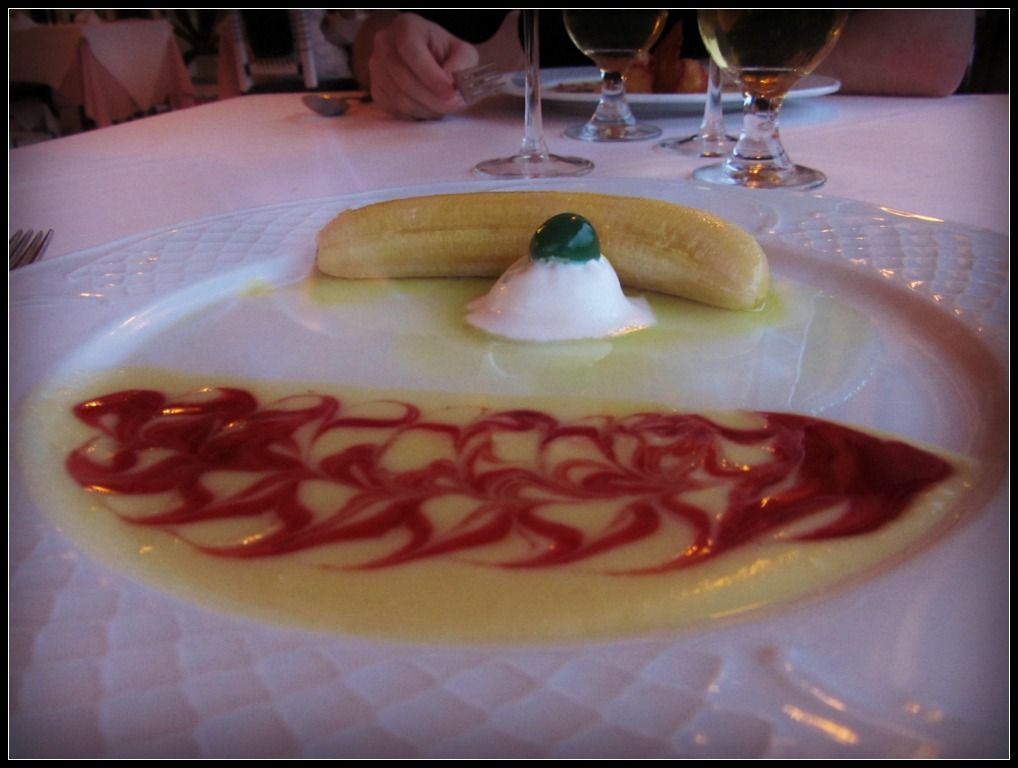
I had another flambéed banana at the Cuban restaurant, this time served with a lovely sauce and basically a plate full of rum!  You can't see the flames too well in the picture below, but the server poured a glass of flaming rum all over my plate in front of me; it was pretty exciting!  I felt a little tipsy by the time I finished that plate though!

Flambeed banana

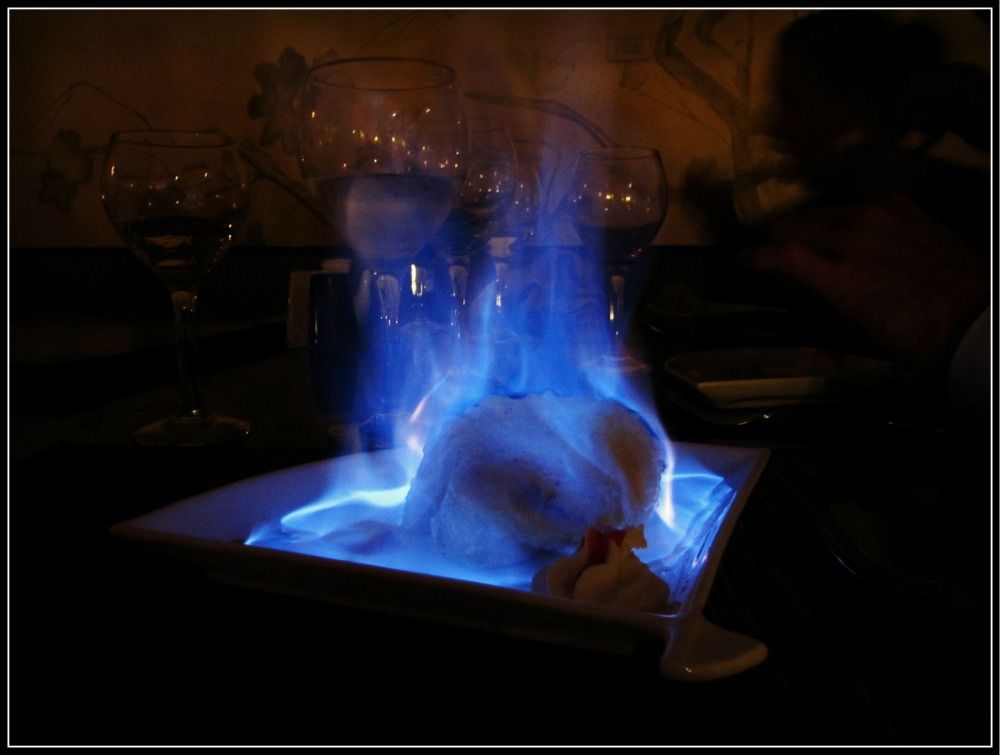
The best flambéed dessert I had was at the Japanese restaurant, where I enjoyed flambéed deep-fried ice cream.  Look at those flames!

Flambeed ice cream

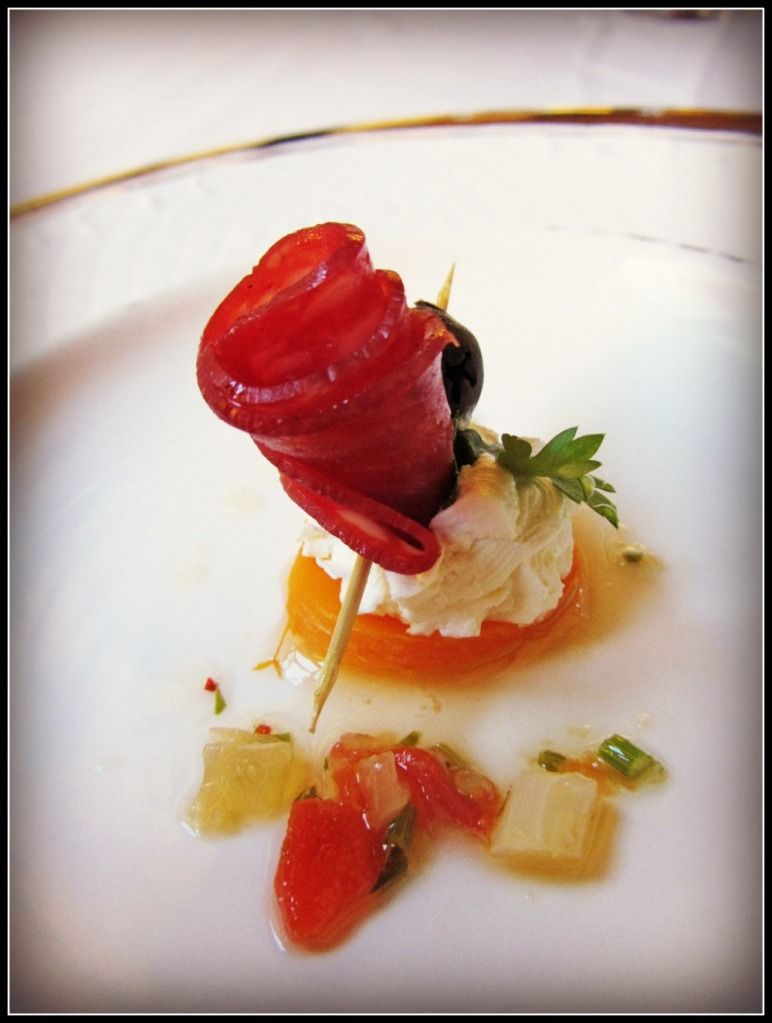
The restaurants always started your meal off with flower-shaped meat amuse-bouche.  I'm not a big fan of red meat, but I appreciated the beauty of these little bites that were almost too pretty to eat anyway!

Meat Rose

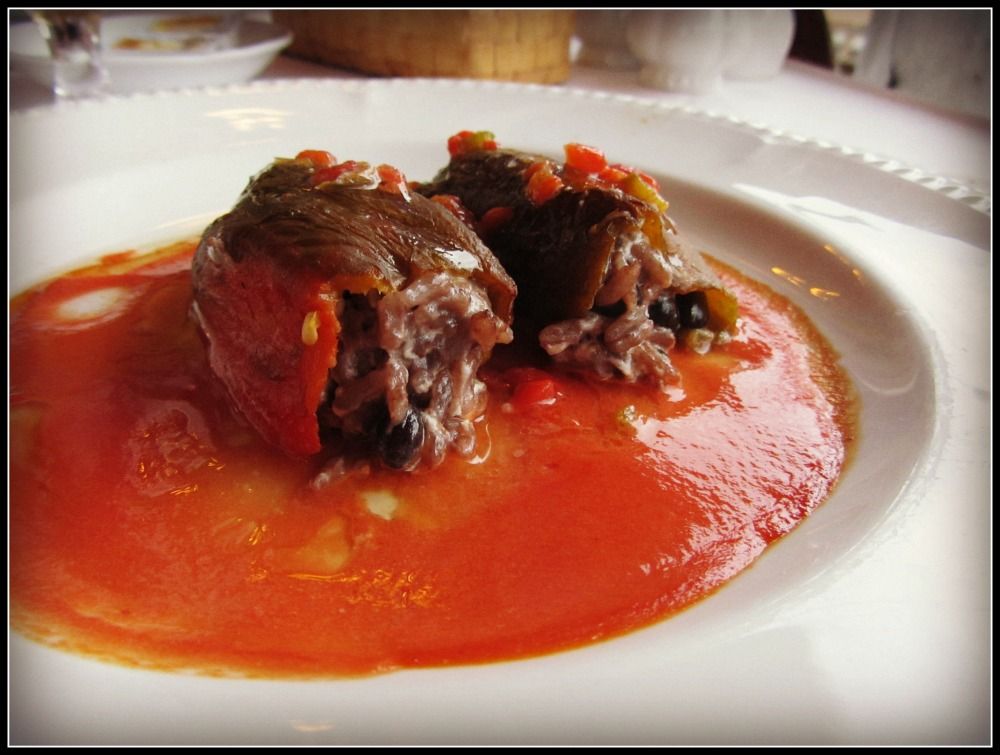
My favourite meal was another dish that looks gross in the picture but tasted amazing!  It was a pepper stuffed with rice, beans, and tons of goat cheese, then served with a delicious roasted red pepper sauce.  I tried to eat it slowly so I could savour every bite, but in reality it was probably gone in under a minute!

Stuffed Peppers

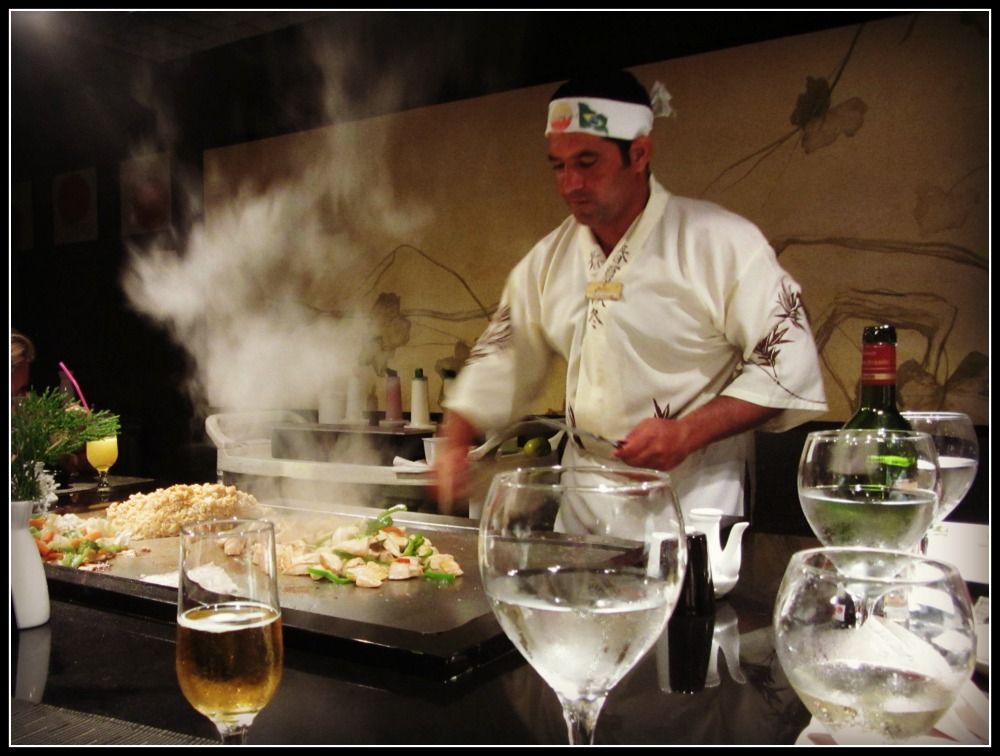
My favourite restaurant was the Japanese restaurant because we got to sit at a show table and watch our meal being prepared right in front of us by our hilarious chef.  It's nice to be able to see every ingredient that goes into your meal, and it tasted really good too!

Japanese Restaurant

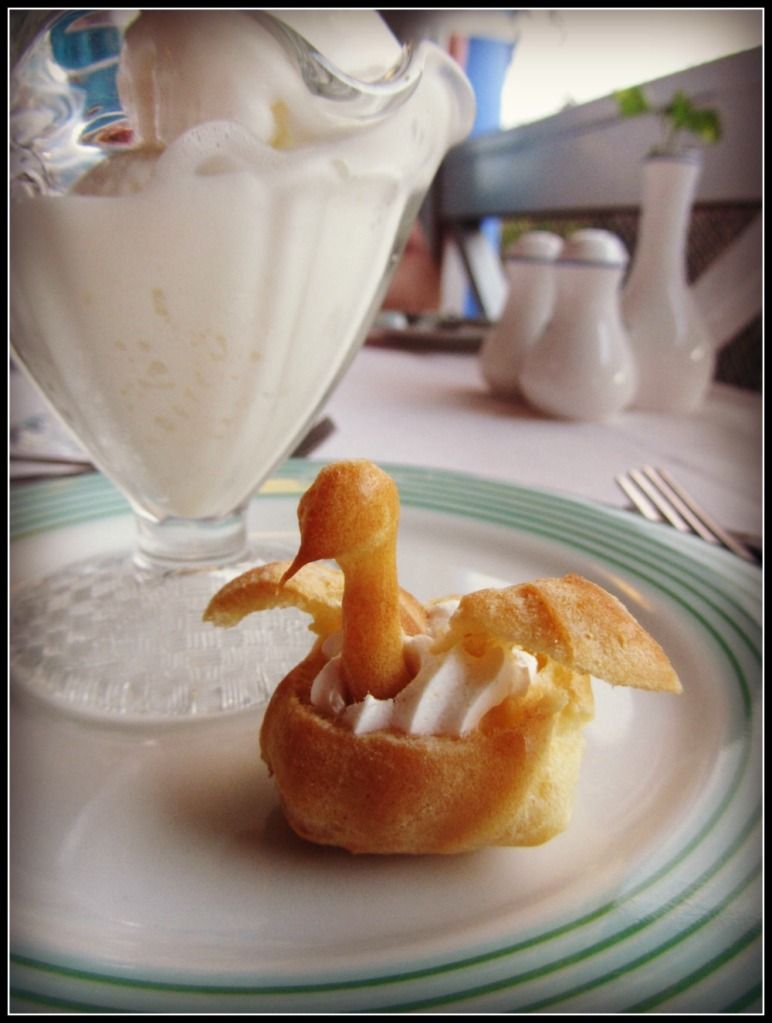
My favourite dessert was this adorable little pastry swan that I found at the buffet.  There were so many of them and I can't imagine the amount of time that went into making them all!  Though it wasn't very memorable taste-wise, I still loved it (and the coconut ice cream you'll notice in the back had already more than satisfied my taste buds)!

Pastry Swan

I'm not going to include pictures of everything I ate in Cuba because that would take forever, but it was all really great!  And finally, I couldn't complete this recap without mentioning the drinks - I enjoyed many pina coladas, strawberry daquiris, and of course, beer!  Beer on the beach = heaven.

Beer on the Beach

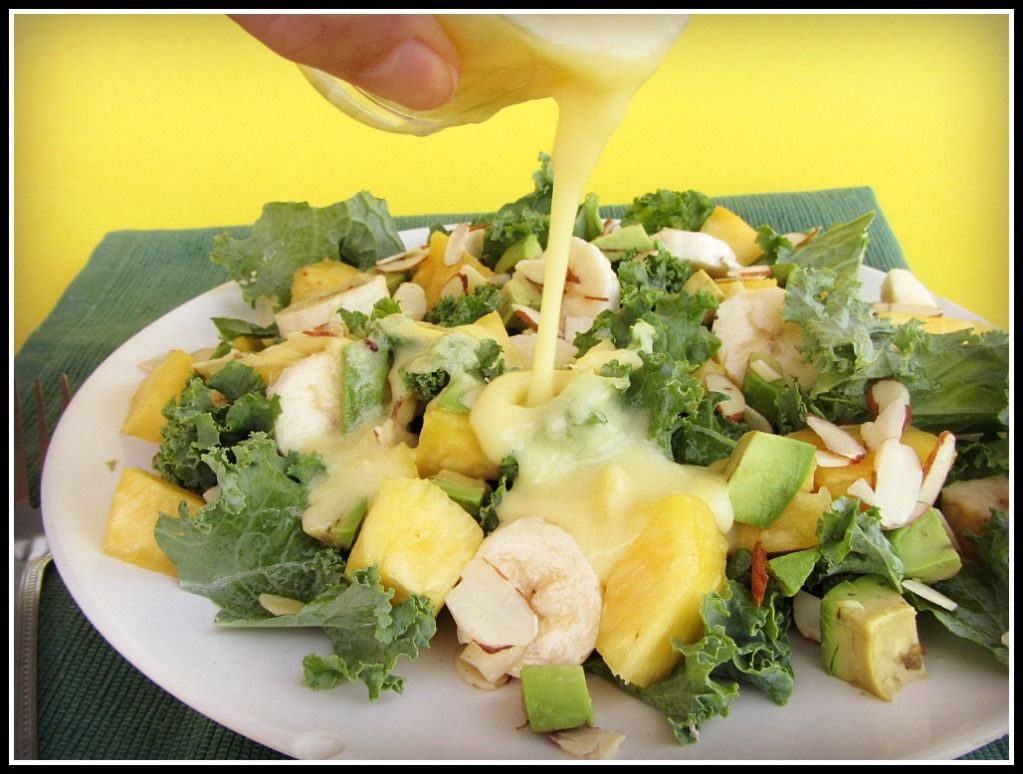
After I returned home, I was desperate to try to recreate the tastes of the tropics so I could pretend I was still on vacation.  One of those attempts was this tropical kale salad from Oh She Glows, with pineapple, banana, avocado, and kale, topped with a creamy pineapple coconut dressing. 

Tropical Kale Salad

Because I was still feeling lazy from my vacation, I took a lot of shortcuts with the salad, so it didn't turn out quite as good as it should have, but I still enjoyed the tropical flavours and fresh ingredients that I didn't find much of while I was away.

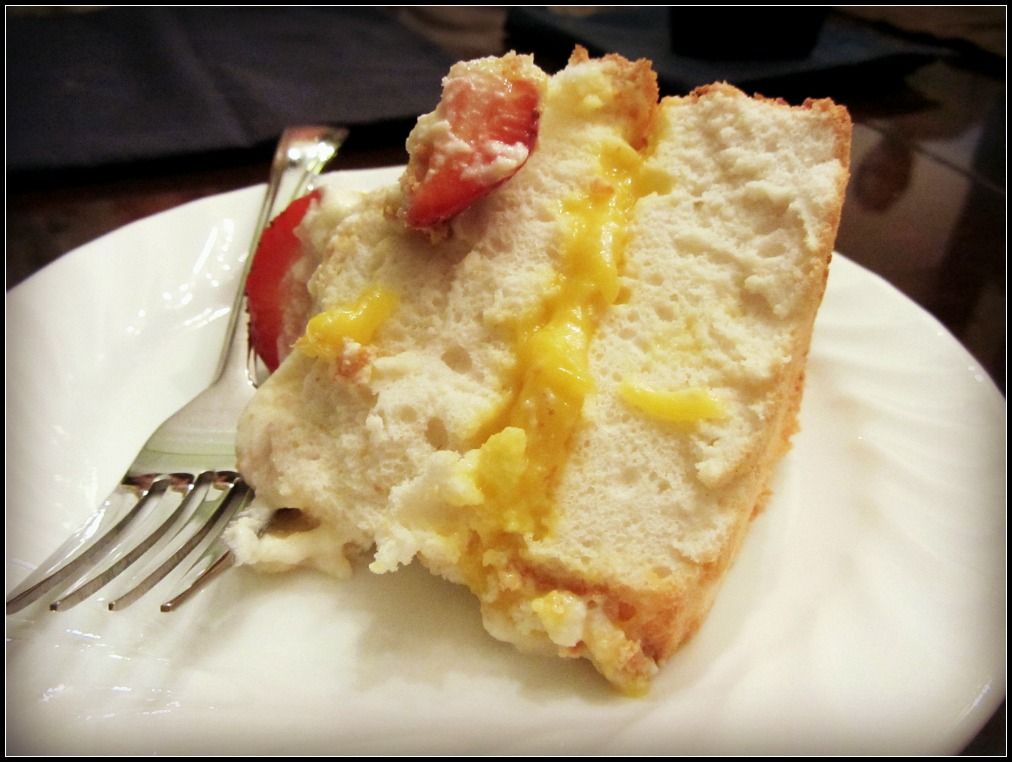
Soon after I returned to Canada, I went home for Mother's Day weekend.  On the Saturday night, my relatives got together to celebrate the moms in the family, and my aunt made an amazing angel food cake.  She's pretty much the queen of angel food cakes, and we love finishing a big meal with a light and fluffy dessert that doesn't leave you feeling stuffed.  This time she outdid herself with an angel food cake stuffed with lemon curd and topped with strawberries and mascarpone whipped cream.

Lemon Curd Cake

I took a horrible picture of it in the dark dining room, but trust me that it was delicious!  She got the recipe from Canadian Living, so if you're in need of a light spring or summer dessert for a crowd, go check it out!

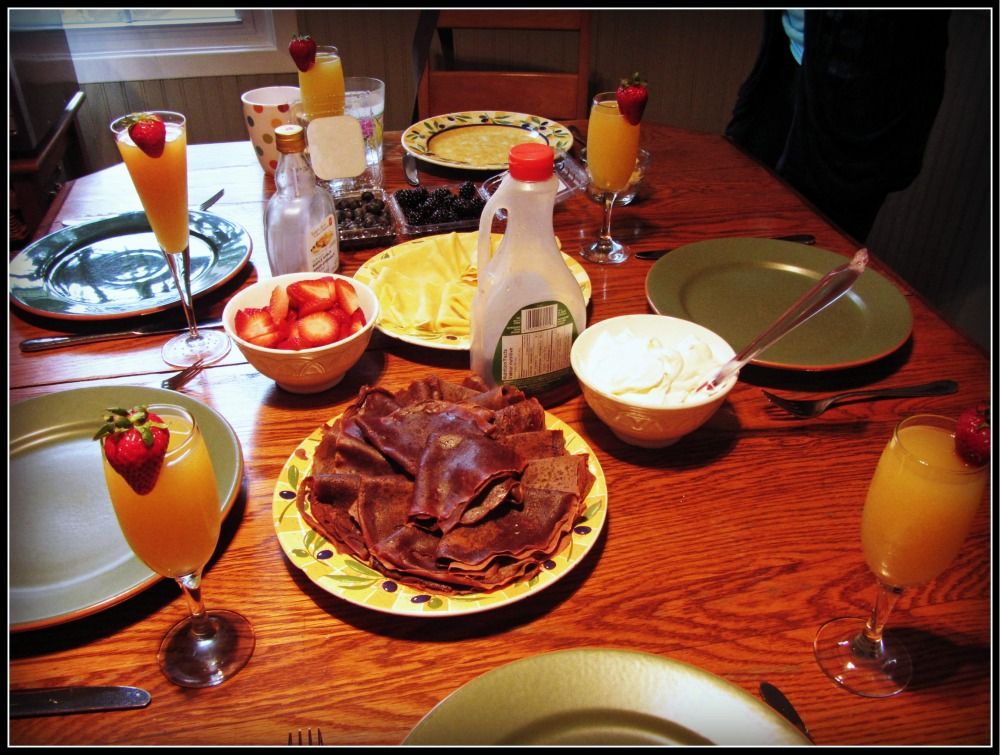
On the Sunday, my sister Genevieve and I made a big brunch for our family to enjoy with some orange strawberry mimosas.  I made a batch of chocolate crepes using Emeril Lagasse's recipe, and Gen made a batch of vanilla crepes using this recipe.  We whipped up a bowl of fresh whipped cream, sliced some strawberries, blueberries, and blackberries, then everyone could serve themselves however many crepes they liked!

Mother's Day Brunch

It was a fun and filling breakfast that was a great start to the day!

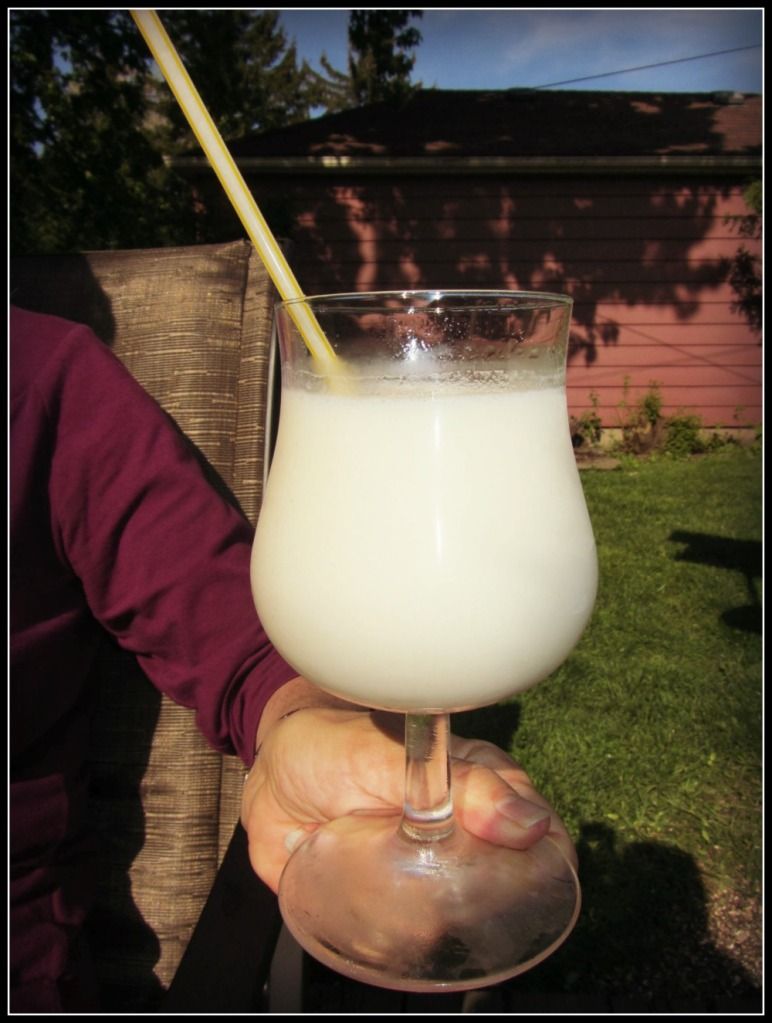
Later in the evening, we made our mom sit outside with a pina colada (using some rum I'd just brought home from Cuba) while we gave her some gifts then got to work on dinner!
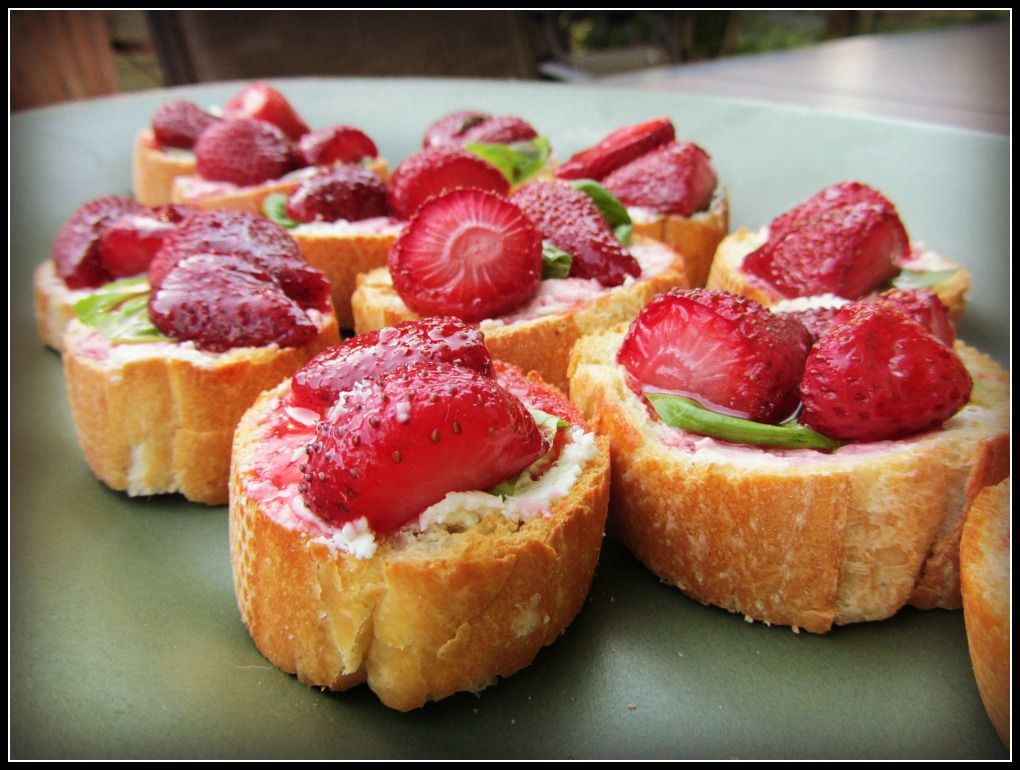
Pina Colada

Gen made some roasted strawberry crostini with basil and goat cheese as an appetizer before dinner, and it was amazing!  I'm seriously going to request this at every outdoor dinner we have for the rest of the summer; the combination of sweet roasted strawberries with the tang of goat cheese and hint of basil was so good and perfect for summer!

Strawberry Bruschetta

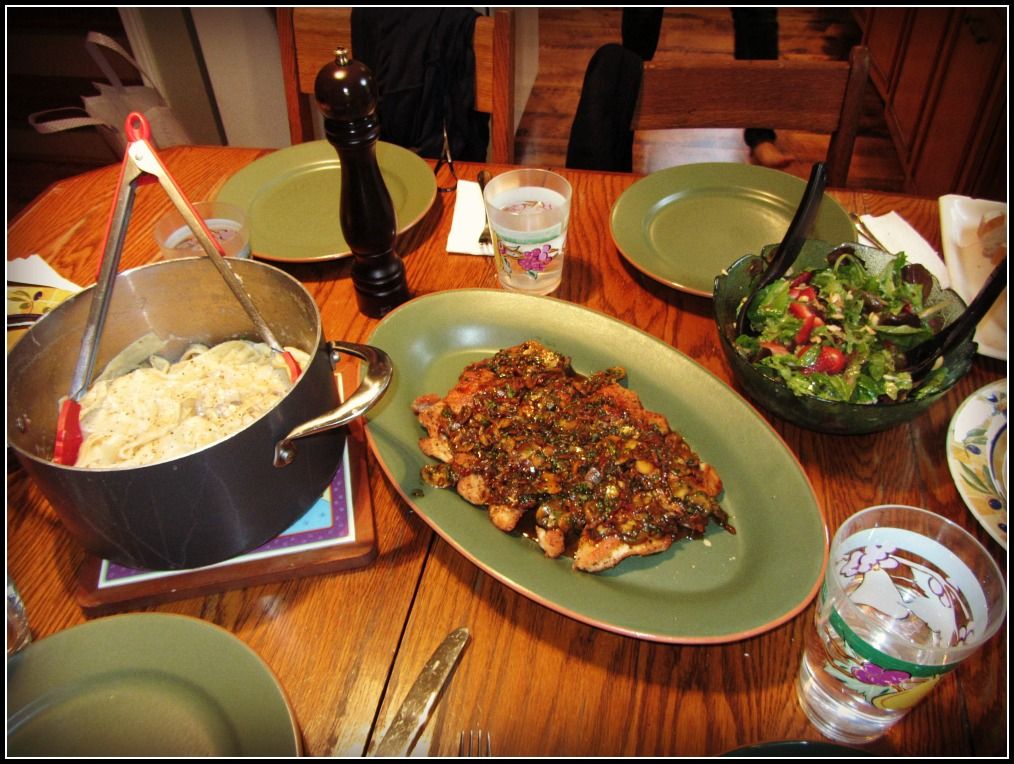
She also prepared one of our favourite salads for dinner, which has strawberries, toasted almonds, and goat cheese, and my dad was a huge help to us by preparing the main course for dinner: fettucine alfredo with chicken marsala (mom's request).  I haven't had fettucine alfredo in ages and I'm not sure if I've ever even tried chicken marsala before, but both were delicious, especially when eaten together.  Dad used recipes from Cooks Illustrated for both dishes, which I can't post here, but you can probably find very similar versions online if you're interested in the recipes! 

Mother's Day Dinner

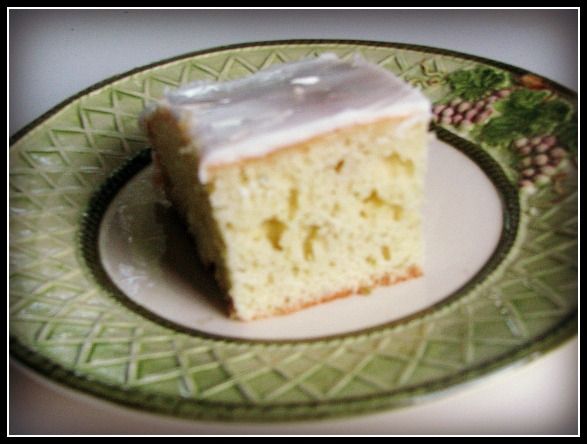
I had known what I'd be making for Mother's Day dessert as soon as I saw Jessica from How Sweet It Is post a recipe for a gin and tonic cake!   My mom's favourite summertime drink is a gin and tonic, so I knew this would be perfect!  The only picture I got of it was this little blurry one, but as always, Jessica's blog has tons of gorgeous photos that you can check out to see what the cake looks like!

gin and tonic cake

The cake was really easy to put together and was a great simple summertime dessert that everyone really enjoyed.  Gen and I thought the gin taste was really strong but others didn't even taste it, so I guess it depends on how much you like gin!

This past weekend was a long weekend in Canada for Victoria Day, and what better place to spend it than in our nation's capital, Ottawa!

Ottawa

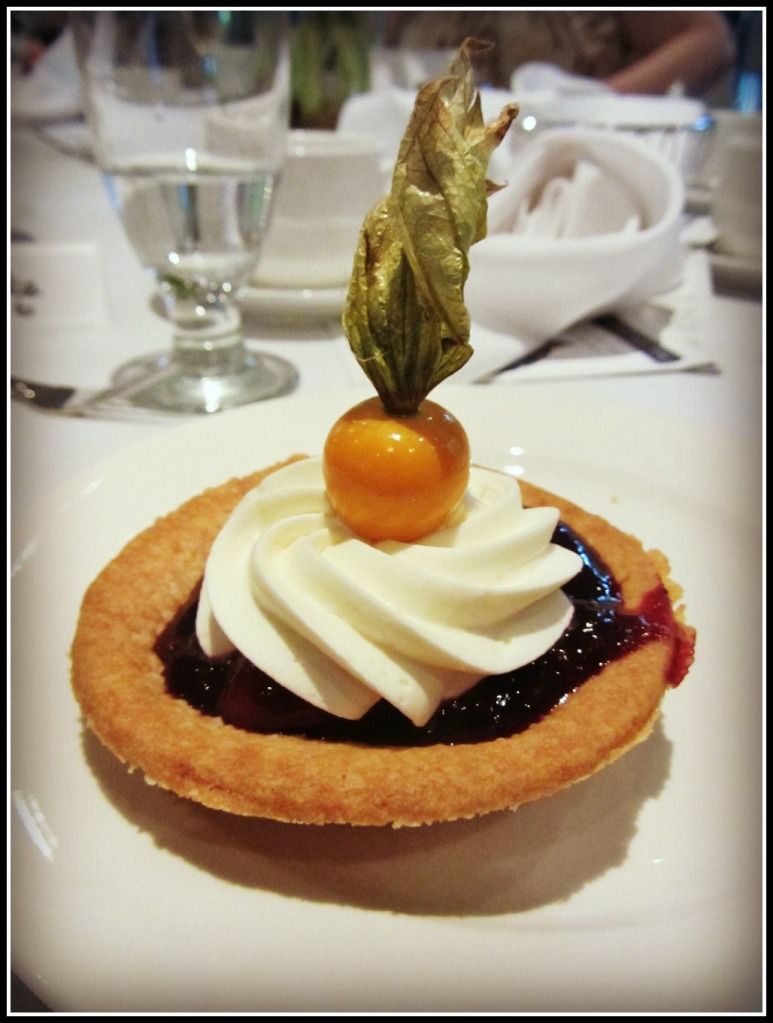
I went to Ottawa/Quebec for the weekend to attend a beautiful wedding, and I got to fit in some sightseeing as well.  The weather was gorgeous and it was a great way to kick off the summer!  I didn't take many food pictures over the weekend but wanted to include one picture of the dessert at the wedding because it was so good!  We were served berry tarts with whipped cream and what I believe was a persimmon on top.  It was a great finish to a really great meal, and got me really excited for summertime berry desserts!

Berry Tart

I feel like I've been travelling so much lately but hope to stay put for a while now, and get back to cooking for myself! 

I hope my fellow Canadians had a great long weekend and that my American friends enjoy their long weekend that's coming up!

May 18, 2012

Pizza Hummus

pizza hummus

It's a long weekend here in Canada, and I'm currently on a train headed toward our nation's capital, Ottawa, for a wedding weekend!  The weather is supposed to be hot and sunny over the next few days so it should be a great weekend!

I had a bit of a rough start to the trip this morning, waking up at the ungodly hour of 4:30am to be at the train station by 6am for a 6:30 train.  Around the time our train was scheduled to arrive, they announced that it was actually cancelled due to an accident, and we'd be switched to a later (and much less comfortable) train that would allow me only 15 minutes to make my connecting train in Toronto.  I haven't taken a train in ages so I was a bit panicked when we arrived at the station and I had no idea where to go or how to get to my next train!  I followed a crowd down a set of stairs, carrying my giant heavy suitcase along with three other bags, only to realize at the bottom that the exit led out to the street.  I turned around to try to go back up the stairs against a swarm of people trying to go down.  Just when I was sure I was going to topple backwards with all my bags in tow, an extremely nice guy carrying his bicycle down the stairs saw me struggling, grabbed my suitcase, and carried it AND his bicycle backwards all the way back up the stairs for me.  I'm definitely not a girl who gets offended from offers of help from strong men - I was so grateful!  I eventually managed to figure out how to get to my train and hopped on with about 5 minutes to spare before it left, and before the lump in my throat started to turn into tears haha - I'd had a dream the night before that I missed my train so I was so worried it was going to come true!  Anyways, the rest of the trip should be smooth sailing now, and I'm really excited to see a bit of Ottawa and also Quebec, which I rarely get to visit!

As I have about four free hours on the train before we arrive, I wanted to share a quick snack recipe that I made a while ago and have been dying to share!  You probably know by now that I love making hummus, but I was a bit nervous about the idea of pizza hummus, which I'd seen in my Food Network magazine a while back.  I loved their buffalo wing hummus from the same issue though, so I decided to give this one a shot too, and I was so glad I did!


pizza hummus

I noticed that Tessa from Handle the Heat recently wrote about this hummus too, so I thought now would be a good time to share it and spread the pizza hummus love further!  I made quite a few changes to the recipe though, as the original calls for 3 cups of chickpeas, which is an odd amount when working from canned chickpeas.  So I adjusted all the amounts to work with just  one regular can, and also added in some nutritional yeast, because what's a pizza hummus without cheesy flavour!

While it may seem odd, this hummus truly tastes like pizza, with just the right combination of tomato, herb, and cheese flavours.  Though the tomato paste gave it a rather unfortunate-looking pinkish hue, the taste totally made up for it!

I could not stop eating this hummus right after I made it, but I managed to force myself to put it in the fridge to save for later.  It still didn't last too long though!  I ate it with garden herb pita chips and I loved how the extra herbs in the chips enhanced the flavour of the pizza hummus.  I think I've seen parmesan herb pita chips before though, so if you can find those then they'd probably be an even better match!

Hope my fellow Canadians have a wonderful long weekend and get a chance to enjoy the sunshine!

pizza hummus

Pizza Hummus

Adapted from Food Network

Makes about 2 cups

Ingredients:

1 (540mL) can chickpeas
1/3 cup liquid from the chickpea can
3 tablespoon tahini
3 tablespoons tomato paste
1-1/2 tablespoons fresh lemon juice
2 cloves garlic, minced
1-1/2 teaspoons dried oregano
1 teaspoon dried basil
1/2 teaspoon salt
1 tablespoon nutritional yeast
2 teaspoons olive oil
Additional salt and pepper for seasoning

Directions:

Add all ingredients except for the olive oil to the large bowl of a food processor and blend until smooth.  Add olive oil to feed tube and process as the oil slowly mixes in.  Taste and season with salt and pepper if desired; adjust any amounts to your liking (e.g. Add more dried herbs for a stronger herb flavour, add more nutritional yeast for a stronger cheesy flavour, add more tomato paste for stronger tomato flavour, etc.)

May 15, 2012

Breakfast Potato Boats

Breakfast Potato Boats

The other day I posted a barbeque chicken baked potato recipe and mentioned how much I love using a simple baked potato as the base for a delicious and easy dinner.  Well it turns out that baked potatoes also make for a pretty amazing breakfast that is still easy enough to prepare for yourself on a weekday morning, or elegant enough to serve to guests for brunch!

I first saw the idea for a breakfast potato boat on Inn Cuisine a while ago, but their version calls for hollowing out a potato, filling it with scrambled eggs, cheese, and bacon, and using the scooped-out potato to make hashbrowns on the side.  I thought it was a pretty creative breakfast idea, but that it might be even better to use the scooped out potato as part of the potato filling, mixed in with the eggs and cheese, kind of like a breakfast version of a twice-baked potato.

I couldn't wait to try this out for myself, but leaving out the bacon for a vegetarian version, using less eggs since I was using potatoes in the filling to make up for it, and adding salsa to liven the whole thing up a bit!

Breakfast Potato Boats

These turned out so much better than I'd even hoped!  While the components are simple - fluffy baked potato mixed with scrambled eggs, melted cheese, and some salsa - the taste was amazing and made for a fun twist on breakfast.  The dish also made for a nice presentation, so I think it would be great to make a big batch of these to serve to guests.  As I mentioned at the start of this post though, you can also quickly make them for yourself by baking the potato the night before, then all you have to do in the morning is cook the egg and mix everything together, then give it a quick reheat in the  microwave!

You could also get really creative with these if you want something a bit fancier - try adding in black beans and a spicy cheese for more of a tex-mex flair, add bacon or sausage for a meat version, or add spinach and other veggies for a more nutritious breakfast!

After a successful Mother's Day breakfast of crepes and fruit on Sunday, I'm already thinking ahead to Father's Day and thinking that these might be a nice addition!  That reminds me that I'll have to share some of the amazing food we enjoyed for Mother's Day soon - Hope you all spoiled your moms or were spoiled by your kids!  Did any of you have anything special to eat on Sunday?

Breakfast Potato Boats

Breakfast Stuffed Potato Boats

Inspired by Inn Cuisine

Serves 2

Ingredients:

1 large russet potato
2 large eggs
1/2 cup shredded cheese (I used cheddar but a Pepper Jack or Mexican blend would be good too)
Salsa
Salt & Pepper

Directions:

Preheat oven to 400°F.  Scrub potato, then pierce several times with a fork. Rub the skin with olive oil and a bit of salt.  Place directly on the middle rack of the oven, with a pan underneath to catch any drippings.  Bake for 1 to 1-1/2 hours, until cooked through and soft.

Let the potato cool slightly, then cut potato in half lengthwise.  Use a spoon to scoop out the insides of each half, leaving about 1/4” layer of potato on the skin.  Transfer the scooped out potato to a small bowl and mash with a fork.

Scramble eggs in a non-stick skillet until almost done but still slightly wet.  Transfer the eggs to the bowl with the mashed potato. Add cheese and season to taste with salt and pepper, then mix thoroughly. 

Spoon the mixture into the shelled out potato skins.  Heat potatoes in a microwave on high for 30 seconds to 1 minute, until potatoes are hot, cheese is melted, and eggs are completely cooked.  Spoon salsa on top, then serve (with additional salsa on the side, if desired).

*Note: I baked my potato the night before, then kept it in the refrigerator.  In the morning, I reheated it in the microwave then proceeded with the rest of the directions.

May 10, 2012

Sesame Soba Noodle Salad

soba noodle salad

I'm back!  I had a wonderful, relaxing week on vacation in beautiful Cuba, but now I'm having a hard time adjusting back to work and reality!  I apologize for the lack of posts lately, as well as my delay in checking in with other blogs (I currently have over 800 unread blog posts in my Google Reader to get to!), but I'm hoping this tasty and refreshing sesame soba noodle salad will help make up for it!

This is actually a dish inspired by a meal I ate in a Japanese restaurant on my earlier trip to Singapore.  I wasn't exactly sure what I was ordering when I requested the soba noodle salad, but I certainly didn't expect to see lettuce and noodles mixed together!  I didn't have high hopes for it when it appeared in front of me, but was pleasantly surprised when I took a few bites.  Since the noodles were cold, the whole salad was light and refreshing with an interesting mix of textures that worked well together.  But what really made the dish stand out was the delicious sesame dressing that was served with it.  

You may remember the picture I posted of the dish back in my recap of what I ate in Singapore, where I promised I would try to replicate it back at home.  Well, I stayed true to my word and recreated it the weekend after I got home from that trip!

soba noodle salad 3

The salad part was easy - I just used some of my favourite salad ingredients, topped them with a pile of cooked soba noodles and a garnish of sliced nori and sesame seeds.  The salad dressing was a little harder as I had to play around with different ingredients quite a bit until I found the perfect balance, but I think I ended up with a pretty amazing dressing!

This salad tasted just as good as the one I remembered eating in Singapore - it was cool, fresh, and full of flavour thanks to the filling sesame peanut dressing.  It's great for summer and I will definitely be making this again now that my trip to Cuba has given me a taste of the hot weather I have to look forward to!

soba noodle salad 2

Sesame Soba Noodle Salad

Inspired by a dish I ate at Rakuzen in Singapore

Serves 2

Ingredients:

For the Dressing:
2 tablespoons peanut butter
1 tablespoon tahini
2 tablespoons sesame oil
2 tablespoons rice vinegar
1 teaspoon low-sodium soy sauce
1 clove garlic, minced
1 teaspoon minced ginger
1 teaspoon honey
Dash of salt
2 tablespoons water

For the Salad:
4-6 oz soba noodles (depending on desired amount)
Lettuce (desired amount for 2 people)
Sliced cucumber, carrot, mushrooms, and snowpeas (or other desired salad ingredients)

For Topping:
1 sheet of nori, thinly sliced for garnishing
2 tablespoons sesame seeds

Directions:

Cook soba noodles as per package ingredients.  Drain and rinse well with cold water.  Let cool.

In a small bowl, whisk together all ingredients for the salad dressing.  Taste and adjust any amounts to your liking, and add more water to thin it out if necessary.

Divide lettuce and salad ingredients between two bowls/plates.  Top with cooked cooled soba noodles.  Garnish with nori and sesame seeds and serve with sesame dressing.

May 03, 2012

Barbeque Chicken Baked Potato

Barbeque Chicken Baked Potato


Sorry for the lack of posts this week, but I'm currently on vacation in Cuba! I won’t have internet access while I’m here, which means I won’t be able to keep up with reading all my usual blogs or replying to comments.  I still wanted to share at least one recipe this week though, so I chose a super easy weeknight dinner recipe that I actually made quite a while ago but was saving to post for just an occasion like this!  

I actually planned on writing this post at the airport before I left and scheduling it to appear while I was away, but after a last-minute minor disaster involving the new Blogger not working on an iPad, my helpful sister Genevieve fortunately stepped in to save the day and help post this for me!

There's not much to say about this barbeque chicken baked potato except that it's easy, delicious comfort food.  Though the baked potato does take a while to cook, the rest is easy peasy, and if you're really short on time you could even microwave the potato, though it won't taste quite as good!  

I can't immediately think of a good vegetarian protein you could use in place of the chicken, but if you have any ideas, let me know, or if you have any other good ideas for baked potato toppings, feel free to suggest some in the comments as well!  I'm thinking a buffalo chicken version of this would be great to try next!

Looking forward to catching up with you again next week!

BBQ Chicken Baked Potato

Serves 2 as a light meal served with a salad or side - you may wish to increase the amount of chicken for something more filling

Ingredients:

2 russet potatoes
1 chicken breast
Barbeque sauce
Shredded cheese (e.g. Mexican blend, cheddar, pepper jack)
Salt & pepper

Directions:

Preheat oven to 375°F.  Scrub potatoes and pierce skin several times with a fork.  Rub skin with a bit of olive oil and salt.  Place potatoes in the preheated oven, directly on the oven rack (with a pan underneath to catch any drippings).  Bake for 1 to 1 ½ hours, or until slightly soft and golden brown.

Meanwhile, cook chicken breast (about 4-5 minutes per side over medium-high heat).  Shred with two forks, season with salt and pepper, and coat with barbeque sauce.  Keep warm and reheat if necessary when potatoes are done.

When potatoes are done, prick each potato with a fork in a line lengthwise across the top, then smack the two ends of each potato together so that it bursts open.  It should be nice and fluffy inside.  Top each potato with half the shredded chicken and desired amount of shredded cheese.  Add more barbeque sauce, salt, and pepper if desired.  Serve warm.

UPDATE: I received an anonymous comment from a reader which unfortunately can't show up on my commenting system because it was entered on a mobile device. The reader noted that my potato looked dry and needs more sauce and cheese, which reminded me that I should have mentioned that I did indeed add more bbq sauce and a bit more cheese after I sliced the potato open into pieces, which you can certainly do as well, I just didn't take a photo of that stage.  The reader also noted that what was missing was "butter, sour cream, and scallions".  You can certainly add your own ingredients to the potato - I don't like scallions and I don't normally eat my potatoes with butter and sour cream as I try to keep them healthier, but of course it should go without saying that you can easily adapt this recipe to your own tastes, this is just what worked for me!

Ingredient Index

Related Posts Plugin for WordPress, Blogger...