April 29, 2013

Birthday Treats and Baking Misses

frozen yogurt cake

Sorry for the lack of activity over the past week; I've been keeping busy with family visits and a few birthdays!  Today is both my dad and dad-"in-law"'s birthday, and last Wednesday was my twin sister and my birthday!

I love occasions that give me an excuse to bake something special and I had assumed that I would have at least a couple of dessert recipes to share with you by this week, but unfortunately things didn't go quite as planned.  I made two different desserts for my birthday week - cupcakes and a cake - that sounded so good when I planned them out in my head, but neither turned out quite how I wanted.  But instead of getting frustrated that the recipes I'd spent time and money on planning and had such high hopes for didn't end up being "blog-worthy", I decided to look past their minor flaws so I could still enjoy them with my family, and then turn them into a blog post by talking about what I learned from each baking experience! 

I also think it's nice to point out once in a while that I make lots of mistakes in the kitchen just like everyone else, and I only share recipes on here that I really love!

lemon blackberry cupcakes

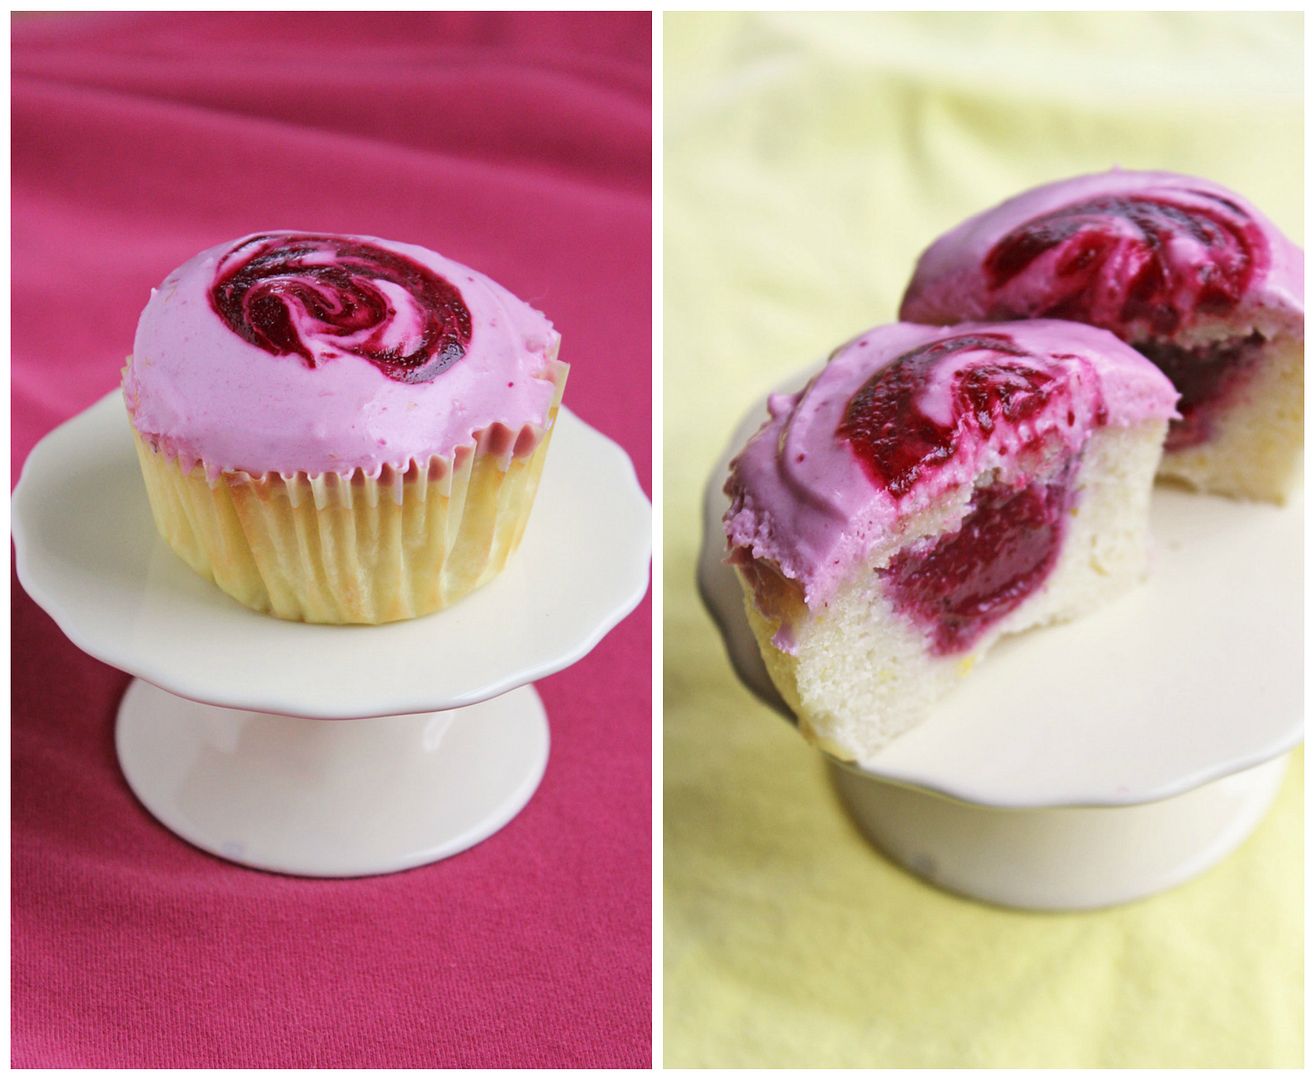
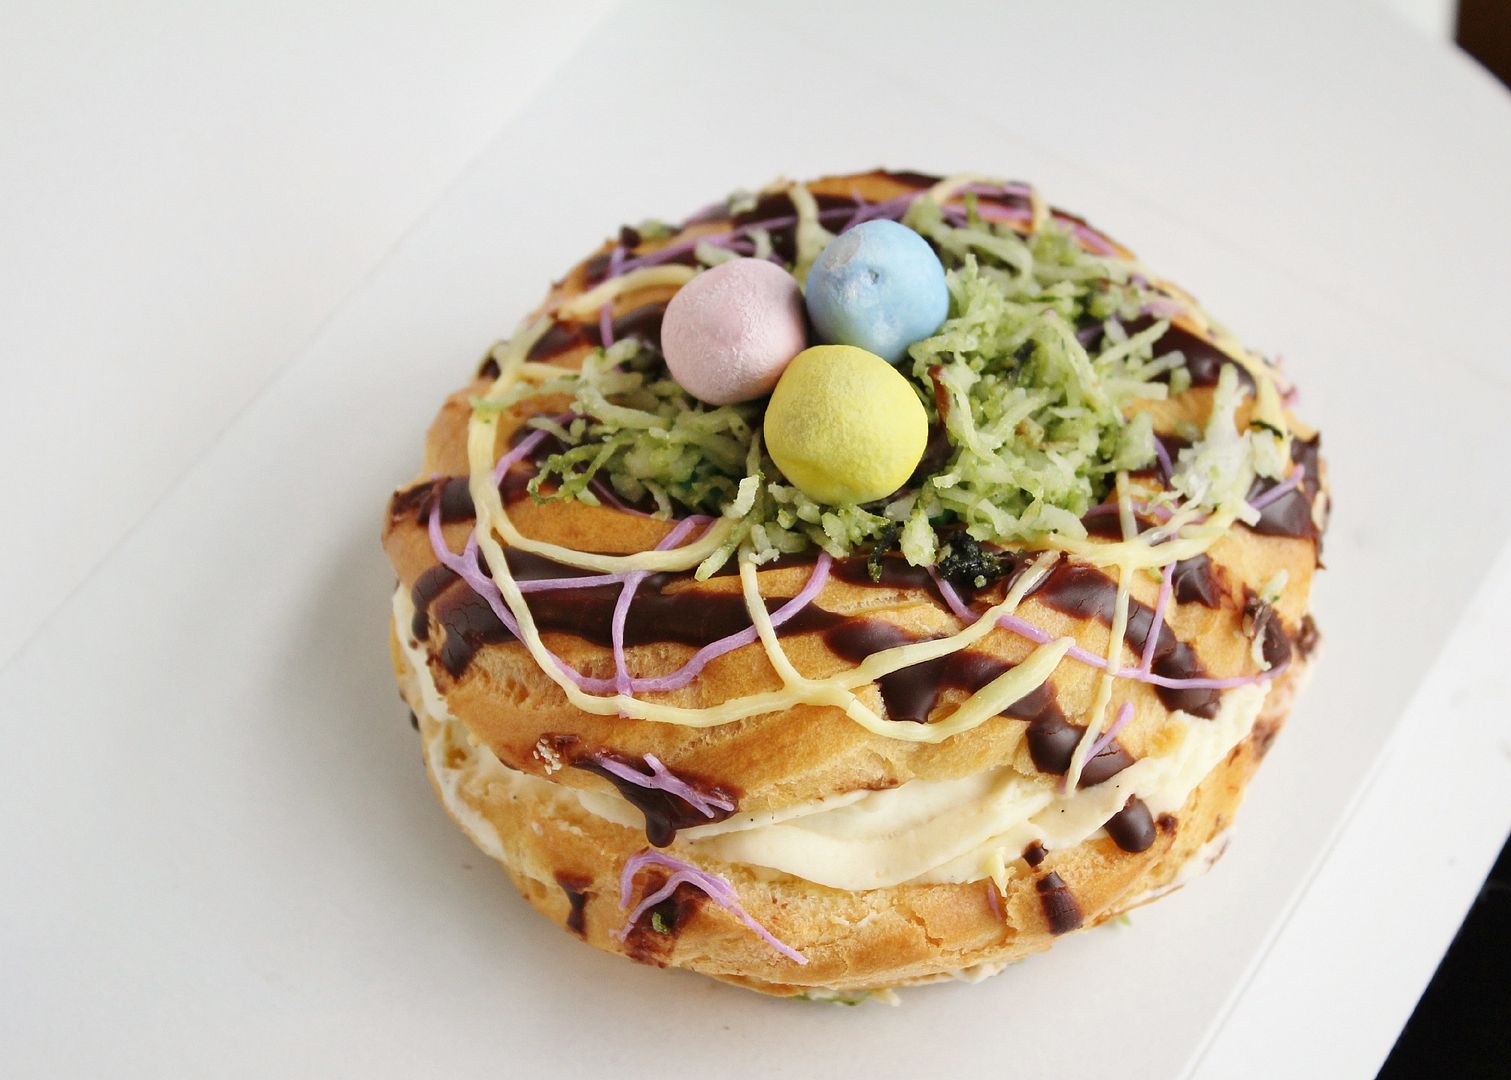
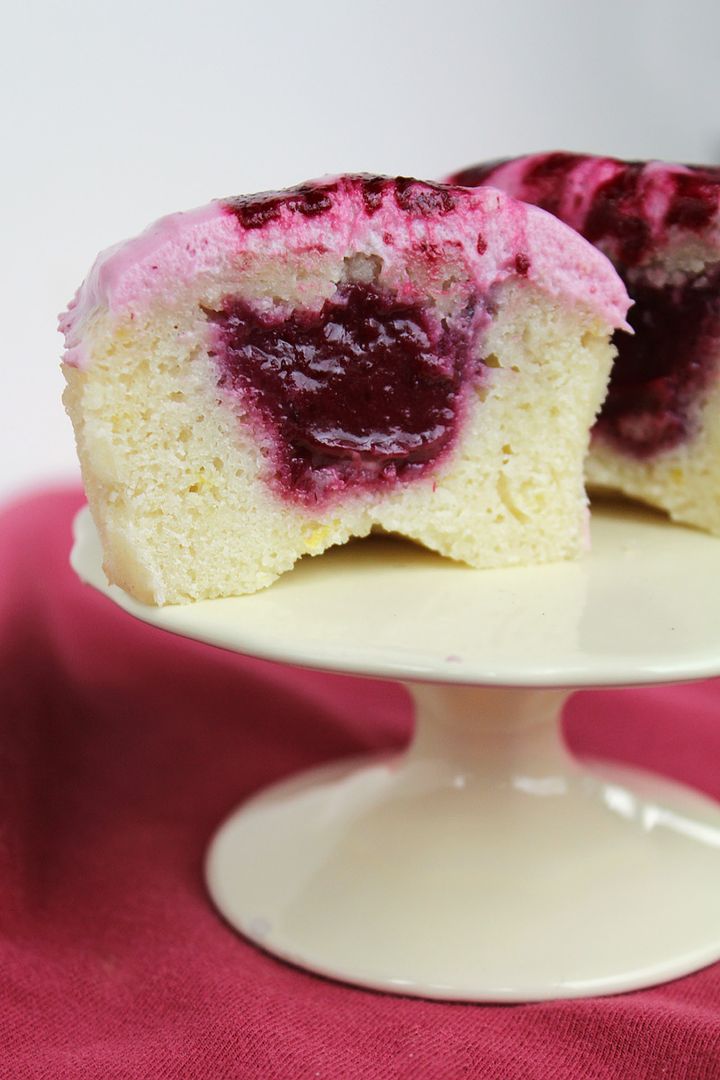
First up were these lemon blackberry cupcakes.  I love lemon and berry desserts and try to take the opportunity to use them in my birthday desserts because it's one of the few events in the year where I can choose to make something completely suited to my tastes without worrying about what others would like (i.e. no chocolate!)

I decided to turn this lemonade layer cake from Cooking Light into cupcakes, then fill them with blackberry curd and top them with blackberry cream cheese frosting.  Unfortunately, every component had minor flaws (in my eyes anyway).  The blackberry curd had a slightly chalky taste; I'm the only one who seemed to notice it and I'm not sure what it was from - maybe adding cornstarch?  If anyone has an idea on what might have caused that, I'm all ears!  I then mixed some curd into a cream cheese frosting, but the frosting wasn't stiff enough to be piped so I had to just spread it on, making them not as pretty as I'd hoped.  I think this was because I tried to reduce the amount of butter and sugar in the frosting - next time, I'll just stick with a recipe.  Finally, the lemonade cake didn't taste quite lemony enough for me, and it ended up being too dense for a cupcake.  I should have known this would happen because there are a ton of comments on the recipe from people saying the cake was too dense, but for some reason I had thought I would still like it because I usually like dense cake.  Unfortunately, dense doesn't really work in cupcakes, which people expect to be light and fluffy, and these almost tasted eggy too - in retrospect, I should have realized the recipe called for too many eggs.

Despite these flaws, I still really enjoyed eating them and everyone else told me they liked them.  So I'm determined to revisit this idea with improvements one day!

(side note: I received the little cupcake stand in these pictures as a birthday gift from my sister - isn't it adorable?!)

lemon blackberry cupcakes

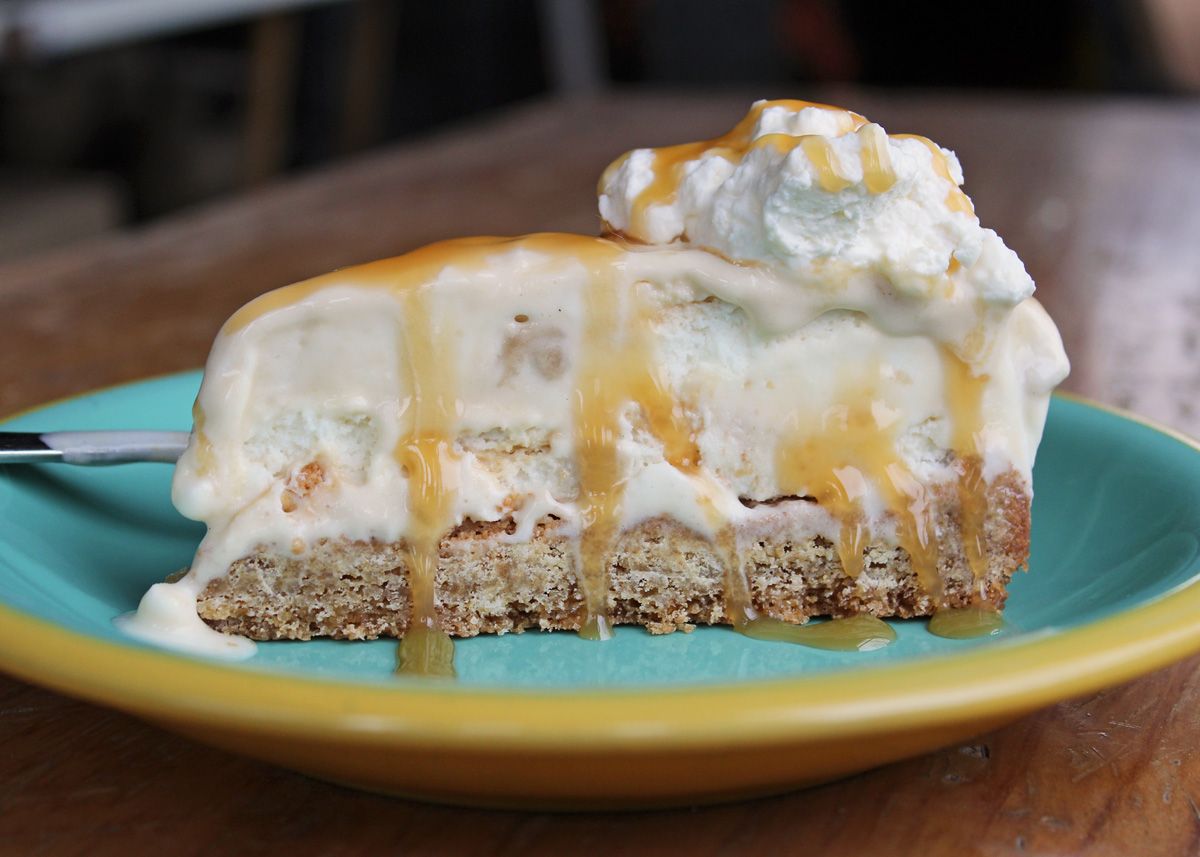
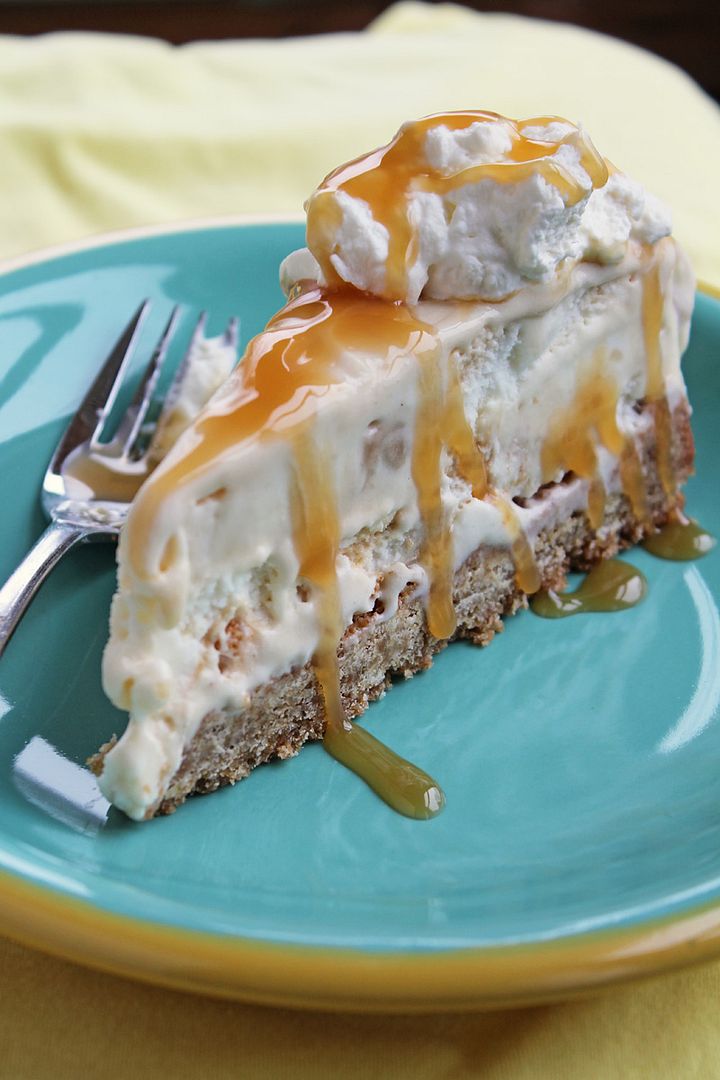
Next up I decided to make a frozen yogurt cake using my favourite frozen yogurt flavour, caramel coconut blondie.  I dreamed up the perfect cake in my head: a browned butter blondie base, caramel coconut blondie frozen yogurt for the cake, and a coconut whipped cream topping with caramel sauce.  Sounds delicious, right?

frozen yogurt cake

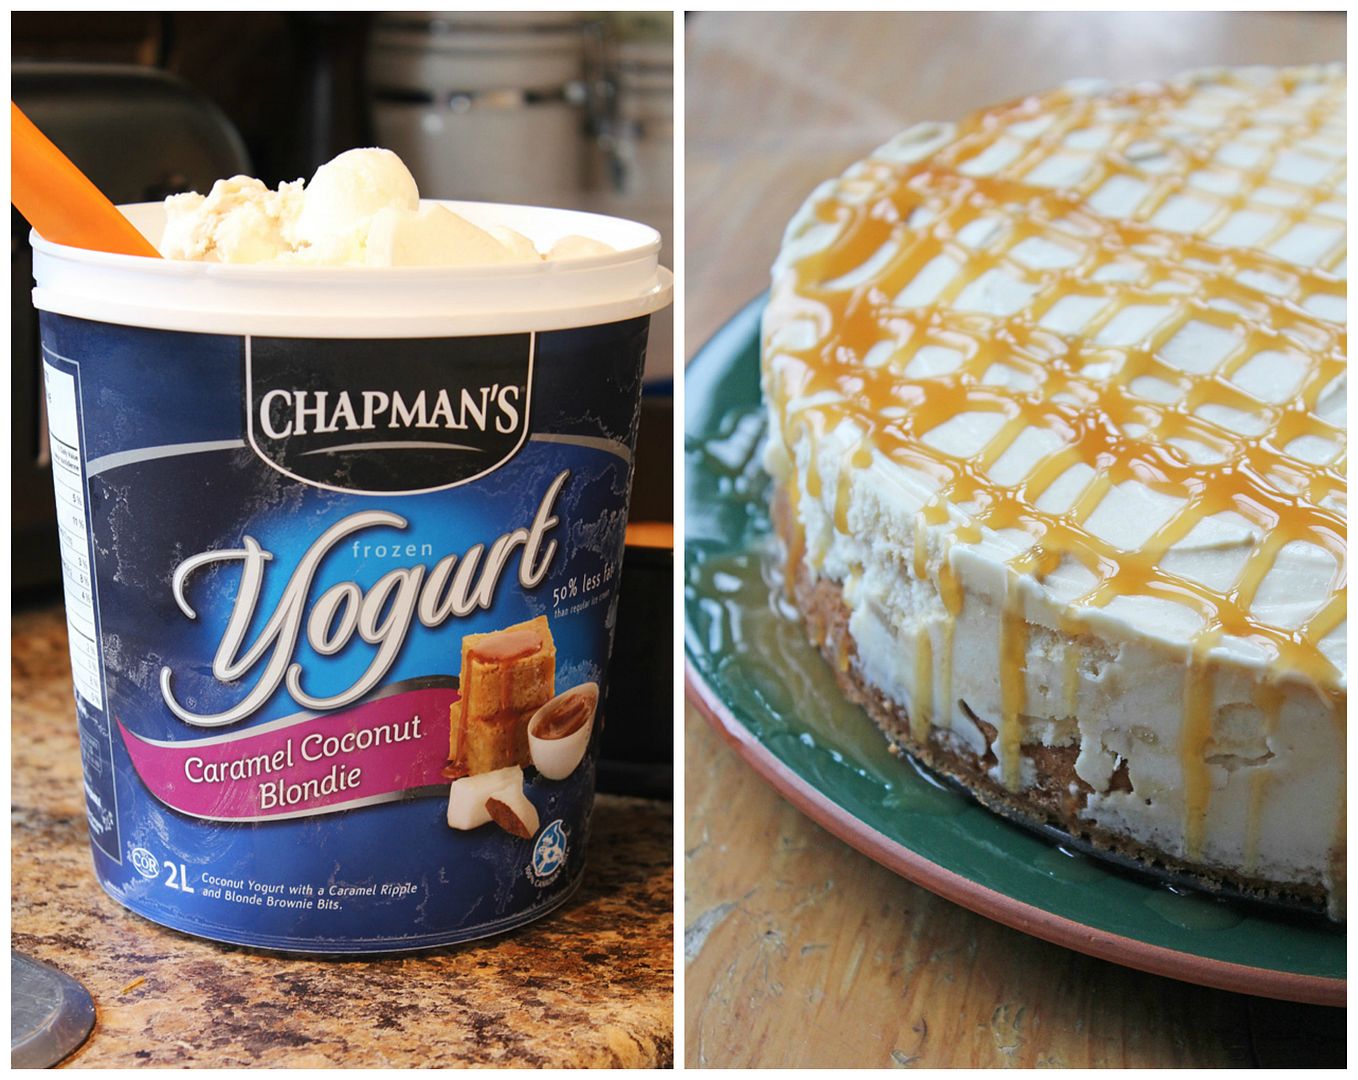
Unfortunately, it didn't work out quite as I'd imagined.  The browned butter blondie base smelled amazing coming out of the oven and I was sure that I was on the right track, so I proceeded to freeze the base, top it with the frozen yogurt, and freeze the cake.  Then I planned on topping it with a coconut whipped cream that my sister was making for her birthday pie, along with a storebought caramel sauce.

What I ended up with when I went to serve it was a rock hard frozen crust that was nearly impossible to cut through, topped with rapidly melting frozen yogurt.  I guess a frozen blondie isn't the best choice for a cake base to begin with, and after doing some reading, I realized that frozen yogurt is a lot softer and melts faster than ice cream, so by the time you wait for the blondie base to soften up, the top part is too soft.

Once again, this was completely edible and tasty, and my family still told me they liked it (and ate it all happily), but we're also lucky the crust didn't go flying across the room as we were all trying to cut through it!  In the future I'm going to keep my frozen yogurt for eating on its own and only use ice cream with standard cookie crumb crusts for ice cream cakes!

frozen yogurt cake

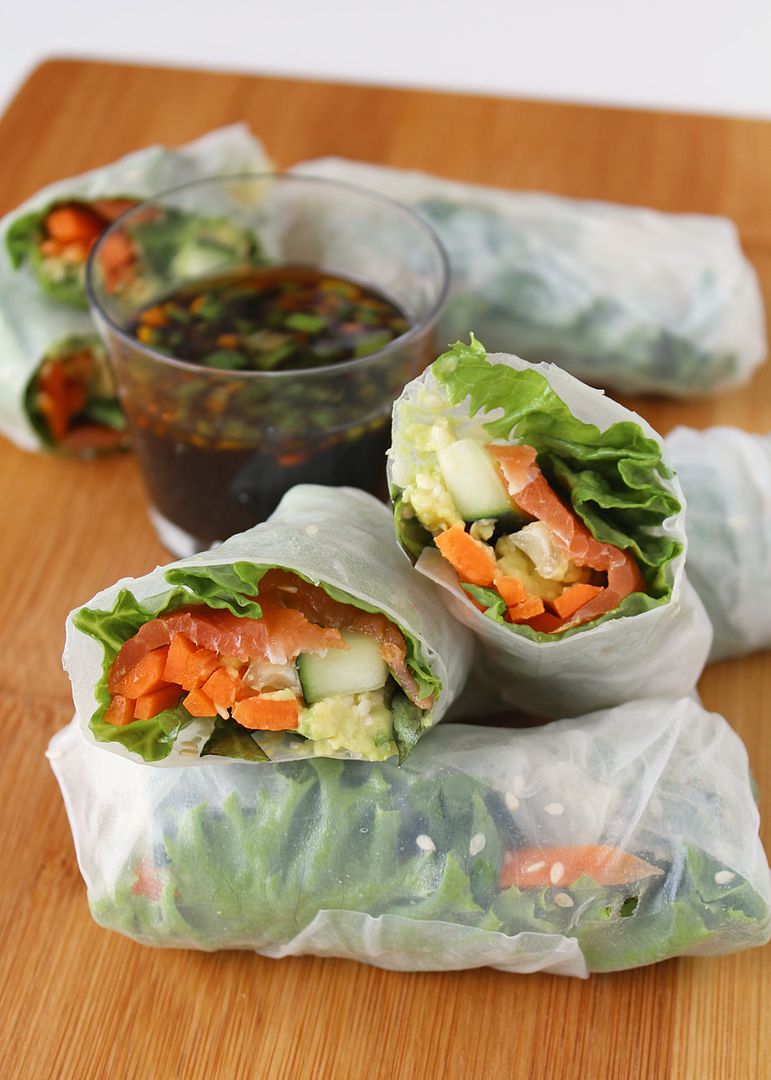
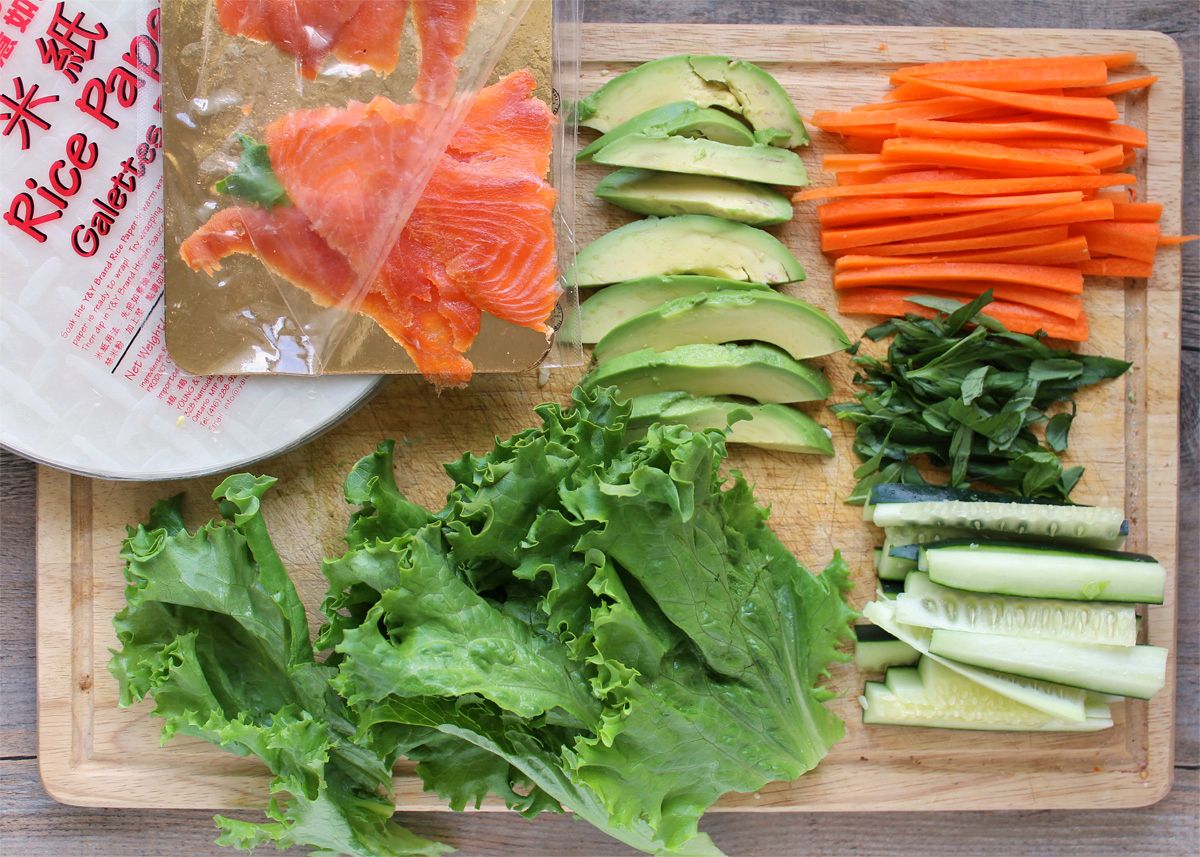
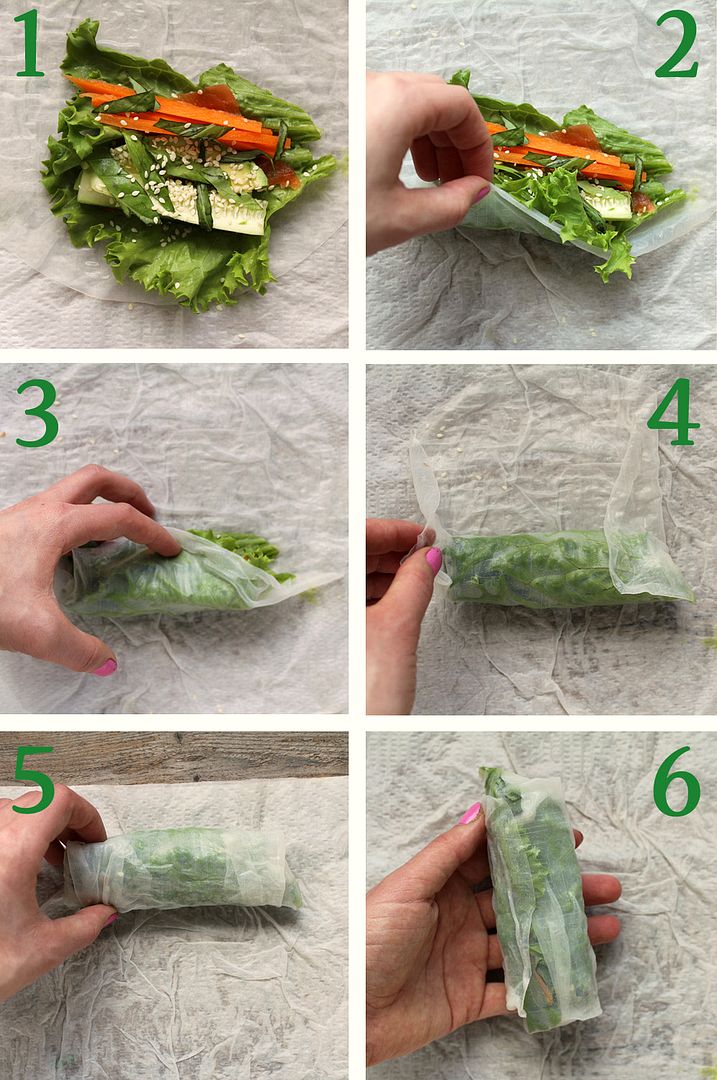
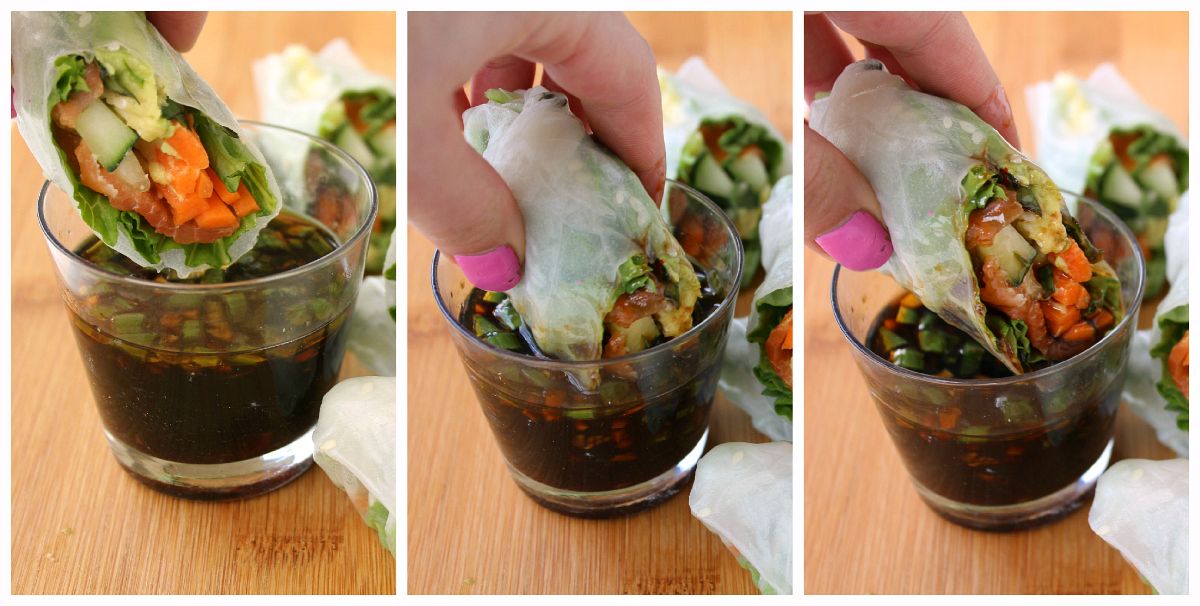
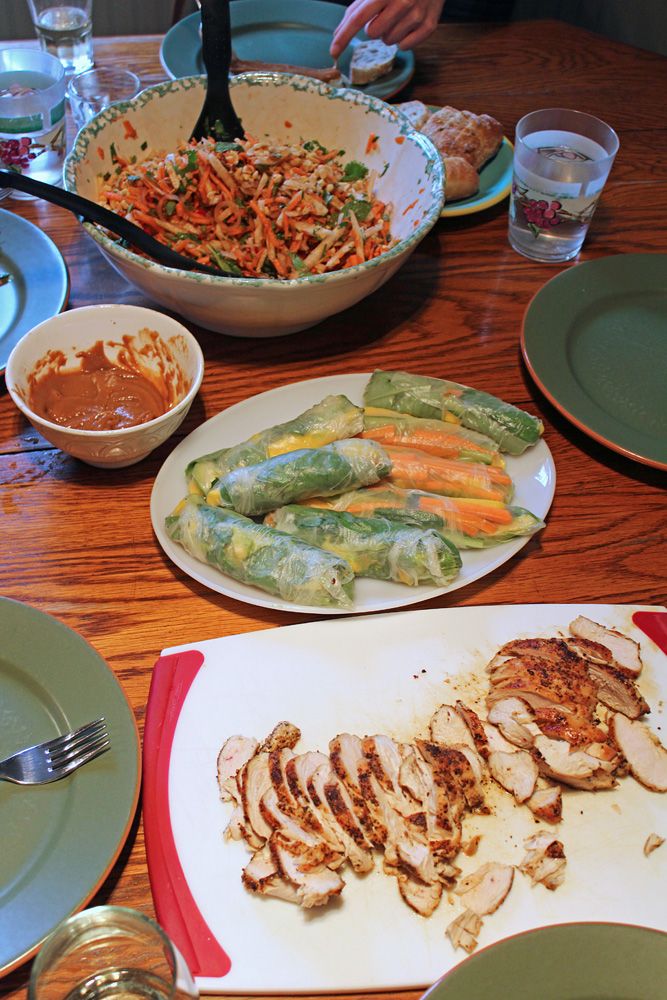
The good news is that I do have one shareable recipe for you in this post!  My sister and I got to choose our birthday dinner (as we do every year year) and this year we decided on this Thai chicken & jicama salad which my dad has made in the past and we've all loved.  This time, he served the chicken on the side and omitted the fish sauce so the salad was vegetarian.  It's so light and refreshing, and even though it snowed that day (!), we all loved it!  My sister also made some mango fresh rolls with peanut dipping sauce as a side - yum!

thai jicama salad

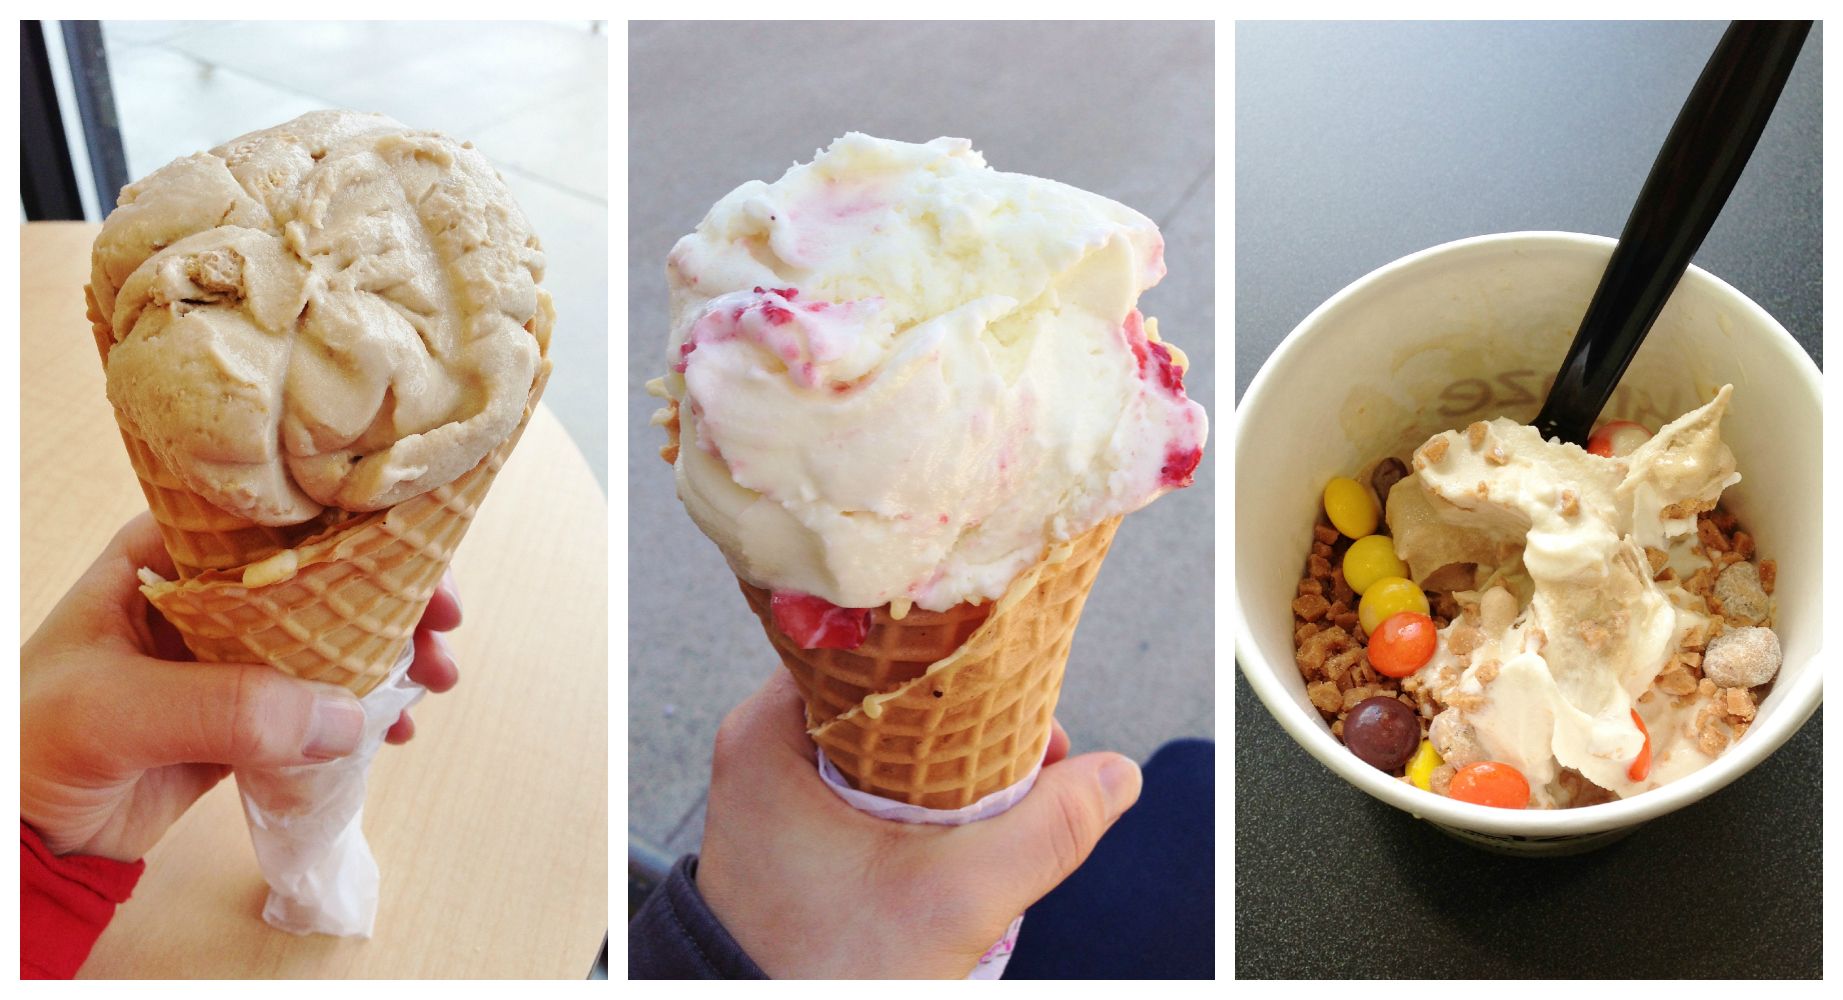
In addition to my frozen yogurt cake, I treated myself to a few other frozen yogurt treats this week thanks to free birthday coupons I've signed up for!  From left to right below are a coffee frozen yogurt with coffee crisp, coconut frozen yogurt with strawberries, and caramel & vanilla frozen yogurts with a bunch of mix-ins.  All so good!

frozen yogurts

My sister wrote about her birthday treats here; she had a few problems with her birthday dessert, a frozen mango pie, but it was still tasty too!

Tonight we decided to leave my dad's birthday cake in the very capable hands of our mom to avoid another baking failure!  And hopefully I'll have a successful recipe to share with you by the end of this week!

April 23, 2013

Cheezy Ranch Hummus

Cheezy Ranch Hummus

Before I get into this post, I feel the need to first clarify that I did not spell "cheesy" wrong in the title.  I'm guessing that the majority of people reading this already knew that, but for those who might not have heard the term "cheezy" before, it's used to describe something that tastes cheesy but doesn't actually use dairy cheese.  I'm not vegan and there is no way I could ever give up real cheese, but there are some dishes where cheese just doesn't really work, like in hummus.  Fortunately, there is a magical little ingredient called nutritional yeast that can blend right in to not only add cheesy flavour but also lots of nutrients.  Again, I'm sure a lot of you have heard of it before, but in case nutritional yeast is new to you (I had no idea what it was a couple of years ago), I described it more in this post for broiled pesto tomatoes, and I also used it in this pizza hummus to get the same cheesy flavour I was going for in this ranch version.

Cheezy Ranch Hummus

This hummus was inspired by Pickles & Honey's vegan cool ranch hummus I saw a while ago and loved.  I don't buy Doritos anymore because I know I'd eat the whole bag in one sitting, but Cool Ranch was always one of my favourite flavours.  I changed almost everything from the original recipe to make my own version, and I wouldn't say that mine is "cool ranch" flavoured, but rather combines elements of ranch dressing like fresh herbs and onion and garlic powder with nutritional yeast for a cheezy ranch hummus that makes a fantastic dip for veggies!

Cheezy Ranch Hummus

In other news, Spring has finally sprung in Southern Ontario and I couldn't be happier!  I love seeing flowers and robins and feeling the sun on my face again.  I hope those still stuck with the white stuff will see it all melt away soon!

Springtime

Cheezy Ranch Hummus

Inspired by Pickles & Honey

Ingredients:

1 (540mL or 19 fl oz) can chickpeas, drained and rinsed
3-4 tablespoons water
3 tablespoons tahini
2 tablespoons fresh lemon juice
3 tablespoons fresh chopped parsley
2 tablespoons chopped chives
1 tablespoon fresh chopped dill
1 teaspoon garlic powder
2 teaspoons onion powder
1/2 teaspoon salt
1/4 teaspoon pepper
2 tablespoons nutritional yeast
1/2 teaspoon dijon mustard
Dash Worcestershire sauce (optional, leave out to keep it vegetarian)
2 tablespoons extra virgin olive oil

Directions:

Add all ingredients except for the olive oil to the large bowl of a food processor.  Process until smooth.  Pour the olive oil into the feed tube of the food processor and let slowly drain into hummus as you continue to pulse.  Once everything is well combined, taste and adjust any amounts to your liking.  Store in the refrigerator and serve with veggies or as a sandwich spread.

April 19, 2013

Caramelized Onion, Apple, and Blue Cheese Naan Pizzas

Caramelized Onion, Apple, and Blue Cheese Naan Pizzas

I think naan pizzas might be my new favourite thing; I've already expressed my love for breakfast naan pizzas with an egg on top, but I can confirm that dinner pizzas are just as good! Especially when you're cooking dinner for one (like I am the majority of the time) - Just take a piece of naan out of the package (and whole wheat works great for a healthier option!), top it with desired toppings, bake for about 10 minutes, and you have a delicious light thin-crust pizza for one!

While you can pretty much top them with anything you like, if you like blue cheese, you have to try this combination of apples, blue cheese, and caramelized onions first - this was seriously one of my favourite things I've eaten in a while!

Caramelized Onion, Apple, and Blue Cheese Naan Pizzas

I already knew that blue cheese and apples go well together because they're some of my favourite salad ingredients, but adding caramelized onions and a sprinkle of thyme made for an amazing combination of flavours.  I even found a caramelized onion flavoured naan bread to use as my pizza base, which went perfectly, but if you can't find them, just use regular or whole wheat naan and these will still be delicious.

Speaking of pizza, I'm off to go enjoy a pizza lunch with my office - Hope you all have a great weekend!

Caramelized Onion, Apple, and Blue Cheese Naan Pizzas

Caramelized Onion, Apple, and Blue Cheese Naan Pizzas

Serves 4 (1 naan pizza each).  I recommend serving them with a side salad.

Ingredients:

1 tablespoon olive oil
2 large sweet onions, peeled and sliced into half moons
Pinch of salt and pepper
1/2 teaspoon sugar
1 tablespoon balsamic vinegar
4 caramelized onion flavoured naan breads (if you can’t find them, plain naan is fine)
1 Gala apple, thinly sliced right before using
4-5 oz blue cheese, crumbled (or about 1/2 cup crumbled)
1 teaspoon fresh thyme

Directions:

First, caramelize the onions (this can be done ahead of time, just keep them in the fridge).  Heat oil in a large skillet over medium heat.  Add onions, stir to coat with oil, and season with salt and pepper.  Spread onions out evenly across the pan and let cook, stirring only occasionally, until softened, about 15-20 minutes.  Add sugar and balsamic vinegar, stir to coat, and let cook for an additional 10-15 minutes, stirring only occasionally.  Once they are caramelized to your liking, remove from pan and set aside.

Preheat oven to 400°F.  Prepare naan pizzas by dividing toppings evenly among each naan bread.  Top each first with a layer of caramelized onions, followed by sliced apples, crumbled blue cheese, and fresh thyme.  Bake in preheated oven for 10-12 minutes and serve.

April 16, 2013

Lemon Yogurt Snack Cake with Coconut Cream Cheese Frosting

Lemon Yogurt Snack Cake with Coconut Cream Cheese Frosting

The sun has finally come through shining here the past few days, but for those who are still buried in snow, and for all of those affected by the events in Boston this past week, I'm sharing this bright and light lemon yogurt cake with coconut cream cheese frosting to help spread some warm and sunny thoughts.

Lemon Yogurt Snack Cake with Coconut Cream Cheese Frosting

This is a simple snack cake made of a dense lemon yogurt cake base topped with a coconut cream cheese frosting and some toasted coconut flakes.  I tried to lighten it up a bit from the original recipe by reducing the oil and sugar, and the texture still came out great and I loved how the lemon and coconut flavours shone through and complemented each other.  This is a great spring cake to make and share with others to spread the sunshine :)

Lemon Yogurt Snack Cake with Coconut Cream Cheese Frosting


Lemon Yogurt Snack Cake with Coconut Cream Cheese Frosting

Adapted from Emily Loves Food

Makes one 9x9-inch cake, about 16-20 squares

Ingredients:

For the Cake:
1 cup plain low-fat Greek yogurt
1/3 cup vegetable oil
1/3 cup fresh lemon juice
2 teaspoons grated lemon zest
1/2 teaspoon vanilla
3/4 cup sugar
2 large eggs
2 cups all-purpose flour
1 tablespoon baking powder
1/2 teaspoon salt

For the Frosting:
8 oz cream cheese (reduced fat, if desired), at room temperature
1/4 cup unsalted butter, at room temperature
1-1/2 cups icing sugar (use 2 if you want it sweeter)
1/2 teaspoon vanilla extract (or coconut extract, if desired)
1/2 cup sweetened shredded coconut

1/2 cup sweetened shredded coconut, toasted for topping

Directions:

Preheat oven to 350°F.  Line a 9x9-inch baking pan with parchment paper on the bottom.

Mix the “wet” ingredients together with a whisk until well combined: yogurt, oil, lemon juice, lemon zest, vanilla, sugar, and eggs.  In a separate bowl, whisk together the dry ingredients: flour, baking powder, and salt.  Add the dry ingredients to the wet ingredients and stir until just combined.  Spread mixture into prepared baking pan and even out with a spatula.  Bake in preheated oven for 30-35 minutes, until a toothpick inserted in the middle comes out clean.  Remove from oven and let cake sit in pan for about 10 minutes to cool, then transfer cake to a wire rack to cool completely.

Meanwhile, prepare frosting.  Beat cream cheese and butter until smooth, about 2-3 minutes.  Add icing sugar and beat until combined.  Add vanilla and coconut and beat until just combined.  When cake has cooled, frost the top with the frosting.  It should  make a thick layer.

Toast the additional 1/2 cup of coconut in a dry skillet over medium heat until golden brown.  Sprinkle overtop frosting.

April 09, 2013

Smoked Salmon & Avocado Fresh Spring Rolls with Soy Dipping Sauce

Smoked Salmon & Avocado Fresh Spring Rolls with Soy Dipping Sauce

While my wishing for the snow to stop seems to have worked because we haven't had snow the last few days, now we are getting rain - A LOT of rain! - much of Southern Ontario has been issued a special rain warning with flood watches for the week.  I guess the old saying "be careful what you wish for" has some truth to it - so now I'm wishing that the phrase "April showers bring May flowers" is also true, and that the May flowers part includes May veggies!  And to help wish Spring along, I made spring rolls - clever right?  :)

When it comes to spring rolls, I actually much prefer fresh rolls made with rice paper than the more common deep fried version, because the focus is on the fresh ingredients inside the roll, whose flavour isn't masked by a thick fried wrapper.  Plus fresh rolls are super easy to make - just lay some ingredients you like on a circle of rice paper and roll it up!  Rice paper wrappers get pretty sticky when they're wet so they'll stay together well as long as you wrap them up tightly.  The only down side is they have to be eaten pretty soon after making them so they don't harden, but with these smoked salmon and avocado rolls, you won't have any problem eating them all up right away!

Here are the ingredients I put in my fresh rolls: smoked salmon, avocado, carrots, cucumber, basil, lettuce, and a sprinkle of sesame seeds.

Ingredients for Smoked Salmon & Avocado Fresh Spring Rolls

Just soak your rice paper wrapper, lay it on a clean surface (I used a damp paper towel), place your ingredients in the bottom half, then roll it up!  Easy peasy!

Making Smoked Salmon & Avocado Fresh Spring Rolls

I loved how the creamy avocado and smoked salmon paired with the crunchy veggies in these fresh rolls, but the best part was the soy dipping sauce that infused the whole thing with even more flavour - it's an absolute must!

If smoked salmon isn't your thing, I also love these sweet & spicy kiwi mango fresh rolls with lime dipping sauce.  And if you have other fresh rolls flavour combos that you love, let me know - I have a ton of rice paper wrappers to use up now!

Smoked Salmon & Avocado Fresh Spring Rolls with Soy Dipping Sauce

Smoked Salmon & Avocado Fresh Spring Rolls with Soy Dipping Sauce

Adapted from Eating Well

Makes 6 fresh rolls

Ingredients:

For the Fresh Rolls:
6 (9-inch) rice paper wrappers
6 pieces of lettuce
1 (100g or 3-4oz) package smoked salmon, in 6 slices
1 large carrot, peeled and julienned (you might not use the whole carrot)
Half a cucumber, julienned
1 ripe avocado, sliced (you might not use the whole avocado – I only used about half of one but that was being stingy)
1/4 cup sliced basil
1 tablespoon sesame seeds

For the Dipping Sauce:
2 tablespoons soy sauce
2 tablespoons rice vinegar
1 teaspoon sesame oil
1 teaspoon minced ginger
1 teaspoon sweet thai chili sauce
2 teaspoons sugar
1 green onion, chopped

Directions:

Have all of your components for the spring rolls prepared before you start rolling them (i.e. slice your carrot, cucumber, avocado, basil, and salmon, and have the lettuce and sesame seeds ready to go).  

Soak one rice paper wrapper at a time in a shallow dish of hot water for about 10 seconds until it is soft and bendable.  Remove, let excess water drip off, and lay on a damp paper towel (the original recipe suggests a cutting board, which would work too, but I liked to keep the wrapper damp).  Lay lettuce on bottom third of wrapper, top with a piece of salmon, a few pieces of carrot, a couple pieces of cucumber, a slice or two of avocado, a bit of basil, and a sprinkle (about 1/2 teaspoon) of sesame seeds.  Fold the wrapper up over the filling and roll into a tight cylinder, folding in the sides as you go.  Remember that the wrapper will stick to itself, so make your folds where you want them, as it can be hard to undo!  Repeat with remaining wrappers and filling.  Cut each finished roll in half.

*Note: I also tried rolling one with the ingredients placed in the center before rolling and found that it worked that way too, but I preferred starting to roll from the bottom.

To prepare dipping sauce, whisk all ingredients together in a small bowl.  Serve rolls immediately with the dipping sauce, or refrigerate for up to 4 hours covered with a damp paper towel so they don’t harden (the original recipe suggests individually wrapping them in parchment or wax paper).

April 04, 2013

Butternut Squash & Blue Cheese Crostini

Butternut Squash and Blue Cheese Crostini

So I promise this is the last time I'll complain about snow on here (especially because I know a lot of people have even worse weather right now), but it was practically a blizzard on my way to school yesterday!

snow on april 3rd

It was actually a very beautiful and peaceful falling snow; I would have loved it in November-December and tolerated it in January-February, but it was just hard to appreciate in April!  I need the snow to stop so the already too short season for spring vegetables here (in Ontario) doesn't get any shorter!

But while I'm (impatiently) waiting, I'm at least happy to extend the season of delicious winter ingredients like butternut squash a little further.  And using squash atop crostini not only feels light enough to help transition my meals into Spring, but also makes for what is probably my new favourite appetizer!

Butternut Squash & Blue Cheese Crostini

This was my first time pairing squash and blue cheese together and the combination worked so well together!  I wanted to add caramelized onions because I thought that would make the flavour combination even better, but to keep things on a smaller scale I sauteed some minced shallots instead, which worked even better.  Add a drizzle of balsamic reduction to bring it all together and you have an elegant and flavourful appetizer that would be a unique addition to any party! Or if you want to make this into a meal for yourself and don't love crostini, the squash and blue cheese mixture on its own was delicious and would taste amazing mixed into a salad with a balsamic dressing.

It's looking much better out today so fingers crossed I'll have a Spring recipe to share next week! :)

Butternut Squash & Blue Cheese Crostini

Butternut Squash & Blue Cheese Crostini with Balsamic Reduction

Makes about 10 crostini

Ingredients:

1 pound butternut squash cubes, about ½-inch wide
2 tablespoons olive oil, divided
Salt and pepper
1 large shallot, minced
~1/4 cup balsamic vinegar
1 whole wheat baguette, sliced diagonally into about 10 slices (you may not use the whole loaf)
1 to 1.5 ounces blue cheese, crumbled

Directions:

Preheat oven to 400°F.  Toss butternut squash cubes with 1 tablespoon olive oil and season with salt and pepper.  Spread on a foil-lined baking sheet and roast in preheated oven for 25-35 minutes, until tender and cooked through.

Meanwhile, add balsamic vinegar to a small saucepan and bring to a boil.  Let simmer until reduced to only about 1 tablespoon – it should be thicker and syrupy.  Remove to a small bowl to let cool.

Heat remaining olive oil in a medium skillet over medium-high heat. Add minced shallot and cook until golden brown, stirring often, about 5 minutes.

Once squash is done, leave oven on, and spray baguette slices with cooking spray.  Set on baking sheet and let toast in oven for about 3-5 minutes, until crispy.

Meanwhile, mix squash with shallots and blue cheese in a large bowl.

Assemble the crostini:  Spoon the butternut squash mixture onto each toasted baguette slice.  Drizzle with balsamic reduction and serve warm or at room temperature.

Note: I added a tiny amount of minced parsley to add some green on top of the crostini for visual purposes, but basil would probably work well too if you like!

April 02, 2013

Easter Eats and Treats!

I was planning on posting a new recipe today, but my family made such great food for Easter dinner on Sunday that I had to share it instead!

While I used to look forward to Easter morning as a kid, when I would find the basket of chocolate that the Easter bunny left me then go on a search for the eggs we dyed, now I look forward to Easter evening, when I get to eat a delicious meal with my family.  The Easter bunny has evolved over time too, from leaving me chocolate bunnies to chocolate flavoured tea!

Here are some of the delicious things I enjoyed on Easter:

fruit tray with yogurt dip

Starting with appetizers, my aunt put together a fruit tray with yogurt dip.  What made this better than any other fruit tray I've had was that she served it with coconut Greek yogurt - yum!  I highly recommend using that as a dip for your next fruit tray!

 vegetarian pate

The most popular appetizer was this herb crusted peppercorn lentil-nut pâté that my sister Genevieve made. I haven't had pâté in ages and now it kind of grosses me out, but this vegetarian pâté had the same light, mousse-like texture as the meat version, but tasted so much better - and it was healthy!  Everyone (meat-eaters included) loved it, and there was still a lot leftover because the recipe makes a ton!  The recipe can be found at The Lunchbox Bunch.

southwest deviled eggs

My contribution to the appetizers was deviled eggs, because you can't have Easter without eggs!  The ones pictured above were spicy southwestern deviled eggs from Southern Living, with pickled jalapenos and spices mixed in to the filling, and fresh jalapeno and paprika sprinkled on top.  I went a little too heavy with the paprika sprinkling, but everyone really liked them!

Unfortunately, my second type of deviled egg wasn't as successful.  I made guacamole deviled eggs (pictured below) which sounded like a great combination, but something just wasn't right about them.  Maybe I made them too far before serving time, maybe I shouldn't have added garlic to the guacamole, or maybe it was just too hard to get past the look of green eggs - I'm not sure, but I had to take these away from the table after a couple people tried them and didn't really like them (myself included)!

appetizers

I also put together some smoked salmon on rye crisps with chive cream cheese and capers, pictured at the far end of the table above.  I didn't make much because I wasn't sure how people felt about smoked salmon, but they disappeared pretty quickly!

 Easter ham

For the main course, there was of course ham.  The bottom picture above was my cousin's complete dinner plate - we thought it was hilarious!

vegetables wellington

For the vegetarian main course, my older sister made a vegetables wellington redux from Vegetarian Times, which had a filling of vegetables, pesto, and goat cheese wrapped up in puff pastry and baked in a loaf pan.  I wish I took pictures of it in better lighting, but it was really delicious and everyone (again, meat eaters included) loved it.  My sister even made little decorative Easter eggs on top - so cute!  I'd definitely recommend this as a vegetarian main course for a family gathering; my sister just noted that she reduced the amount of goat cheese in the filling, and that you have to make sure you completely wet the edges of the puff pastry with egg to help pinch the seams together.

side dishes

For side dishes, my mom made scalloped potatoes, which we usually have at every holiday meal.  I think scalloped potatoes might be my favourite potato dish; it's too bad that they're also the least healthy, though that's probably the reason I love them so much!

My sister made a salad with mixed greens, strawberries, toasted coconut, toasted almonds, basil, and a strawberry basil lemon dressing from Oh She Glows.  I took a picture before it had many of the components in it, but it was really good!

Italian cream cake

For dessert, my aunt made the Italian Dream Cream Cake from the Looneyspoons cookbook.  I didn't get a picture of the beautiful layers inside, but it had lots of coconut, cream cheese, and pecans.  This cake has made an appearance at a few family gatherings now because everyone always requests it!

Easter cream puff

Moving on to other treats that filled my day, my dad bought my sisters and I each one of these Easter nest cream puffs from the market.  The filling was to die for!

Davids tea and mug

My parents also gave us a set of different chocolate flavoured teas from David's Tea to share, and each of us got a mug that comes with a tea infuser and lid.  I already have one of these mugs at school and love it - the tea infuser fits the mug perfectly and is easy to clean, the lid keeps the team warm and then catches all the drippings from the infuser when you remove it.  Now I have a second mug to keep at home which is perfect, and I love the elephant design on this one.  And I can't wait to try all our new teas - they have actual chocolate chips in them!

Easter treats

My aunt and sister gave Gen and I even more treats - sesame and sunflower brittles and coconut macarons.  My family has learned by now that I don't like eating chocolate bars much, so I get much more delicious things!  I love both the brittles and was surprised by how much I liked the macarons too.  I've always thought I don't like macarons but now I want to try making them myself - I know they're really challenging but I like challenges!

easter treats

And of course there were a couple of the usual Easter treats!  I've always had a soft spot for mini eggs and jelly bellies :)

Hope you all had a great weekend!  I'll be back later this week with a new recipe - I was worried about delaying it into April because it's a squash recipe, but seeing as there's once again snow on the ground this morning, I don't think it's a problem!

Ingredient Index

Related Posts Plugin for WordPress, Blogger...