November 30, 2011

Hidden Candy Cane Kiss Cookies

candy cane kiss cookies
One of my favourite holiday cookie recipes that I discovered last year was Recipe Girl’s Candy Cane Kiss Cookies – they look so cute with the red and white swirled Kiss in the middle, and the chopped up Kisses throughout the cookie give it an amazing 
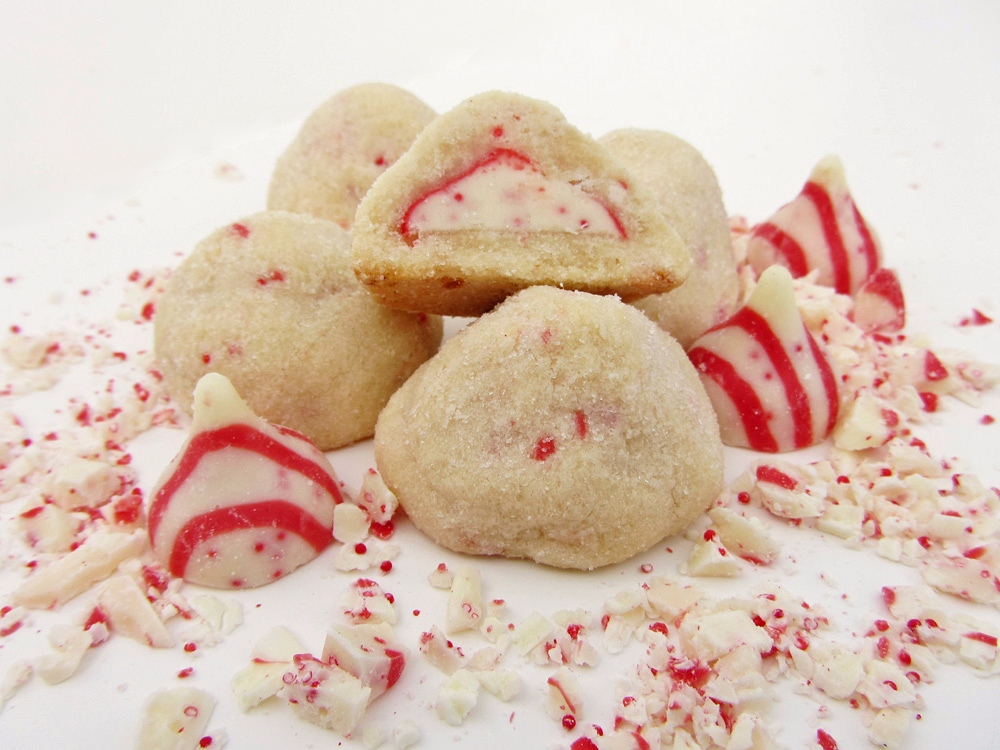
peppermint flavour. This year, I decided to switch them up a little by hiding the Kiss inside the cookie. Though it hides the pretty swirls, it adds an element of surprise when you bite into the cookies and discover a delicious Candy Cane Kiss inside! 

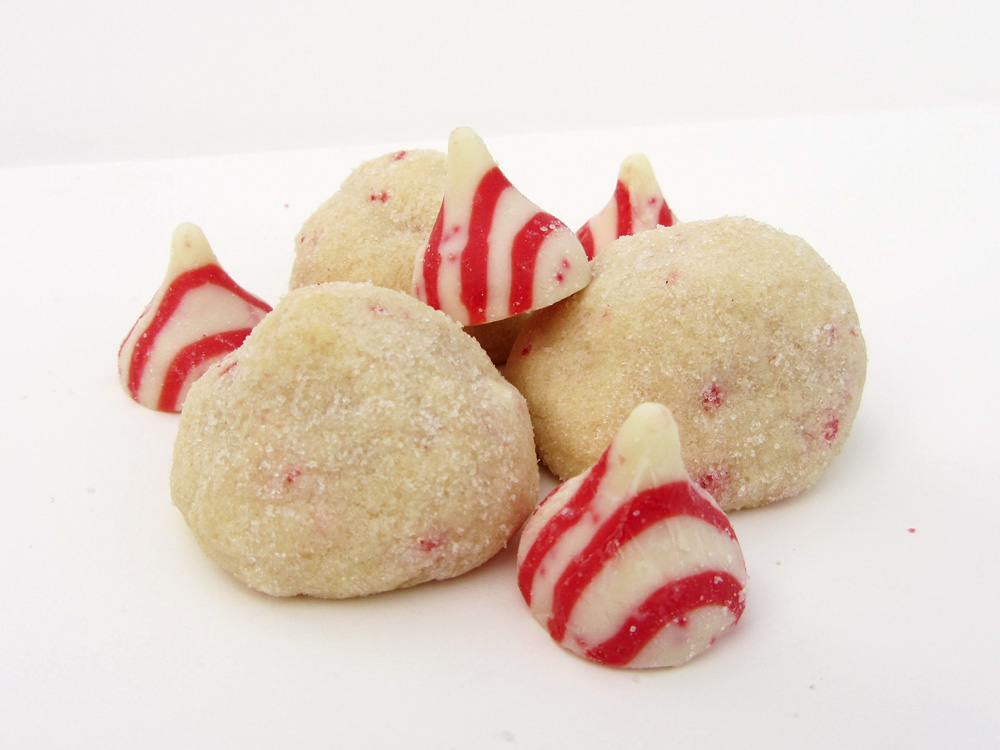
These are the perfect holiday cookie because they’re nice and small, taste like a festive candy cane, and have a pretty sparkle from rolling them in sugar. I think I might like this version better than the original, mostly because they’re easier to make (because you don’t have to worry about the middle of the cookie baking all the way through, which I tend to have problems with) and they’re easier to store (without having to worry about the Kisses on top melting or breaking), but also because they’re just so different from the average cookie, and much more fun to eat!

I’ve already made these twice this season – once for Ryan’s coworkers and once for a cookie swap at school, which was today (though sadly, I overbaked them a little this time) – and I’ll probably make them again closer to Christmas!

candy cane kiss cookies Hidden Candy Cane Kiss Cookies

Adapted from Recipe Girl

Makes about 30 cookies

Ingredients:

1/2 cup + 2 tablespoons unsalted butter, at room temperature
1/2 a large egg (whisk one egg in a small bowl, then divide equally in half and only use one half)
3/4 cup icing sugar
1 teaspoon vanilla extract
1-1/2 cups all-purpose flour
1/2 teaspoon baking powder
1/4 teaspoon salt
1/4 cup finely chopped Candy Cane Hershey's Kisses (about 10 Kisses)
~2 tablespoons granulated sugar
About 30 additional, unwrapped Candy Cane Kisses

*Note that you should only need to buy one 200g bag of Candy Cane Kisses for this recipe, as a bag contains about 45 Kisses and you need about 40 for this recipe.

Directions:

Preheat oven to 350°F.

In the bowl of an electric mixer, combine icing sugar, butter, vanilla, and egg. Beat at medium speed, scraping the bowl often, until creamy (about 2-3 minutes).

In a separate medium bowl, whisk together the flour, baking powder, and salt. Add the dry ingredients to the wet ingredients in the electric mixture in two additions, mixing well after each addition, until well blended. Stir in chopped Kisses.

Scoop about 1 tablespoon of dough and press a Candy Cane Kiss into the middle of the ball of dough, molding the dough around the Kiss so that it’s completely covered by the dough. Try to smooth out any lumps; if the cookie looks lumpy before baking, it will look lumpy after being baked! Repeat with remaining dough; you should end up with about 30 cookies.

Pour granulated sugar into a shallow bowl and gently roll each cookie in the sugar to coat. Place on a parchment paper-lined baking sheet and bake at 350°F for 10-12 minutes, then cool on a wire rack. To make things go quicker, I form 15 cookies first, put them in the oven, and while they’re baking I form the other 15 cookies.

candy cane kiss cookiesI'm submitting these cookies to the Holiday Recipe Exchange. Come join the fun at the My Baking Addiction and GoodLife Eats Holiday Recipe Swap sponsored by OXO.

November 27, 2011

Mini Banana Chocolate Chip Cupcakes

mini banana chocolate chip cupcakes
I recently realized that I hadn’t posted a dessert recipe in an awfully long time, and it just so happened that a wonderful colleague was celebrating her birthday last week, creating the perfect opportunity to bake something sweet (with the help of my sister Genevieve)!

Gen and I wanted to make cupcakes because they seemed most appropriate for a birthday, but because everything is cuter in mini form, we decided to make mini cupcakes! We chose a fail-proof Martha Stewart recipe for banana cupcakes, which seemed like a crowd-pleasing flavour, but threw in some mini chocolate chips for the chocolate lovers (which Gen and I are not). And because in our view, cream cheese frostings are the only way to go, we made two kinds of cream cheese frostings: peanut butter and chocolate. 

chocolate cream cheese frosting cupcake
The cupcakes were so easy to make and they were the perfect two-bite treat to bring to a crowd, all of whom loved them! The cupcakes themselves had a strong banana flavour with just the right hint of chocolate from the mini chocolate chips, but the frosting was definitely the best part! Both frostings were so good that Gen and I couldn’t decide which one we liked better, although the chocolate ones did seem to disappear faster than the peanut butter (much to my dismay, as I was the one in charge of the peanut butter frosting – ha!)

These are the perfect little treat to celebrate a birthday, or just to have around to brighten up any other day. I’m loving making mini things lately and can’t wait to find another use for my mini muffin pan, so if you have any ideas, send them my way!

peanut butter cream cheese frosting cupcake
Mini Banana Chocolate Chip Cupcakes

Makes 3 dozen mini cupcakes

Banana Chocolate Chip Cupcakes

Adapted from C&C Cakery, who adapted from Martha Stewart

1 1/2 cups all-purpose flour
1/4 cup brown sugar
1/2 cup white sugar
1 teaspoon baking powder
1/2 teaspoon baking soda
1/4 teaspoon salt
1/2 teaspoon cinnamon
1/2 cup unsalted butter, melted and cooled
1 1/2 cups mashed ripe bananas (about 3-4 large bananas)
2 large eggs
1 teaspoon vanilla
6 tablespoons mini semisweet chocolate chips
---
Chocolate cream cheese frosting & Peanut butter cream cheese frosting (recipes below)
About 18 banana chips and a handful of mini chocolate chips for topping
---
Preheat oven to 350°F.
In a large bowl, whisk together the dry ingredients (flour, two sugars, baking powder, baking soda, salt, cinnamon).

In a medium bowl, whisk together the wet ingredients (melted butter, mashed bananas, eggs, vanilla).

Stir the wet ingredients into the dry ingredients until almost incorporated. Add chocolate chips and stir until just incorporated. Do not overmix. Spoon mixture into a mini muffin pan that has been lined with mini muffin liners. Fill each cup almost to the top of the liner. Bake for 10-15 minutes or until the cupcakes are golden and a toothpick inserted in the middle comes out clean. Cool before frosting.

Frost half the cupcakes with the peanut butter cream cheese frosting, and half with the chocolate cream cheese frosting. Top with banana chips or mini chocolate chips if desired.

Chocolate Cream Cheese Frosting

Adapted from Cupcake Project

4 oz (half a block) cream cheese, softened (we used reduced fat)
2 tablespoons unsalted butter, softened
1 to 1 ½ cups icing sugar
3 tablespoons cocoa powder

Beat cream cheese and butter until smooth. Add icing sugar (start with less and add more if needed, depending how sweet you want it) and cocoa powder and beat until smooth.

Peanut Butter Cream Cheese Frosting

4 oz (half a block) cream cheese, softened (we used reduced fat)
2 tablespoons unsalted butter, softened
1/4 cup smooth peanut butter
1/2 to 3/4 cup icing sugar
1/4 teaspoon vanilla
1 teaspoon milk (optional)

Beat the cream cheese and butter together until smooth. Mix in the peanut butter, followed by the icing sugar (start with less and add more if needed) and vanilla, and beat until smooth. Add milk if you need to thin out the frosting a little.

mini banana cupcakes inside

November 23, 2011

Buffalo Wing Hummus

buffalo wing hummus

You may have noticed that I have a slight obsession with making hummus (see here, here, and here), but considering that the top two most popular recipes on my blog are hummus recipes, I’m thinking you guys won’t mind if I post another one!

I’d been dreaming about this buffalo wing hummus ever since I first saw it in September’s Food Network magazine, and once I tried it I couldn’t believe I didn’t make it sooner! This is easily my new favourite hummus recipe; it tastes exactly like buffalo wings but in a healthy dip form. It’s also the creamiest hummus I’ve made, even though it doesn’t contain any oil like most recipes. This dip makes a healthy snack served with celery or carrot sticks, but is also delicious served with pita chips or even off your finger ;)

If you love buffalo wings but are looking for a healthier way to enjoy their flavour, try this hummus out, you won’t regret it!

buffalo wing hummus
P.S. I want to wish all my American readers a very happy Thanksgiving!! And if you missed it earlier, be sure to check out my Thanksgiving recipe roundup if you need some last minute ideas!

Buffalo Wing Hummus

Adapted from Food Network

Makes about 2 cups of hummus

Ingredients:

1 (19oz) can no-salt added chickpeas (about 2 cups)
1/3 cup liquid from the chickpea can
1 clove garlic, minced
3 tablespoons tahini
2 tablespoons fresh lemon juice
1 teaspoon paprika
2 tablespoons barbeque sauce
2 to 3 tablespoons hot buffalo sauce
1/2 tablespoon distilled white vinegar (optional, you may want to taste before adding this as some brands of buffalo sauce can already taste quite vinegary)
1/2 to 1 teaspoon salt
Freshly ground pepper for seasoning, optional

Directions:

Place all ingredients in the bowl of a food processor and process until smooth.  For amounts that have a range (i.e. the buffalo sauce and salt), start with the smaller amount and add more after tasting if desired.  Taste and adjust any other amounts to your liking.

Serve with celery sticks, carrots, pretzels, or pita chips. Store in the refrigerator.

*Note: Because this recipe uses the liquid from the chickpea can, it's a good idea to buy no-salt added chickpeas.  If you can't find that and are watching your sodium, you can also make this by replacing the chickpea liquid with about 1 tablespoon olive oil and 3 tablespoons water.

Update: Here are a couple more (brighter) photos from a more recent batch in February 2014:

buffalo wing hummus

buffalo wing hummus

November 20, 2011

Butternut Squash Lasagna with Smoky Marinara Sauce

butternut squash lasagnaI know I haven't been posting as often lately, but I've developed a seemingly never-ending cold that has resulted in my attempting to eat garlic and ginger for every meal to try to get rid of it (so far, no luck). I haven't felt like cooking nice meals that I won't even be able to taste, or baking treats for others that will probably just spread my germs to them.

Fortunately I still have a few recipes that I haven't shared with you guys yet, and this delicious lasagna is one of them. I actually made it back when I was testing recipes for my Canadian Thanksgiving Week because I thought a lasagna would make a great vegetarian Thanksgiving main dish. While I absolutely loved this dish, I ended up posting a roasted vegetable galette instead because I thought it was just slightly more appropriate for a Thanksgiving dish.

I've been waiting for a chance to post the lasagna recipe though, and now with American Thanksgiving coming up this week, along with lots of other opportunities for family gatherings in the coming months, I think now's the time to share this dish that is very worthy of taking center stage at your next family feast.

butternut squash lasagnaI've actually tried three different versions of butternut squash or pumpkin lasagna before, usually with some sort of white sauce, cheese, and sage, but they always seem to disappoint me because they end up being very one-dimensional in flavour. I was intrigued when I saw this recipe for butternut squash lasagna from Cooking Light, because it looked completely different from the other recipes I'd tried by combining squash with a smoky marinara sauce instead the more common white sauces I'd seen.

I'm so glad I gave this version a try because I now finally have a squash lasagna recipe with FLAVOUR! The smoky marinara sauce (which you must be sure to buy the fire-roasted tomatoes for) has such an interesting flavour that made it the star of the dish, while still complementing the squash nicely. The provolone cheese added to the smokiness of the dish, and the addition of three other cheeses (ricotta, goat cheese, and parmesan) created a wonderful combination of flavours that was so much more interesting than the more traditional but bland combination of mozzarella and ricotta. I used fresh lasagna noodles so the end product had a wonderful texture, but dried noodles would work just fine as well.

The only downside to this recipe is that it's a fair amount of work and contains a lot of ingredients, but I just poured myself a glass of wine and put on some good music to listen to, and I thought the whole process was really enjoyable! Your guests (both vegetarians and meat eaters) will love this impressive and delicious dish, and since it makes a ton, you'll hopefully be able to enjoy the leftovers all week!

butternut squash lasagna

Butternut Squash Lasagna with Smoky Marinara Sauce

Adapted from Cooking Light

Serves 12

Ingredients:

For the smoky marinara:
1 tablespoon olive oil
3 garlic cloves, minced
1/4 cup chopped fresh basil
2 tablespoons chopped fresh parsley
2 tablespoons chopped fresh or 2 teaspoons dried oregano
2 teaspoons balsamic vinegar
1/8 teaspoon salt
1/8 teaspoon pepper
1 (28-ounce) can crushed tomatoes, undrained
3 (14-ounce) cans diced fire-roasted tomatoes, undrained

For the lasagna:
1 tablespoon olive oil
3 cups chopped onion
3 cloves garlic, minced
10 cups fresh spinach
1 cup shredded sharp provolone cheese
1/2 cup chopped fresh flat-leaf parsley
1 teaspoon salt
1 teaspoon freshly ground black pepper
2 large eggs, whisked
1 and a half 15-oz cartons (22.5 oz total) reduced-fat ricotta cheese
1 (113g) log of goat cheese
1 large butternut squash
Smoky marinara sauce (from above)
6 eight-inch square sheets of fresh lasagna, or 12 oven-ready boxed lasagna noodles
1 cup (4 ounces) grated fresh Parmesan cheese

Directions:

Preheat oven to 400°F. Peel butternut squash, scoop out the seeds, and slice into thin pieces, about ¼ to ½-inch thick. Spread on a large baking sheet and toss with olive oil, salt, and pepper until evenly coated. Roast in the oven for 30-40 minutes, until soft, but not mushy. Remove from oven and set aside.

Meanwhile, prepare the smoky marinara sauce. Heat olive oil in a large saucepan over medium heat. Add garlic, basil, parsley, and oregano, and sauté 1 minute, stirring frequently. Stir in vinegar, salt, pepper, and the cans of tomatoes. Reduce heat and simmer for 10-20 minutes. Remove from heat.

Reduce oven temperature to 375°F. Spray a 9x13 glass baking dish with cooking spray.

Heat olive oil in a large saucepan over medium-high heat. Add onion and sauté 5 minutes, or until soft. Add garlic, and sauté for 1 minute, stirring frequently. Add the spinach and sauté for 1-2 minutes, or until spinach wilts. Transfer everything to a large bowl. Add the provolone, ricotta, goat cheese, parsley, salt, pepper, and eggs to the bowl and stir everything together until thoroughly combined.

To layer the lasagna:

  1. Coat the bottom of the dish with 1/4 of the marinara sauce
  2. Layer lasagna noodles on top of the sauce (2 of the fresh sheets, or 4 dry sheets)
  3. Spread half of the cheese mixture on top of the noodles
  4. Layer half of the roasted squash pieces over the cheese
  5. Spread 1/4 of the marinara sauce over the squash
  6. Layer more lasagna noodles over the marinara
  7. Spread the other half of the cheese mixture over the noodles
  8. Layer the other half of the squash over the cheese
  9. Spread 1/4 of the marinara sauce over the squash
  10. Layer the last of the noodles over the marinara
  11. Spread the rest of the marinara sauce over the noodles
  12. Sprinkle the parmesan cheese on top.

Cover with foil and bake at 375°F for one hour.

*Note: The original recipe called for the lasagna to be divided among two 8x8 pans. I decided to put it all together in one 9x13 pan instead, which is slightly less total volume than the two pans. This made for a very full lasagna pan, which is why I kept it covered in foil for the full baking time, so that the sauce wouldn’t spill over in the oven (although a tiny bit still did). If you’d rather split the lasagna into two pans, remove the foil halfway through cooking.

Ingredient Index

Related Posts Plugin for WordPress, Blogger...