January 29, 2013

Blue Cheese Stuffed Buffalo Turkey Meatballs

Blue Cheese Stuffed Buffalo Turkey Meatballs

I know I just posted a buffalo sauce recipe, so I apologize to any buffalo-haters out there - I know it’s not for everyone, but the boyfriend and I are huge buffalo sauce fans and these meatballs would go so well with the Super Bowl so I had to share them this week!  I actually made these for us to enjoy during the playoff games two weekends ago, so I can vouch that they go very well with football!

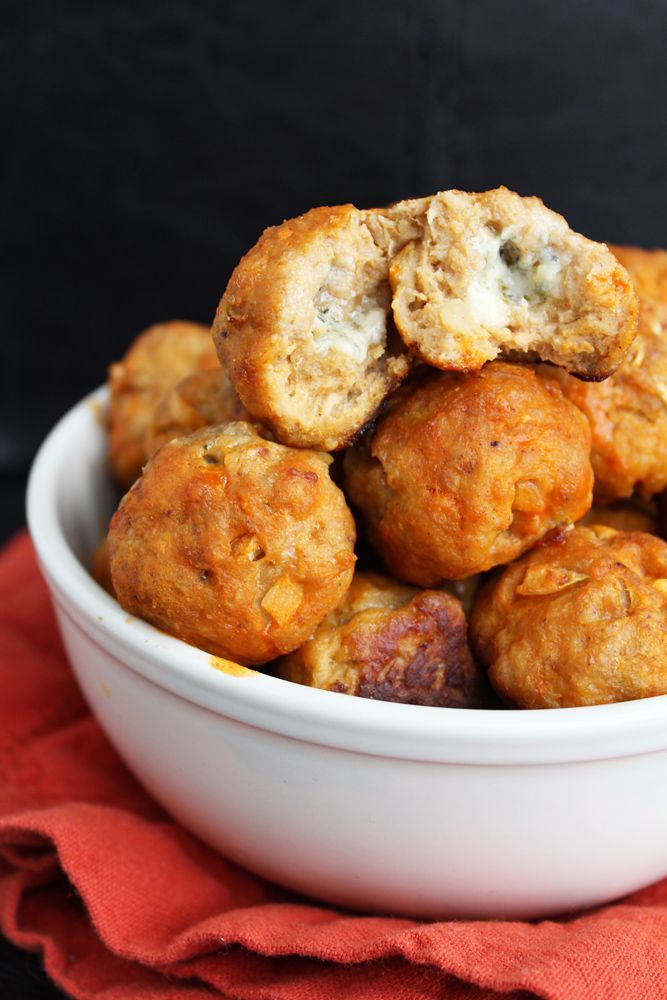
When I first thought of making buffalo-flavoured meatballs, I also came up with what I thought was a brilliant idea of stuffing blue cheese in the middle of them.  Again, I know blue cheese isn’t for everyone, but if you’re a fan of buffalo there’s a good chance you like the buffalo-blue cheese combination (and if you don’t think you do, you should give it a try!)  Of course, as soon as I started Googling I found that many other people had already had this brilliant idea long before me, but at least it confirmed that it would work!  I based my recipe on a combination of other similar ones, but used turkey instead of chicken because I just like it better, and left out the diced celery that a lot of recipes called for because I don’t like having crunchy bits in my meatballs.  Instead I added garlic, onion, and a dash of worcestershire sauce for extra flavour, and with the addition of buffalo sauce and blue cheese, these tasted (and smelled!) amazing!

Blue Cheese Stuffed Buffalo Turkey Meatballs

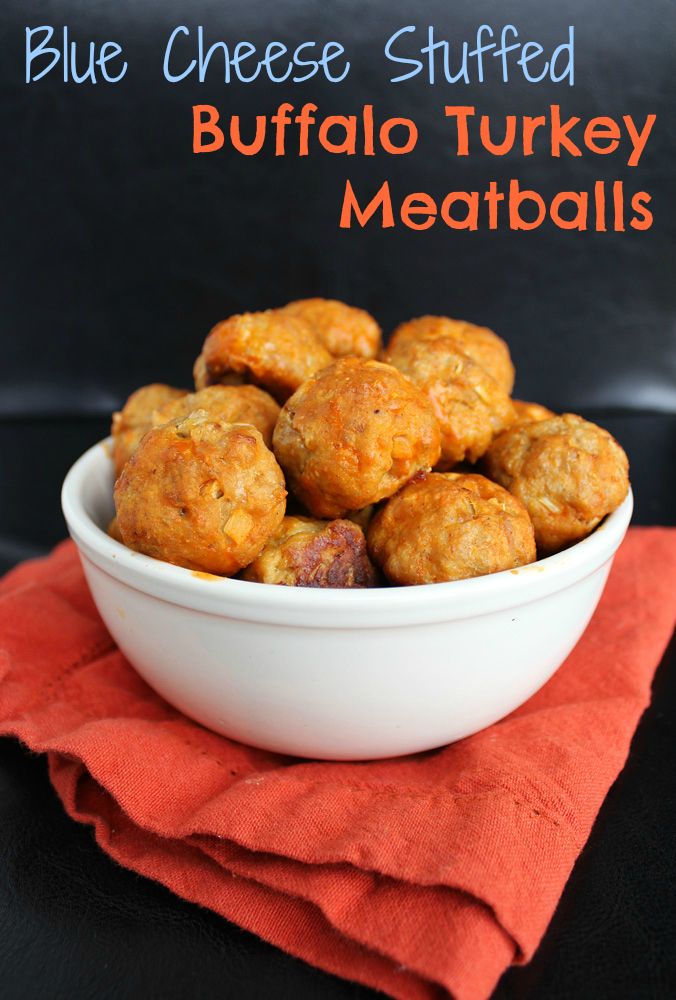
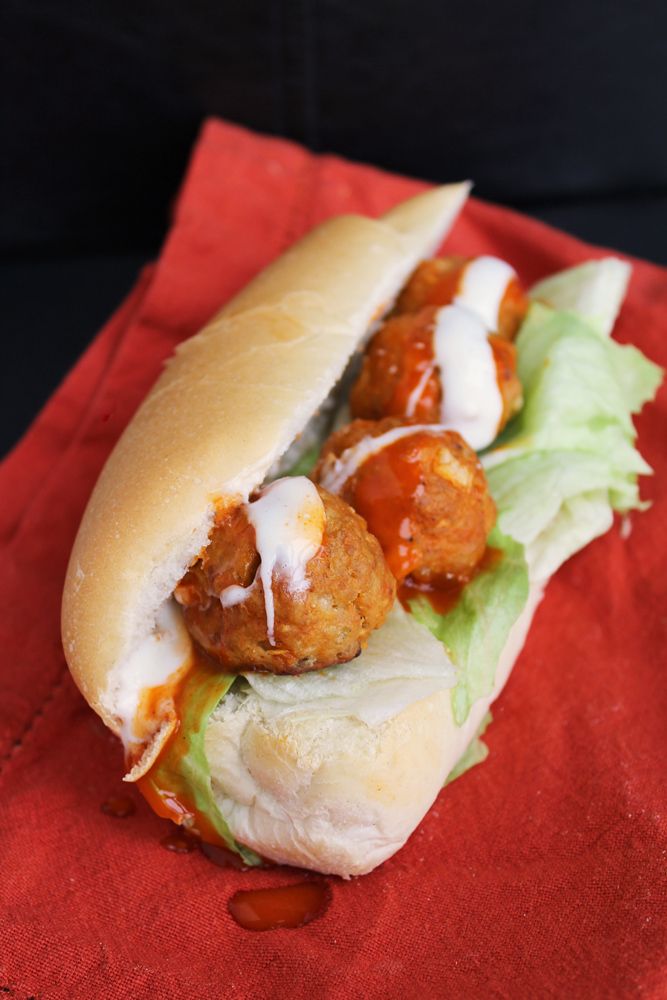
A lot of buffalo meatball recipes also call for coating them in a mixture of melted butter and hot sauce afterwards, but since we weren’t planning on eating these on their own, I thought I’d save a few calories by just drizzling them with a little buffalo sauce after baking instead.  They were still delicious on their own, but even better as meatball subs!  Add a little light ranch dressing and some crumbled blue cheese (which I completely forgot in the picture below), and you have a Super Bowl worthy sandwich - or turn them into sliders for a lighter snack!

If you’re starting to look for Super Bowl recipes and either want more buffalo ideas or want nothing to do with buffalo sauce, I’ve been collecting lots of both types of recipes on my Pinterest board!

Blue Cheese Stuffed Buffalo Turkey Meatball Sub

Blue Cheese-Stuffed Buffalo Turkey Meatballs

Adapted from Baked by Rachel

Makes about 30 meatballs

Ingredients:

1 lb lean ground turkey
3/4 cup breadcrumbs
1/4 teaspoon salt
1/4 teaspoon ground pepper
2 garlic cloves, minced
1/4 cup onion, minced (about half a yellow onion)
1 large egg, lightly beaten
1 teaspoon worcestershire sauce
1/4 cup buffalo sauce + more for drizzling
~1/3 cup crumbled blue cheese

Directions:

Preheat oven to 400°F.

Combine all ingredients for meatballs in a large bowl – turkey, breadcrumbs, salt, pepper, garlic, onion, egg, worcestershire, and 1/4 cup buffalo sauce.  Use your (clean) hands to mix everything together until well combined.

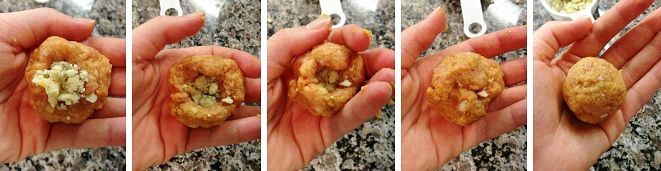
Form mixture into meatballs approximately 1 to 1.5” in size.  For each meatball, you’ll roughly form a ball, then place a few crumbles of blue cheese in the center, then push the cheese to the center so it’s covered by meat on all sides, and shape into a round ball, as shown in the pictures below.

 stuffing blue cheese in meatballs

Transfer all formed meatballs to a parchment-lined baking sheet and bake in preheated oven for 25-30 minutes, until cooked through.  Transfer meatballs to a bowl and drizzle with extra buffalo sauce to taste, tossing to lightly coat. 

Serve warm as is, as sliders, or on a sub.  For our subs, we added lettuce, more buffalo sauce, light ranch dressing, and blue cheese crumbles.

January 25, 2013

Buffalo Hummus Mashed Potatoes

Buffalo Hummus Mashed Potatoes

When I first saw hummus mashed potatoes on one of my favourite blogs, Gimme Some Oven, I thought it was such a fantastic idea – I love hummus and love mashed potatoes, so combining the two would not only taste great but would be a great way to healthify potatoes!

Of course, my mind starting immediately whirring with all the flavours of hummus you could use to change things up, and my first choice was buffalo.  If you love buffalo flavour and haven’t tried this hummus yet, you need to do so asap; I eat a lot of hummus and this is definitely one of my favourites!

These mashed potatoes are super easy to make – first you have whip up a batch of buffalo hummus, but that takes only five to ten minutes max, and you can do it while you wait for your potatoes to  boil.  Then you simply mash the potatoes, stir in some hummus, season with salt and extra buffalo sauce for spice, and that’s it!  There’s no adding tons of butter and cream, and you still end up with smooth and fluffy mashed potatoes, but with the added benefit of protein and healthy fats from the chickpeas and tahini in the hummus.

If you’re a fan of the buffalo/blue cheese combination, feel free to add some blue cheese in there - I didn’t have any on hand but I think it would have made a great addition!  This would make a great side dish to some chicken and steamed broccoli for a complete meal, but I liked it so much I ate it all on its own before I had a chance to try it that way!

Update: I realized after writing this post that these mashed potatoes are also vegan (correct me if I'm wrong, but from what I've read online, Frank's buffalo sauce does not contain milk products), giving you all the more reason to like them!  :)

Buffalo Hummus Mashed Potatoes

Buffalo Hummus Mashed Potatoes

Inspired by Sabra Hummus and Gimme Some Oven

Serves 3-4 as a side dish (can easily be doubled to serve more)

Ingredients:

1 pound Yukon Gold (yellow-fleshed) potatoes (about 2.5 cups peeled and cubed)
1-2 tablespoons buffalo sauce
Salt to taste

Directions:

Prepare a batch of buffalo hummus up to a few days in advance. 

Peel potatoes and chop into about 1” pieces.  Immediately transfer to a large pot and cover with cold water until potatoes are covered.  Bring to a boil, then reduce heat to a simmer and let cook 20-30 minutes, until potatoes are easily pierced with a fork.

Drain, then place potatoes back in the dry pot and let heat over medium heat until they appear dry, about 2-3 minutes.  Remove from heat and mash potatoes in the pot or in a bowl.  Add 3/4 cup hummus and mix.  Add 1 tablespoon of buffalo sauce, mix in, and add up to 1 additional tablespoon if desired.  Season with salt to taste.

January 22, 2013

Pizza Stuffed Breadsticks

Pizza Stuffed Breadsticks

So it looks like I chose a pretty good year to be a Niners fan!  Let me rewind a bit .. With the NHL lockout earlier this year, my boyfriend decided to get into football more, and I decided it would be a lot more fun for me if I joined him.  I always watch the Super Bowl and sometimes playoff games, so I knew the basics of the game and who all the teams were, but I had never payed much attention to the regular season or had a favourite team.  So we each decided, before the season started, to choose a team to root for, and I chose the San Francisco 49ers.  I watched (almost) every game of theirs this season and discovered that football is probably the only sport I can watch on tv and actually enjoy every minute - it's so entertaining!

This past Sunday was especially exciting with the 49ers in the NFC Championship game (which they won, yay!), so I decided to make some football food to go along with the game.  Enter these pizza stuffed breadsticks!

Pizza Stuffed Breadsticks

These are super easy and super tasty - you really can't go wrong with pizza dough and cheese.  Most cheese-stuffed breadstick recipes have you wrapping individual pieces of dough around cheese, but I went the lazy route with these. All you have to do is roll pizza dough into a rectangle, top it with marinara sauce and shredded cheese, add a top layer of dough (brushed with an egg wash, seasonings, and parmesan), then bake and slice it into breadsticks.  Served with marinara sauce for dipping, you get something that tastes like pizza but is more fun to eat!

Between eating these and watching the game, I was a happy girl on Sunday!  Now I can't wait for the Super Bowl!

Pizza Stuffed Breadsticks

Pizza Stuffed Breadsticks


Makes about 20 breadsticks

Ingredients:

1 ball of storebought frozen or refrigerated pizza dough (or 1 homemade pizza dough)
1/4 – 1/3 cup pizza/marinara sauce
200g brick of pizza mozzarella, shredded (about 2 cups)
1 large egg
2 tablespoons milk
2 tablespoons parmesan cheese
2 cloves garlic, minced
3/4 teaspoon dried basil
3/4 teaspoon dried oregano
Extra marinara sauce for dipping

Directions:

Preheat oven to 425°F.

Let pizza dough come to room temperature if using storebought dough.  Divide ball of dough in half.  Roll each half into a rectangle approximately 15”x10” on a floured surface.   If the dough won’t stay stretched, let it rest then try again.  Transfer one dough rectangle to a greased or parchment-lined 15x10-inch baking sheet, stretching as needed to meet edges of pan.  Brush pizza sauce over the surface, then sprinkle evenly with mozzarella.  Place second dough rectangle over top, and fold the edges under the bottom layer of dough, pinching to seal all around.

Use a pizza cutter to cut dough into 20-21 breadsticks (I cut it crosswise into thirds first, then cut each third into 7 breadsticks).  Do not separate the breadsticks.

Mix egg, milk, parmesan, garlic, basil, and oregano in a small bowl.  Use a pastry brush to brush over the tops of the breadsticks.  You won’t need to use all of it.  Bake in preheated oven for 15-20 minutes, until puffed and golden.  Recut along seams to separate breadsticks and serve warm with extra marinara sauce for dipping.

Note: Mennonite Girls Can Cook has some great step-by-step photos of her breadsticks if the above directions aren't clear - mine just used storebought dough, added marinara sauce in the middle layer, and used a little less cheese, but otherwise the steps were the same!

Note 2: (thanks to Genevieve for pointing this out in the comments): We loved these as is, but it could also be fun to try out different versions with various toppings stuffed in the middle!  I imagine that diced pepperoni or veggies would make fun variations!

January 15, 2013

Cauliflower Linguine with Lemon & Capers

Cauliflower Linguine with Lemon & Capers

This past weekend, the temperature went up to 12°C (about 54°F for my American friends!) and it was glorious.  The snow had all melted, I didn't need my winter jacket, and something about the spring-like air just made me so happy!  Of course it was just a big tease and it's now back to being even colder than it was before, but that glimpse of Spring got me in the mood for lighter meals than the stews and chilis I've been enjoying lately.

Cauliflower Linguine with Lemon & Capers

This almost sauce-less pasta dish with lemon juice felt like a Spring-like dish, but the addition of cauliflower reminded me I still have a ways to go before I can add things like asparagus and peas in there!

Because there's not much of a sauce on this pasta, the mix-ins are really important!  And this has plenty of mix-ins: along with the cauliflower and lemon juice, there are sauteed onions and garlic, capers, fresh parsley, parmesan cheese, and a toasted breadcrumb and walnut mixture that gets mixed throughout for a little added crunch. 

Cauliflower Linguine with Lemon & Capers

I was in a hurry to photograph this before the day's light disappeared so I hadn't tasted it yet when I took pictures.  It definitely didn't disappoint - it was just what I was in the mood for and I loved how all the flavours combined, but as I ate, I thought of two extra add-ins that would have made it even better.  Sliced kalamata olives would complement the salted, pickled flavour of the capers well, and golden raisins would add a nice burst of sweetness throughout.  I added a handful of raisins to my leftovers today and loved it, and tomorrow I'm going to add olives!  As always, taste and customize to your liking!

(Update: I didn't have kalamata olives in my fridge so I added green olives today and it was delicious!)

Cauliflower Linguine with Lemon & Capers

Cauliflower Linguine with Lemon and Capers

Adapted by combining recipes from William Sonoma and Clean Eating Magazine

Serves 4

Ingredients:

10 oz linguine pasta
2 tablespoons olive oil, divided
3 cloves garlic, minced
1/2 cup panko bread crumbs
1/4 cup chopped walnut pieces
1 yellow onion, diced
1 head cauliflower, chopped into florets
3/4 teaspoon red pepper flakes, or to taste
1/2 teaspoon salt
3 tablespoons capers
1/4 cup chopped parsley, plus more for topping
1/3 cup grated parmesan cheese, plus more for topping
3 to 4 tablespoons lemon juice (or to taste)
Freshly ground pepper
Optional add-ins: Sliced Kalamata olives and/or golden raisins

Directions:

Bring a large pot of salted water to a boil.  Add the pasta and cook according to package directions to bring it to al dente.  Drain the pasta, reserving 1 cup of the cooking water.

Meanwhile, heat 1 tablespoon olive oil in a large saucepan over medium heat.  Add garlic, bread crumbs, and walnuts.  Cook, stirring often, for 2-4 minutes, until bread crumbs are golden brown and toasted.  Remove and transfer to a small bowl.  Add remaining tablespoon of oil to the saucepan and heat over medium heat.  Add onion and sautee until golden brown, stirring occasionally, 5-6 minutes.  Add cauliflower, red pepper flakes, and salt.  Cook, stirring occasionally, for another 5-6 minutes.  At this point, the pasta should be ready.  Add 3/4 cup of the reserved pasta cooking water and cook until cauliflower is tender, 5 to 7 minutes, adding more cooking water if needed.  Add the pasta to the saucepan, and stir in the capers, parsley, parmesan, toasted breadcrumb mixture, and lemon juice.  Taste and season with more salt if needed, along with freshly ground pepper. You can also add more lemon juice or throw in more capers if you like!

Serve immediately, topping each portion with additional parmesan cheese and parsley if desired.

Note: As I was eating this I thought that either golden raisins would have been a nice addition for a hint of sweetness, or Kalamata olives to complement the flavour of the capers.  Either ingredient would boost the overall flavour of the dish, and could be stirred in at the end along with the capers, etc., but it was also fine without them!

January 11, 2013

Roasted Garlic & Shallot Soup

Roasted Garlic & Shallot Soup

Since my cold doesn't seem to be going anywhere, I tried to help it along this week with a big batch of garlic soup!  I remember reading somewhere that raw garlic is good for colds, and in the past I've tried horrible things like making garlic tea and scarfing down pieces of bread with raw cloves of garlic hidden inside.  But since those things probably don't make a difference anyway, this time I decided to go ahead and roast the garlic and turn it into a warm and comforting soup so I could at least enjoy a delicious meal in my runny, stuffy, coughy misery!

Roasted Garlic & Shallot Soup

Some of the reviews of the original recipe on Cooking Light said it had no flavour, but I don't know what they're talking about - I found that the roasted garlic and shallots provided so much flavour on their own, and then you add sauteed onions, white wine, vegetable broth, and fresh thyme - how much more flavour could you need?  I also made a few changes to the recipe, like using yellow fleshed potatoes instead of Russets because I find they have better flavour, substituting the chicken broth for vegetable to make it vegetarian, eliminating the blue cheese croutons and just topping the soup with parmesan to make it easier, and using skim milk instead of 2% so it was even lighter.

Don't be scared by the amount of garlic in this - it all gets roasted, which I can testify is about a million times better than eating whole cloves of garlic raw!  And while this may not have helped my cold at all, it still made me feel better to have this waiting for me for dinner every night this week!

roasted garlic and shallot soup

*The above picture was taken in Jan 2014 - same recipe, just used savory instead of thyme as I didn't have any thyme (and used better lighting!).

Roasted Garlic & Shallot Soup

Adapted from Cooking Light

Makes about 4 bigger portions or 8 smaller portions

Ingredients:

5 whole garlic heads, unpeeled (about 40-50 cloves) - try to use good quality garlic if possible as it will have more flavour than the cheap packages of imported garlic - I've learned that lesson!
3 tablespoons olive oil, divided
1 teaspoon salt, divided
1 teaspoon freshly ground black pepper, divided
10 shallots, unpeeled (about 3/4 pound)
2 cups coarsely chopped onion (about 2 small yellow onions)
1 cup dry white wine (I used Sauvignon Blanc), at room temperature
3 cups vegetable stock
2 cups (1/2-inch) cubed peeled yellow-fleshed potato (about 3/4 pound)
1 teaspoon chopped fresh thyme
1 cup skim or 2% milk, at room temperature
Grated parmesan cheese plus extra thyme for topping (optional)

Directions:

Preheat oven to 400°F. Remove the outside layer of white papery skin from the garlic, cut the tops off each head, and place on tin foil. Drizzle with 1 tablespoon olive oil and sprinkle with 1/4 teaspoon salt and 1/4 teaspoon pepper. Wrap with foil and place on a baking sheet, then roast for 10 minutes in preheated oven. Meanwhile, prepare a shallot foil package by drizzling shallots with 1 tablespoon oil, sprinkling with 1/4 teaspoon salt and 1/4 teaspoon pepper, and wrapping with foil. After the 10 minutes have passed, add the shallots to the pan and continue to roast both the garlic and shallots for another 25 minutes. Remove from oven and let cool until cool enough to handle. Squeeze garlic out of the skins and peel shallots, discarding skins.

While garlic and shallots are cooling, heat 1 tablespoon oil in a Dutch oven over medium heat. Add onion, and cook for 6-10 minutes, stirring occasionally, until softened and lightly browned. Add garlic cloves, peeled shallots, and wine. Reduce heat and simmer uncovered for 5 minutes.

Stir in vegetable stock, potatoes, and thyme. Bring to a boil, then cover, reduce heat, and let simmer for 20-25 minutes, until potatoes are tender. Cool slightly, then puree in batches in a blender (I did mine in 3 batches), transferring pureed portion to a bowl each time. Pour pureed soup back into Dutch oven, stir in milk, 1/2 teaspoon salt, and 1/2 teaspoon pepper. Reheat for about 5 minutes, taste, and adjust any seasonings if necessary.

Top each portion with grated Parmesan cheese and a sprinkling of fresh thyme, if desired.

January 08, 2013

Butternut Squash & Kale Baked Risotto

Butternut Squash & Kale Baked Risotto

I'm so excited to finally have a new recipe on the blog!  I loved spending the holidays at home and having amazing meals cooked for me most nights, but it also feels good to be back in my own kitchen cooking again, especially using healthy ingredients after a bit of overindulgence over the holidays!

I love risotto, and while it's pretty easy to make, I don't always love standing over a hot stove stirring for half an hour.  I had no idea that baked risotto existed until recently and was very eager to try it out as soon as possible!

This uses all the same ingredients and follows most of the same steps as regular risotto, but when you get to the part of slowly adding broth to the rice and stirring, you just pour it all in at once instead and bake it on the oven (see pic below).

Butternut Squash & Kale Baked Risotto

This version adds butternut squash and kale so it's healthy and tasty!  I found that the texture doesn't turn out to be exactly as creamy as traditional risotto, but it was pretty close.  I know the pictures somehow make it look like regular rice, but it was much creamier than that!  I'd still make the regular version if I wanted to impress guests (or get a good arm workout), but this is a nice shortcut option to have for weeknight meals.

I completely forgot to add the parmesan cheese before taking these photos - it helps the rice stick together and adds flavour, so don't forget it!

Butternut Squash & Kale Baked Risotto

Butternut Squash & Kale Baked Risotto

Adapted from Martha Stewart

Serves about 6

Ingredients:

1 tablespoon olive oil
1 medium yellow onion, diced
2 garlic cloves, minced
1/2 teaspoon dried thyme
1-1/2 cups Arborio rice
Salt and pepper
1/2 cup dry white wine (I used Sauvignon Blanc)
4 cups peeled and diced butternut squash (from a small to medium 2 pound squash)
1 (900 mL) carton low-sodium chicken broth (substitute vegetable broth for vegetarian version)
1 bunch kale, tough stems removed, sliced crosswise into 1/2-inch strips
Grated parmesan cheese for serving

Directions:

Preheat oven to 400°F.

Heat the oil in a large saucepan over medium heat. Add onion and cook, stirring occasionally, for 5-6 minutes until softened. Add garlic and thyme and cook for 1 more minute, until fragrant. Stir in the rice and cook, stirring frequently, for 3 minutes. Season with salt and pepper.

Add wine and cook until almost absorbed, stirring often, about 2 minutes. Add the squash and broth and bring to a boil. Stir in the kale. Transfer to a 9x13 glass baking dish, cover with aluminum foil, and bake in preheated oven for about 25 minutes, until most of liquid is absorbed and rice is tender. Let sit for about 5 minutes before serving. Top each portion with grated parmesan cheese.

Note: The original recipe called for the use of a Dutch oven - that way you don’t have to transfer the rice to a baking dish as you could just transfer the pot to the oven. I didn’t have a Dutch oven where I was cooking this, but it still worked fine without one.

January 02, 2013

Happy New Year and Looking Back on 2012

Happy New Year!

Hope you’re all off to a great start for 2013!  I had a nice low-key New Year’s Eve drinking craft beer with the boyfriend, and a relaxing New Year’s Day lounging around watching movies.  I had planned on spending this week making tons of new recipes before I get back to school next week, but I’ve been hit by a pretty nasty cold that has me awake all night and energy-less during the day.  Not a great start to the year, but I’m hoping to get through this quickly so I can finally have some new recipes to share with you guys!  Until then, I thought it’d be fun to look back at the past year and make some blog resolutions for the new year!

New Foods/Recipes I Tried Last Year

Jap Chae

I feel like I’m always trying new recipes and new ingredients, but some of the new things that stand out the most from last year are:

Korean cuisine – Before my trip to Seoul this fall I made a few Korean dishes myself – my first time making Korean food!
Doughnuts – I got a mini doughnut pan for Christmas last year and had fun trying out a few recipes with it, like French toast doughnuts and peppermint mocha doughnuts.
Breakfast Quinoa – I need to remember to make quinoa for breakfast more often, it’s such a healthy way to start the day and this chocolate cherry almond quinoa was delicious!
Silken Tofu – I’ve never liked tofu but last year I discovered that silken tofu is a great secret ingredient that makes things light and fluffy without being detectable!  I used it in corn dip and pesto sauce and hope to find a few new ways to use it this year!
Using Booze in Food – Last year I discovered how much I like cooking with wine (as in these red wine lentils and this pasta in a mushroom white wine sauce) and even beer (like this Guinness Dubliner soup or my pumpkin mac and cheese) – both add such unique flavour that nothing else can replicate.

New Foods/Recipes I Want to Try This Year:
I’ve still never made a meal in a crockpot, which is something I must learn how to do!  I also hope to try more Ethnic cuisine at home, I really want to make my own bread more, and I need to make more healthy snacks like homemade granola bars to have around.  Oh and I got a cake pop maker for Christmas so I plan on learning how to use that soon!

New Blog Things I Tried Last Year

5 summer dessert bars

This year I tried to include more posts that were not just about a recipe.  This included more round-up style posts (like 5 summer dessert bars, 5 ways to eat avocado for breakfast, 5 summer quinoa salads, etc.), ‘things I ate’ style posts (like food I ate in Singapore, Thailand, and Korea), theme/idea posts (like baby shower food ideas or food-on-a-stick themed meal), and more personal posts (like my birthday weekend recap). 

These seemed to be received well so I’m going to try to continue to include these types of posts this year!

My 5 Favourite Recipes of 2012

A few days ago I shared the 10 most popular recipes on my blog last year, and now I’ve tried to narrow down my 5 favourites.  In no particular order they are:


Beet and Goat Cheese Risotto

This stands out in my mind not just for its gorgeous colour but because it tasted amazing!

Mini Raspberry White Chocolate Cheesecake

Mini Raspberry White Chocolate Cheesecake

I was so proud of this little cheesecake because it was so cute, and I loved the combination of flavours too!


Heart Shaped Personal Pizzas

Another heart-shaped dish, and this really didn’t require a recipe, but how can you not love these?


No-Bake Peanut Butter Lentil Granola Bars

I worked hard to come up with a granola bar recipe that snuck in lentils and ended up loving these so much I made them multiple times!


Apple Pie Bars

One of my fave desserts – a bit of work to prepare but these are so good!

And a couple of honourable mentions:

Recipe I’ve Made the Most Over the Last Year

Black Bean & Corn Quesadillas

Easy Cheesy Black Bean & Corn Quesadillas – This is probably the easiest recipe on my blog and the dish I always turn to when I don’t feel like making dinner

Recipe I’m Most Proud Of

Mini strawberry & peach pies

Mini Strawberry and Peach Pies – These were a ton of work and I was so proud of how they turned out!


If you have any ideas for things you'd like to see from me this year, let me know!  Cheers to 2013!

Ingredient Index

Related Posts Plugin for WordPress, Blogger...