April 29, 2012

Banana Layer Cake with Peanut Butter Cream Cheese Frosting

banana birthday cake

As I mentioned in my recap of my birthday weekend, my twin sister Genevieve and I always look forward to making our own separate cakes for our shared birthday.  We each love choosing a recipe, making it our own, baking the cakes, and best of all, decorating them!  We also love that it's the only time of year when we can make a cake exactly designed for our own tastes (aka NO chocolate) without worrying about whether or not everyone else will like it!

This year, Gen made a delicious vegan pina colada cake, and I chose to make a banana layer cake with peanut butter cream cheese frosting on the inside and a whipped cream cheese frosting on the outside.

banana layer cake

Whenever the highly anticipated birthday-cake-choosing time of year rolls around, I always think that I want a banana cake but never have any bananas that could be ripe on time to bake it.  This year, I was well prepared ahead of time to ensure that I could finally make my banana birthday cake!

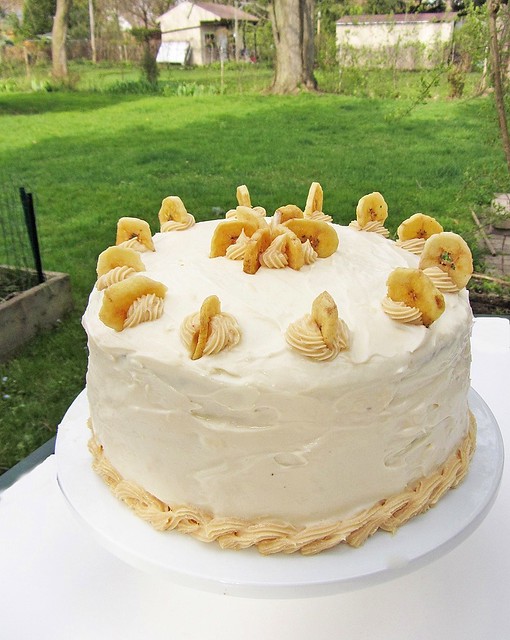
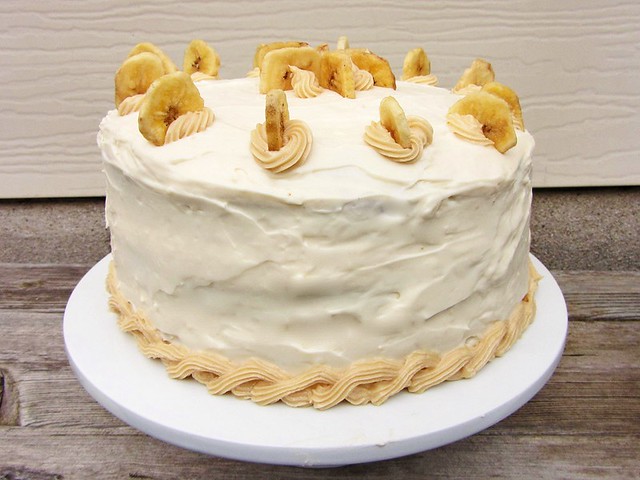
I wanted a three-layer banana cake (three seemed birthday-worthy) that somehow incorporated peanut butter, because peanut butter & banana sandwiches are one of my favourite things in the world.  I didn't want the peanut butter to be too overpowering though, so I chose to incorporate it into a cream cheese frosting that would go in between the cake layers.  I decided to frost the outside of the cake with a plain cream cheese frosting (because I hate buttercream frosting), then decorate it with the remaining peanut butter frosting and some banana chips.

banana layer cake

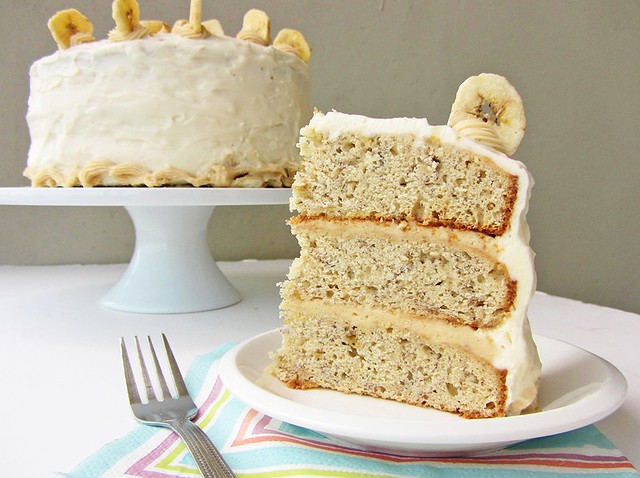
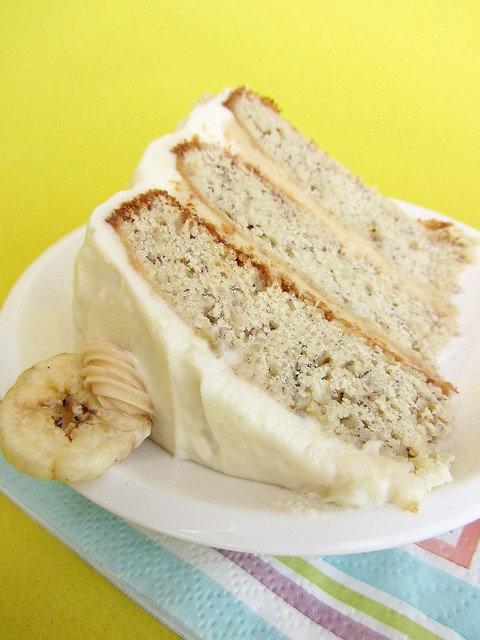
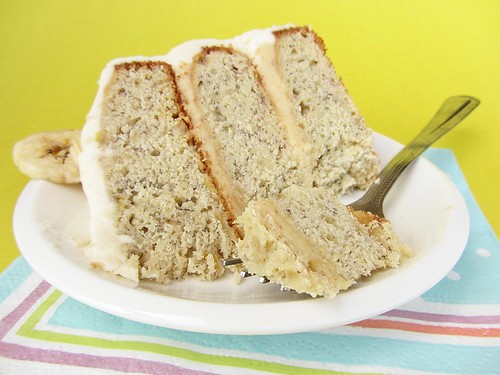
Cutting the first slice of a layer cake is always so nerve-wracking because you can't exactly take a sneak peek or taste before it's time to serve all your guests.  Fortunately, this cake not only looked impressive but tasted amazing too!

banana birthday cake 4

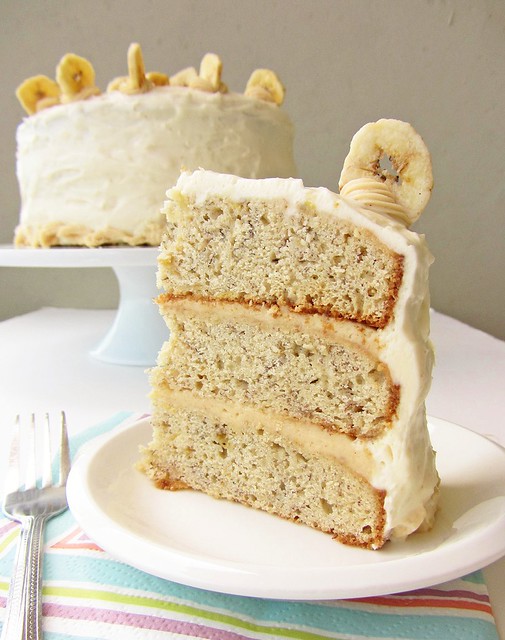
The cake itself had a very strong banana taste and was dense like banana bread, which is exactly what I wanted.  It's definitely not light and fluffy, so if that's what you're looking for then you might want to choose a different recipe!

The peanut butter taste was subtle but delicious whenever you got a bite of it.  It complemented the banana really nicely, as did the cream cheese frosting on the outside of the cake.  If you want a stronger peanut butter flavour, you might want to use the peanut butter frosting on the outside of the cake as well, or try adding peanut butter chips to the cake.

banana birthday cake

If you're a chocolate fan, you could try adding chocolate chips to the cake or even make it a peanut butter-chocolate-banana cake by adding a chocolate frosting to the inside of the cake and using the peanut butter frosting on the outside.  There are lots of variations you could try with this cake, but it's delicious as is too!

This served a lot of people and everyone who tried it really liked it.  I'm so happy I finally got to have my banana cake after all these years of wishing for it!  I don't want to have to wait another whole year before I can try another one, but since everyone else I make a cake for seems to request chocolate, it might be a while!  I'm actually baking a chocolate cake for my dad's birthday today, so I'll let you all know how that turns out!

banana birthday cake


Banana Layer Cake with Peanut Butter Cream Cheese Frosting

Sour Cream Banana Cake Recipe

Adapted from Margaret Wehling via All Recipes and also seen on Food Mayhem

1 cup unsalted butter, at room temperature
1 cup packed brown sugar
1 cup granulated sugar
4 large eggs
4 large ripe bananas, mashed
1 cup sour cream (I used low-fat)
2 teaspoons vanilla extract
4 cups sifted cake flour
1 teaspoon baking soda
1/4 teaspoon salt

Preheat oven to 350°F.  Spray three 9” round cake pans with non-stick baking spray and set aside.

Cream butter and sugars together with an electric mixer until fluffy, about 3 minutes.  Add eggs one at a time, beating well after each addition.  Add bananas, sour cream, and vanilla, and beat until just combined.

In a separate bowl, combine the flour, baking soda and salt.  Sift through a sieve at least once.  Add to the wet ingredients in three additions, folding with a spatula until just combined.

Pour the batter equally into the three prepared pans.  Weigh each pan to ensure that they are equal, and spread the batter in each pan as evenly as possible.  Bake in the preheated oven for about 30 minutes or until a toothpick comes out clean, rotating pans halfway through.  Let cool in the pans for 10 minutes then invert onto a wire rack to cool completely before frosting.

Peanut Butter Cream Cheese Frosting

Adapted from multiple sources

1 8-oz package cream cheese, at room temperature (I used reduced fat)
1/3 cup unsalted butter, softened
1/2 cup smooth peanut butter
Pinch of salt
1 cup icing sugar

Beat the cream cheese with an electric mixer until smooth and creamy, about one minute.  Add the butter and beat for another minute until smooth, scraping down the sides of the bowl as needed.  Add the peanut butter and pinch of salt and beat until combined.  Slowly add the icing sugar and mix on low until incorporated. Taste and add more icing sugar if it’s not sweet enough for your tastes.  Store in the refrigerator until ready to use, but remove from fridge at least 10 minutes before frosting so it is easier to spread.

Cream Cheese Frosting

Adapted from Bon Appetit via Epicurious

1 8-ounce package cream cheese, at room temperature (I used reduced fat)
1/3 cup unsalted butter, at room temperature 
1 teaspoon vanilla extract
1-1/2 cups icing sugar, divided 
3/4 cup chilled heavy whipping cream

Beat cream cheese with an electric mixer until smooth, about one minute.  Add butter and beat for another minute until smooth.  Add vanilla and 3/4 cup icing sugar, and mix on low until smooth.

In a separate bowl, whisk whipping cream and remaining 3/4 cup icing sugar until medium-firm peaks form.  I did this by hand but you could use an electric mixer to make it easier.

Gently fold whipped cream into cream cheese mixture in 3 additions.  Cover and chill in the refrigerator for at least one hour.

Assembling the Cake
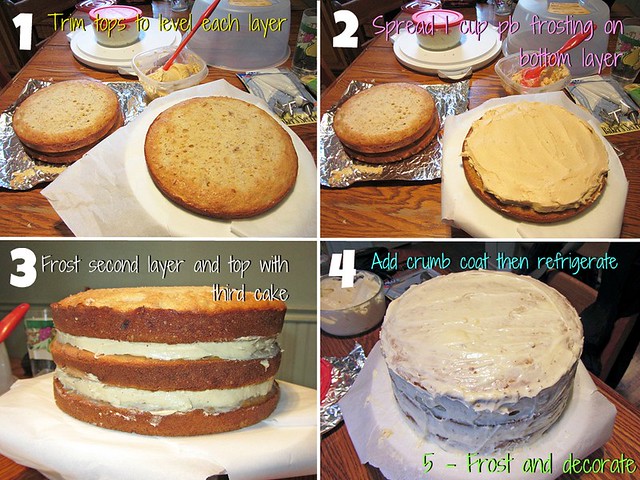
  1. Trim the tops of the cakes with a large serrated knife or cake leveler to level them, if necessary (I just took a bit off the top centers).  Place one cake layer on a cake stand or large plate and insert strips of wax paper or parchment paper underneath for easy clean-up later.
  2. Spread about 1 cup of peanut butter frosting over the cake.  Try to make it thicker around the edges.
  3. Top with second cake layer, then spread another 1 cup of peanut butter frosting on top, and top with third cake layer.  Make sure you're lining the cakes up evenly.  You should have a bit of leftover peanut butter cream cheese frosting which you can save for decorating the cake later.
  4. Spread a thin layer of cream cheese frosting over the top and sides of cake to form a crumb coat.  Refrigerate for at least 15 minutes. 
  5. Spread remaining cream cheese frosting over the top and sides of cake, smoothing it out as evenly as possible with a spatula.  Decorate with reserved peanut butter cream cheese frosting and banana chips, if desired.  Remove wax paper strips from base of cake.
making cake

April 25, 2012

My Birthday Weekend

Breakfast pizza and homefries
Yesterday, my twin sister Genevieve and I celebrated our birthday together, though I'd been stretching out my birthday celebrations for a few days before that! Our birthday involved so much delicious food (and food-related gifts) that I thought it would be a shame not to share it all with you.  Hope you enjoy!

The celebrations began with breakfast Saturday morning at a cute little restaurant/variety store in London, Ontario called the Bag Lady Variety.  I'm stretching things a little by saying this was part of our birthday events because it was more to celebrate finishing classes (yay!), but I loved it there so much that I wanted to include it in this post!  I had a very hard time deciding between "the mojo", which was two pieces of cinnamon french toast sandwiched with peanut butter, banana, and honey, or the breakfast pizza, which was topped with sundried tomato pesto, spinach, mozzarella, peppers, onion, and scrambled eggs.  As you can see from the picture above, I chose the latter, and it was amazing!  Gen ordered the mojo and was kind enough to share a few bites with me, and it was pretty incredible too.  I'm going to have to remember that combination the next time I need to impress someone with breakfast at home!

The best part was looking around at all the interesting odds and ends in every corner of the restaurant - see pictures below for a few examples.  If you're ever in London, you should definitely give this place a try, I hear they have great lunches too!

Bag lady cafe

On Saturday night, I enjoyed a nice dinner out with Ryan to an Italian restaurant called Abruzzi as another early birthday celebration.  We don't go out to eat too often, so it was such a treat to be served such beautiful food!  For my appetizer, I ordered an arugula salad with honey roasted pear, candied hazelnuts, and fried brie with a maple cider vinaigrette.  I've never even heard of fried brie before, but oh my goodness, that stuff should be banned - it's dangerously good!

Pear and arugula salad

For my main course, I ordered one of the few vegetarian items on the menu (I'm not a vegetarian but there aren't a lot of meats that I like), which was a pizza with artichokes, olives, tomatoes, mozzarella, and house-made ricotta.  It arrived piping hot and smothered in cheese, which is exactly how I love my pizza.  I couldn't finish it all but it was really good!  Ryan ordered a wild B.C. halibut with ricotta gnocchi and a basil pesto - I was a little jealous of his choice because it looked even better than mine!

artichoke, olive, and tomato pizza

We spent Sunday laying around being lazy (which was wonderful), then on Monday I had to take care of a lot of schoolwork, errands, and grocery shopping for our birthday dinners and cake!

The morning of my birthday (Tuesday), Ryan took me to Cora for breakfast, where I enjoyed a big plate of crepes, french toast and fresh fruit covered in maple syrup.  Yum!

breakfast at Cora

In the afternoon we went to see The Hunger Games, which made my day - it was amazing!  I've only read the first book so far but got the other two for my birthday so I cannot wait to read them!

I spent the evening relaxing with some prosecco and enjoying spending some time with my family.  For our birthday dinner, our parents always let us choose whatever meal we want and they do all the cooking (and cleaning up!)  Gen and I requested different main dishes this year - she chose (and made) a beet and goat cheese flatbread topped with arugula.  You can see it in the background of the picture below, but she also has a closer picture of it on her blog, Vanilla & Spice.

prosecco

For my main dish, I chose a chicken cheesesteak sandwich that I'd seen on Confections of a Foodie Bride.  I always think that Philly cheesesteaks sound so good, but I don't like steak so I've never actually tried one.  A chicken cheesesteak is much more my style, and my parents did an amazing job of preparing it!  They also made some delicious sweet potato fries and a strawberry and almond salad that we all shared.  Everything tasted amazing - thanks Mom and Dad!!  I highly recommend the chicken cheesesteak recipe - go get it here!

chicken cheesesteaks for dinner

As usual, my family spoiled me with wonderful gifts, and I thought I'd share some of the food-related ones here (actually, the majority of my  presents were food-related - they know me well!)  Below are some of the books I received:
  • An issue of Clean Eating, which I haven't read before but a quick flip through revealed quite a few recipes I'll want to try,
  • A special issue of Vegetarian Times with menus from a ton of different countries - I asked for this after checking it out at a Chapters and wanting to make every recipe in it!
  • The cookbook Healthy Starts Here, which is another one I hadn't heard of but it gets amazing reviews so I'm excited to read it,
  • Food Blogging for Dummies, which looks like it will be a great tool to help me improve my blogging skills (though I wish I'd received it before I started this blog!)


I also received some great food products, pictured below:
  • A set of measuring spoons from my sister, because I'm always complaining that we don't have enough
  • A bottle of ice cider, which I cannot wait to try
  • A vegetable steamer, because believe it or not I didn't own one before!
  • A chip making kit for the microwave! I'm pretty excited to try this one - it comes with a mandoline and special tray for slicing and cooking potato chips, or even sweet potato, carrot, apple, pear, or mango chips!
  • A Silpat baking mat - I've wanted one of these for so long after hearing so many bloggers rave about it, so I can't wait to use it and start saving on parchment paper!

Gen and I love making our own birthday cakes, and even though it means that our family has to eat a ton of cake, we each make separate ones because we each love choosing, designing, baking, and decorating our own cakes!

Gen made a vegan pina colada cake, which was so good!  I admit I was skeptical about it at first because it didn't contain any dairy, but one taste and I was proven wrong - you would never tell it's vegan!  She'll be posting the recipe on her blog in a couple of days, so be sure to check back at Vanilla & Spice for the recipe.  In the meantime, you can read her recap of her birthday here!


For my own cake, I chose a banana layer cake with peanut butter cream cheese frosting on the inside and whipped cream cheese frosting on the outside.  It definitely deserves its own post because it was so good, so be sure to check back here in a couple days when I'll be posting the recipe and lots more pictures!  For now, here's a little tease:


I had an amazing weekend and am so thankful for all the wonderful people in my life who helped make it so special.  I realize I said 'amazing' or 'wonderful' or 'great' in pretty much every sentence of this post, but I couldn't help it, it was!  I'm one lucky girl :)

April 23, 2012

Broiled Asparagus and Spiced Mandarins

orange asparagus

I have been very patiently awaiting the start of asparagus season here in Ontario, as local asparagus is so much better than the often already wilted grocery store variety.  But when seemingly every other blogger I subscribe to has been posting asparagus recipes for almost a month now (apparently asparagus season begins much earlier down south), it's so hard to resist joining in!  I finally caved the other week and bought some imported asparagus to have for lunch, but since local asparagus should be ready this week (and since others may not even have their local asparagus for much longer), I thought now was a good time to share this recipe!

When I make asparagus as a side dish, I pretty much always just drizzle it with a little olive oil, generously season it with salt and pepper, then roast it in the oven - simple and delicious.  But a few weeks ago I saw a recipe for asparagus with broiled spiced tangerines in Sobey's Inspired magazine and just couldn't get it out of my head, so I decided to be a little more adventurous one day and give it a try with some mandarins I had leftover from this mandarin chicken salad.
 

The recipe is still quite simple - rub a mixture of cinnamon, nutmeg, ginger, and honey on some sliced mandarins, broil them with the asparagus, then serve them together along with a little extra orange zest.  You can then squeeze the orange juice over the asparagus so it sits in a delicious puddle of warm orange juice and spices (note that these pictures were taken before doing that).  Even though I didn't make this with fresh, local asparagus, it was still so tasty!

I tried eating one of the broiled mandarin slices on its own and then devoured almost all the rest of them the same way - they're so good!  I love how the warm spices complement the sweet mandarins in such an interesting way that actually reminded me a lot of Christmas flavours!  I supposed it's a strange combination to pair Christmas spices with spring asparagus, but it's actually perfect for a rainy Spring day when you want something comforting but fresh at the same time. 

Give this a try if you're looking for a different way to serve your asparagus.  If you're already sick of asparagus or are still waiting for local produce, then you should at least try the spiced mandarins as a snack to tide you over while you're waiting!


Broiled Asparagus and Spiced Mandarins

Adapted from Inspired magazine, Spring 2012

Serves about 4 as a side dish

Ingredients:

1 bunch asparagus, ends trimmed
2 mandarin oranges (or tangerines)
1/8 teaspoon cinnamon
1/8 teaspoon nutmeg
1/8 teaspoon ground ginger
1/8 teaspoon salt
1/8 teaspoon pepper
2 teaspoons honey
1/2 tablespoon olive oil
Salt & Pepper

Directions:

Preheat oven to broil.

Bring a large pot of salted water to a boil.  Blanch asparagus for 1 to 2 minutes, depending on thickness.  Transfer asparagus to a bowl of ice water to cool, then remove and pat dry.

Zest one mandarin and set zest aside (you won’t need the rest of the mandarin for this recipe so you can just eat it!).  Cut the second mandarin in half crosswise.  Mix cinnamon, nutmeg, ginger, salt, and pepper in a small bowl, then sprinkle it evenly on the two cut sides of the mandarin.  Spread 1 teaspoon honey on each half, then place them cut-side-up on a foil-lined baking sheet.

Toss asparagus with olive oil and sprinkle with salt and pepper.  Spread in an even layer on the baking sheet with the mandarins.  Broil in top third of oven until honey has caramelized and asparagus is lightly blistered, about 4-5 minutes.

Transfer asparagus to a platter and garnish with the reserved zest.  Slice mandarins into wedges to serve alongside asparagus – they can be squeezed over individual servings (but also taste great eaten on their own!)

April 20, 2012

Lemon Artichoke Pesto


I absolutely love spring time – on those first days when I can start going outside with only a light jacket or (gasp!) no jacket at all, there is absolutely nothing that can put me in a bad mood! Sunshine, birds singing, and flowers blooming seem to have the power to fix anything. What I don’t like is that in-between period where one day it’s warm and sunny but the next I’m back to wearing my winter coat – it’s such a tease! Or when it’s freezing in the morning so I put on a heavy coat, but by the time I’m heading home later in the afternoon everyone else is in t-shirts and I look like a fool sweating buckets in my heavy clothes. I can’t wait for the days when it’s bright and sunny all day long – of course, then I’ll be complaining that I’m stuck in my office all day instead of being outside!

Fortunately, I can always bring the spring and sunshine indoors with dishes that are light and bright and lemony, like this lemon artichoke pesto. I love trying different types of pesto, and when I saw a lemon artichoke version on The View from Great Island, I knew I had to make it for Spring!

I ended up combining a few similar recipes for lemon artichoke pesto in order to create something that suited my tastes. I didn’t want it to be too herby, too lemony, or too “artichokey”, and I think I achieved that with a good balance of lemon and artichoke and lots of bright Spring flavour!
lemon artichoke pesto


This was actually my first time making something with canned artichokes, and I realized afterwards that I was meant to use the jarred, marinated kind, instead of the canned water-packed kind that I used. I think the marinated artichokes would have worked a lot better in a pesto so I’d recommend buying them instead, though from what I’ve read online, the quality of jarred artichokes can vary substantially by brand. If you’re wary about what goes into the cans/jars of artichokes (i.e. lots of sodium) but still want something easy to use, frozen artichoke hearts may be even better!

I used most of my pesto in spaghetti, topped with lots of extra lemon juice, grated parmesan, and salt and pepper. Simple and delicious!

lemon artichoke pesto pasta

With my leftovers, I made a quick lunch by spreading the pesto on a pita and topping it with asparagus, parmesan, and salt and pepper, then baking it in the oven for a bit. It was fantastic!

I could also see this being great with ravioli, stuffed in a chicken breast, or simply as a spread for some toasted bread. Be creative both with your uses for the pesto and with the ingredients that go into it - You’ll notice that I wasn’t very specific with the ingredients list because all the amounts you use may depend on your personal preferences – don’t be afraid to experiment, and let me know what works!

lemon artichoke pesto pizza

Lemon Artichoke Pesto


Ingredients:

1 14-oz can artichoke hearts, drained – NOTE: I bought the canned type by accident - it worked fine, but jarred marinated artichokes would likely taste much better. You could also use thawed frozen artichokes if you don’t like the jarred ones, you may just need to adjust the amounts of artichokes and oil to suit your tastes.
2 garlic cloves, minced
1/2 cup walnuts (or pistachios, almonds, or pine nuts)
1/3 cup fresh parsley (or more for a stronger herb taste)
1/4 cup freshly grated parmesan cheese
1/2 teaspoon lemon zest
2 tablespoons lemon juice
1/4 cup olive oil (you may use less/more depending on type of artichokes used and personal preference)
1 tablespoon water or artichoke marinade to thin out if needed
Salt and pepper to taste (I seasoned very generously!)

Directions:

Add the first 7 ingredients to the large bowl of a food processor and pulse until well blended. Add the olive oil to the feed tube and let it slowly drain into the bowl as you blend – you may wish to start with less oil and continue adding more slowly until you reach the consistency you like. Add water or artichoke marinade to thin out the sauce if necessary. Taste and adjust any ingredients to your liking. Season with salt and pepper to taste. Store in an airtight container in the refrigerator.

If serving with pasta, add a little pasta water to the pesto to thin it out, mix it with cooked pasta, and top with lots of parmesan cheese, salt and pepper.

April 17, 2012

Mini Toffee Scones

mini toffee sconesYou may have noticed that I have a bit of an obsession with mini foods; so far on this blog I’ve shared mini cupcakes, mini tarts, a mini cheesecake, mini party appetizers, and mini doughnuts. And now I give you my new favourite mini treat: mini scones! (Doesn’t the word ‘mini’ start to look really strange when you see it that many times in a row?)

I love scones but eating a full-sized scone (that’s made with tons of butter and cream) isn’t exactly the best way to start a morning. Mini scones, however, are just as easy to make, if not easier, and are the perfect size for a mid-morning snack or a treat to share with your family or coworkers – if you can bear to give these adorable little treats away!

mini toffee sconesFor my first attempt at making mini scones, I decided to incorporate toffee bits into them because they not only taste amazing but they’re also tiny so I knew they would give every bite lots of toffee flavour. I used a basic scone recipe from All Recipes, but left out the raisins and added toffee bits, cinnamon, and vanilla (and of course made them mini-sized!) They were incredibly easy to make and I had no problem making them on a weekday morning – they take about 15 minutes to make and then 15 minutes to bake (during which you can do other things), so I only had to wake up 15 minutes earlier than normal one morning to have them ready to bring to school with me on time.

I brought them to a meeting and they disappeared really quickly – everyone loved them! They were soft, light, and full of rich toffee flavour – such the opposite of the dry, hard scones you usually find at coffee shops. They were delicious at room temperature but amazing warmed up slightly with a little dab of butter! They’re sweet enough that they don’t need a glaze or frosting, but if you want to dress them up a little, a drizzle of maple glaze would probably work well!

I wish I'd taken a picture of these next to something else so that you could see how small they are, but you'll just have to trust me that they're cute and little! Bring these to your next morning meeting or brunch, they’re sure to be a hit!


mini toffee scones
Mini Toffee Scones

Adapted from Pam Anderson’s recipe for Simple Scones on All Recipes

Makes about 24 mini scones

Ingredients:

2 cups all-purpose flour
1/3 cup sugar
1 teaspoon baking powder
1/4 teaspoon baking soda
1 teaspoon cinnamon
1/2 teaspoon salt
1/2 cup unsalted butter, frozen
1/2 cup sour cream
1 large egg
1 teaspoon vanilla extract
2/3 cup toffee bits (In Canada we have Hershey’s Chipits Skor Toffee Bits, but in the U.S. I believe Hershey’s has Heath toffee bits. They should be located with the rest of the chocolate chip bags.)

Directions:
Preheat oven to 400°F. Line a baking sheet with parchment paper and lightly sprinkle flour over surface.

Add the flour, sugar, baking powder, baking soda, salt, and cinnamon to the large bowl of a food processor and pulse a few times to combine. Add the frozen butter and pulse several times until coarse crumbs form.
Add the sour cream, egg, and vanilla extract and pulse a few times until mixed in. Add toffee bits and continue to pulse until dough starts to come together to form a ball.

Transfer dough to the floured parchment paper lined baking sheet. Pat dough into a square that’s roughly 7 by 7 inches. Cut into 12 squares, then cut each square diagonally in half to make 24 triangles, as pictured below:

how to cut mini sconesSpread scones out about 1 inch apart and place baking sheet in oven. Bake for 14-17 minutes until scones are golden. Remove from oven and let cool 5 minutes before eating. Serve warm or at room temperature.mini scones before baking

April 13, 2012

Mandarin Chicken Salad

Mandarin chicken salad

I’ve been fortunate enough to travel to Asia a few times now, and while I love experiencing the incredible and diverse food Asia has to offer, one of the things I always find myself missing is a fresh, crisp salad. A lot of vegetables over there are cooked, and sometimes you can’t trust the fresh ones because they may have been washed in tap water. Towards the end of my trips, I actually start dreaming about raw vegetables and would give up all the amazing food there just to have one bowl of refreshing salad!

So the first thing I did when I got home from my most recent trip was to make myself a giant bowl of salad! I wanted to make something with Asian ingredients though, and realized it was the perfect time to try a salad recipe I’d had bookmarked for a year but kept forgetting to make: this mandarin chicken salad from Munchin with Munchkin. While it looked like a lot of ingredients to buy, I actually had all the ingredients for the dressing already, and I didn't mind buying the vegetables because I knew I'd eat whatever was leftover as a snack, so it was money well spent!

I changed quite a few little things with the recipe in order to suit my tastes (and based on what ingredients I had on hand), so be sure to check out the original recipe too so that you can also adjust the ingredients to your tastes! You should also check out the rest of Kris’ amazing blog while you’re there – it was just voted the Best Recipe Blog in The Kitchn’s Homies awards!
This salad was so fresh and flavorful and exactly what I was craving after my trip. I loved how the sweet mandarins were balanced by all the crunchy vegetables, and the sweet and sour vinaigrette gave it the Asian flavour I was still desiring. I have a feeling I’ll be craving this salad a lot more now that I know how much I love it!

Mandarin chicken salad
Mandarin Chicken Salad

Adapted from Munchin with Munchkin

Serves 2

Ingredients:

For the Dressing:
1 tablespoon rice vinegar
1 tablespoon fresh lime juice

1/4 teaspoon chili garlic sauce (optional for a bit of spice)
1 tablespoon sesame oil
1 teaspoon soy sauce
1 tablespoon dark brown sugar
1 garlic clove, minced
1/2 teaspoon sweet Thai chili sauce 
Dash of salt

For the Salad:
1 boneless, skinless chicken breast, cooked and shredded into small pieces (I cooked mine in sesame oil)
2 cups lettuce
1/2 red bell pepper, cut into thin strips
1 medium carrot, cut into matchsticks
1/4 cup snow peas
1/4 cup shelled edamame, cooked as per package directions
2-3 mandarins, segmented
2 tablespoons ground peanuts (ground in a food processor)
2 tablespoons sesame seeds

Directions:

In a small bowl, whisk together all ingredients for the dressing. Taste and adjust any amounts to your liking. Set aside.

In a large bowl, combine salad ingredients, toss with dressing, and divide salad between two plates/bowls, with the peanuts and sesame seeds sprinkled on top.

Notes:
- Next time I might eliminate the carrots and snow peas and increase the mandarins. Choose ingredients and amounts to your own taste!
- Optional additional toppings may include green onions, cilantro, and chow mein noodles

April 10, 2012

Thai Turkey & Carrot Meatballs

thai turkey carrot meatball subSince I returned home from my brief trip to Thailand, I've been really eager to try my hand at cooking Thai dishes at home. I wish I could say that this recipe was a brilliant and creative attempt at recreating Thai flavours in my own dish, but I actually made this dish a couple of months before I even went there, and it wasn't my idea but was inspired by an intriguing recipe I found from Foodland Ontario.

Nevertheless, these little turkey and carrot meatballs do pack a ton of Thai ingredients like ginger, lime, cilantro, fish sauce, and chili hot sauce, and they make for a juicy and tasty little bite that's bursting with flavour! They obviously aren't a dish you'd expect to find in Thailand, but I thought they were a really nice way of incorporating some Thai flavours into more of a familiar Western-style dish.

I also love that these are fairly healthy because they're baked instead of fried, and they're made with lean ground turkey, lots of carrots, and other good-for-you ingredients like ginger, garlic, and cilantro. I can imagine a vegetarian version made with something like lentils and cashews, though I haven't tried that yet - maybe that will be my next project!

thai turkey carrot meatballsThese are really easy to make and the recipe makes a ton of meatballs, so they can serve a big group as a party appetizer, or can be frozen to be eaten later in any recipe you like! I ate some of mine on their own with the peanut dipping sauce suggested in the original recipe. I wasn't a fan of the sauce because it had a coconut milk base that was too sweet for me, but with a regular peanut sauce or Thai chili sauce, these would be great!

I then discovered that throwing the meatballs in a sub bun with carrot slaw, cilantro, and lots of peanut sauce made for one of the best sandwiches I've ever had. It was really messy but as long as I ate it in private so no one would see my sauce covered face and hands, it was amazing! I think the meatballs would also be great in a peanut noodle dish or a coconut curry soup - be creative and let me know what works!

I hope to start experimenting with more authentic Thai dishes soon, and hopefully I'll end up with a few successful recipes to share with you guys!

thai turkey carrot meatball sub
Thai Carrot & Turkey Meatballs

Adapted from Foodland Ontario, as seen on 50Plus

Makes about 50 small meatballs

Ingredients:

3 cups grated carrot (about 2-3 large carrots, weighing about 1 pound total)
2 cloves garlic, minced
1 large egg
1/2 cup minced cilantro
1 tablespoon grated fresh ginger
2 tablespoons fresh lime juice
1/4 teaspoon lime zest
1 tablespoon honey
2 teaspoon fish sauce
1 teaspoon chili-garlic sauce (or more for more spice)
1/2 teaspoon salt
1-1/2 teaspoons ground coriander
1 pound lean ground turkey
1/2 cup breadcrumbs

Directions:

Preheat oven to 375F. Line two baking sheets with parchment paper.

Add all ingredients except for the last two (breadcrumbs and turkey) to a large bowl and mix well. Add breadcrumbs and ground turkey and mix in until everything is thoroughly combined.

Roll about 1 tablespoon of the turkey mixture into a ball and place on the parchment paper-lined baking sheet. Repeat with the rest of the mixture, until you have about 50 meatballs. Place in preheated oven and bake 12-16 minutes, rotating pans halfway through, until meatballs are firm and no longer pink inside.

Serve warm on skewers with a peanut sauce dip, sweet chili sauce, or other dipping sauce.

To make Meatball Subs:

I used a white baguette for the bun, covered the bottom half in a storebought broccoli-carrot slaw that I'd coated in a good amount of (storebought) peanut sauce, placed as many turkey meatballs as I could fit on top of that, sprinkled some fresh cilantro on top, then added another drizzle of peanut sauce.

April 06, 2012

Carrot Hummus

There's been a ton of cute Easter recipes floating around the internet lately, but they're mostly all for desserts. Of course there's nothing wrong with that, and I even contributed to the pile of nest/basket-themed Easter dessert recipes myself with these mini Easter basket lemon mousse tarts. But when I came across an idea on Pinterest for baby carrots planted in hummus pots, I thought it was so refreshing to see a healthy (but still adorable) Easter recipe!

I had no intention of copying the idea myself until I realized that they would give me the perfect excuse to make a carrot hummus, which I'd been wanting to try for a while. Because what's better than carrots planted in regular hummus? Carrots planted in carrot hummus, of course!

I found a recipe for carrot hummus on Pip & Ebby and only made a few slight changes to suit my tastes. Slicing and boiling the carrots seemed to be the fastest and easiest method to cook them before adding them to the hummus, but I saw other recipes where the carrots were roasted instead, which would probably give them a deeper flavour. I just didn't feel like waiting that long, so choose your cooking method depending on your own preferences!

Once the carrots are cooked, all that's left to do is blend them up with the standard hummus ingredients and season, season, season! As long as you keep tasting as you make hummus, I think it's pretty impossible to ever end up with an end product that you don't like. I kept mine pretty simple, but I could imagine lots of different spins on the recipe that would add even more flavour: adding ginger and sesame oil for an Asian-inspired hummus; adding cayenne, cinnamon, and more cumin for a Moroccan-inspired hummus; or adding cardamom and more honey for a slightly sweeter hummus - be creative!

To serve the hummus, I spread it in a wide, shallow bowl, and "planted" little sprigs of carrot greens in rows to look like a carrot patch. At first I didn't attach baby carrots to the carrot tops because I didn't want to copy the original idea exactly, but halfway through photographing the dish I added them in just to see what it would look like, and it looked a million times better! If you're serving this hummus for Easter or any other spring gathering, I'd highly recommend checking out Pottery Barn Kids to get the instructions on how to plant baby carrots in the hummus!

I think this would make a great appetizer for an Easter gathering, but I've been enjoying eating it on my own all week as a dip for carrots and crackers - it's really tasty! I had planned on trying to save some for our Easter gathering on Sunday, but there won't be any left by then so I might have to make another batch!

Hope you all have a great Easter, Passover, or just enjoy the long weekend!


Carrot Hummus

Recipe adapted from Pip & Ebby, Carrots in hummus idea inspired by Pottery Barn Kids

Makes about 2 cups

Ingredients:

1 cup sliced carrots
1 19-oz can chickpeas
1/4 cup tahini
3 tablespoons lemon juice
1/2 tablespoon honey
2 cloves garlic, minced
1/2 teaspoon cumin
1/4 teaspoon paprika
Generous pinches of salt and pepper (to taste)
2 tablespoons olive oil

Directions:

Place chopped carrots in a large saucepan and cover in water. Bring to a boil, cover, and let cook 5-8 minutes, until carrots are tender. Drain and rinse with cold water to cool.

Place all ingredients except for the olive oil in the large bowl of a food processor and blend until smooth. Slowly add olive oil through the feed tube while processing.

Taste and adjust any seasonings to your liking – I added more lemon juice and salt, but if you wish it to be sweeter you could add more honey, or for more spice, try increasing the cumin and adding some cayenne!

April 04, 2012

Easter Basket Lemon Mousse Tarts

Easter basket lemon mousse tartsWhen I returned from my trip to Asia (aka two weeks of eating out for every meal), I was very eager to get back in the kitchen and start cooking for myself - though I certainly did not miss having to clean up after meals! And with only a week until Easter, I wanted to make sure I fit in at least one Easter recipe on the blog before Sunday!

Easter nest and basket recipes seem to be really popular this year - I've seen a lot of cupcakes and cookies that are either topped with toasted coconut and mini eggs to resemble a bird's nest, or green coconut and jelly beans to resemble an Easter basket, both of which look absolutely adorable!

Easter basket lemon mousse tartsWhen I saw this recipe for Easter Basket Cookies from Betty Crocker, I thought it was a great idea because it looks just like a little basket and can be filled with any type of filling you like! I decided that instead of using a cookie dough to form a basket, I would take an even easier approach and use mini tart shells.

I wanted to fill the tarts with something other than a standard icing (which I hate), and since lemons always remind me of spring and Easter, I decided to fill the tarts with a light and fluffy lemon mousse.

Easter basket lemon mousse tarts
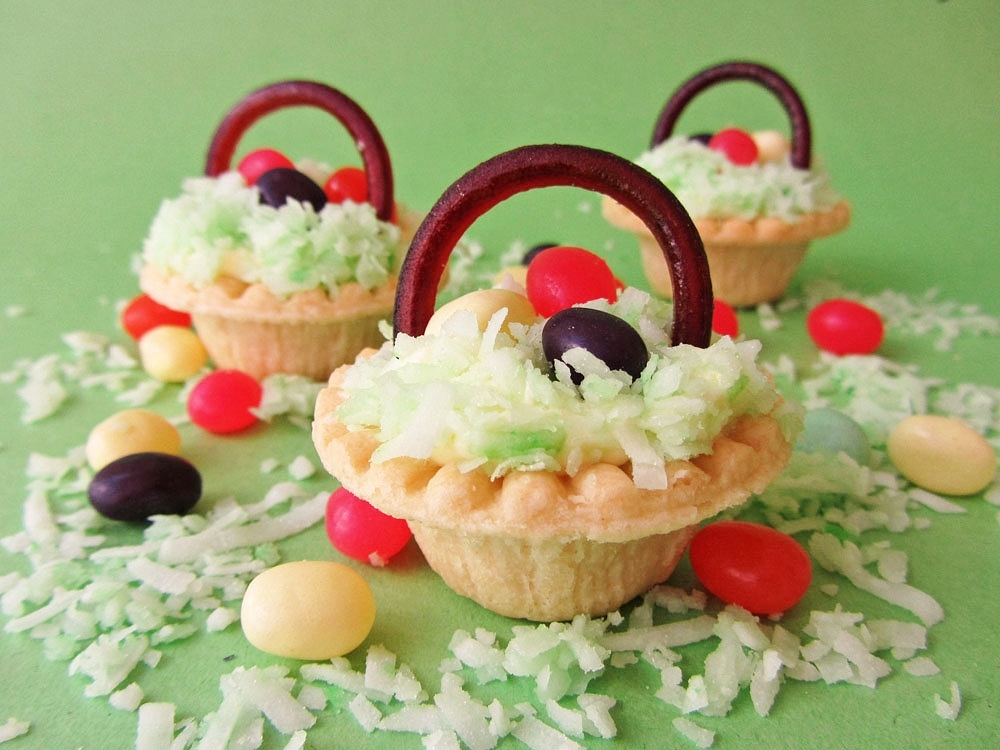
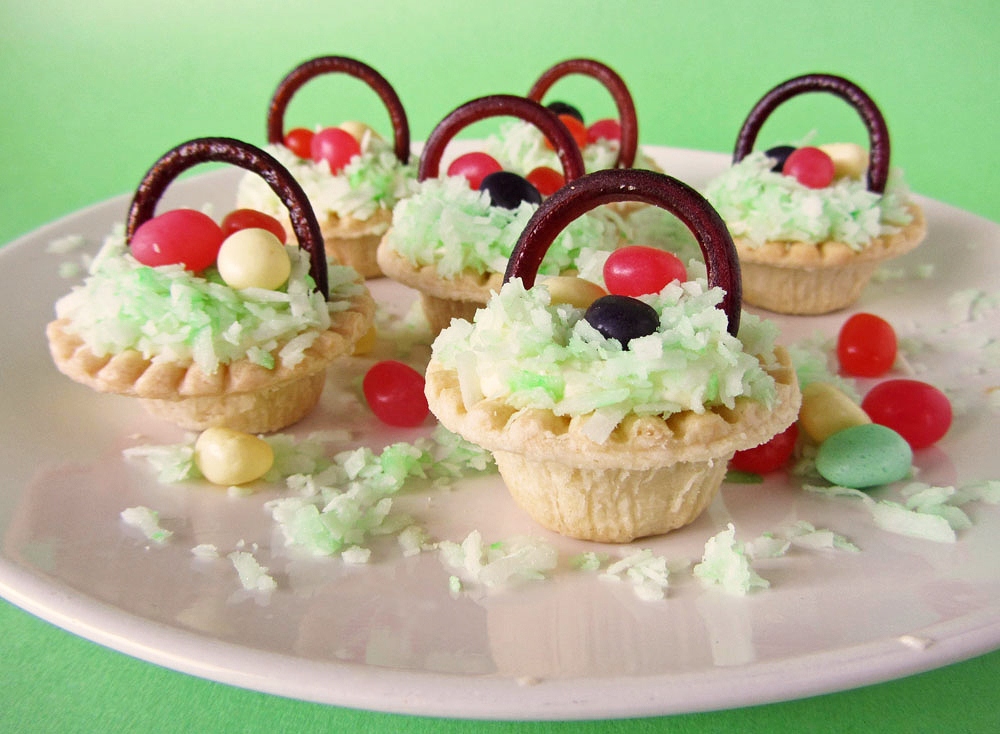
The coconut and jelly beans were obvious choices for the top, but I had a hard time thinking of something edible to make the basket handle out of. I saw some recipes that used shoestring licorice, but I didn't really want to buy a big package of licorice that I would never eat.

Then my genius sister suggested that I use fruit bars instead:

The SunRype fruit snacks I bought were already shaped in little ropes that could easily be cut apart, and they were the perfect length for a basket handle. Plus they made for at least one (semi) healthy ingredient in these tarts! I do wish I could have found something more basket-coloured to match the tart and make it look like a complete basket, but I couldn't think of anything - if you have an idea, let me know!

Once the lemon mousse is made, assembling the baskets is super easy and really fun! Even the lemon mousse isn't difficult to make, it just takes a bit of time because you have to allow for cooling. The only hard part is not eating the whole bowl of lemon mousse with a spoon before it makes it into the tarts - it's soooo good!

Easter basket lemon mousse tartsThe end result was these adorable little Easter baskets that I was so happy with! I love that they're bite-sized so they would make a great addition to an Easter dessert spread. The lemon mousse is creamy, fluffy, and tart, and is complemented nicely by the coconut.

I admit that jelly beans and fruit bars don't exactly go with lemon mousse tarts, but the idea is that you would pick those parts off to eat first or save to eat later (or not at all in my case, as I'm not really a fan of jelly beans!), then eat the lemon mousse tart on its own. Kids would probably have no problem eating them all together though!

Easter basket lemon mousse tartsIf you want a more grown-up dessert to serve on Easter, or if you don't celebrate Easter, you could of course leave off the toppings and serve simple lemon mousse tarts - they're still delicious on their own!

And if you're looking for other Easter dessert ideas, I've started a Pinterest board with lots of incredible Easter treats from other blogs, so be sure to check it out!

Easter basket lemon mousse tarts

Easter Basket Lemon Mousse Tarts

Inspired by these Easter Basket Cookies; Lemon Mousse recipe adapted from Bon Appetit, via Epicurious

Makes 18 mini tarts

Ingredients:

For the Mousse:
1/2 cup sugar
1/4 cup + 2 tablespoons fresh lemon juice
1 tablespoon + 1 teaspoon lemon zest
3 large egg yolks
1 large egg
3/4 cup chilled whipping cream

For the Tarts:
18 frozen mini-tart shells (I used one box of Tenderflake shells)
1 cup flaked sweetened coconut
Green food colouring
54 small jelly beans
18 short pieces of shoestring licorice or fruit snacks for basket handles

Directions:

Make the Lemon Mousse:

Whisk the sugar, lemon juice and zest, egg yolks, and egg together in a medium metal bowl. Set over a saucepan of simmering water, making sure the bowl doesn’t touch the water. Whisk constantly until mixture thickens and thermometer inserted into mixture registers 160°F, around 5 minutes. Transfer lemon curd to a separate bowl and let cool to room temperature, then cover and chill in refrigerator until cool.

Using an electric mixer with the whisk attachment, beat the whipping cream on high speed in a chilled bowl until medium-firm peaks form. Gently fold 1/3 of whipped cream into chilled lemon curd, then fold in remaining whipped cream. Store in the refrigerator until ready to fill tarts.

Assemble the Easter Basket Tarts:

Bake frozen tart shells according to package directions and let cool.

Add a few drops of green food colouring and a few drops of water to a medium ziplock bag. Add the coconut, close the bag, and toss to coat the coconut evenly. Add more food colouring for a stronger green colour if desired (I used three drops and got a very light green colour, as pictured).

Use a small spoon to fill each tart shell with the lemon mousse (don’t fill too much over the edge of the tart). Sprinkle coconut on top, top with 3 jelly beans, then insert both ends of licorice or fruit bar strand into the tart to form a basket handle, as pictured below:

Keep in refrigerator until ready to serve. You may have leftover lemon mousse and coconut depending on how much you used.

Ingredient Index

Related Posts Plugin for WordPress, Blogger...