So you may have noticed that my site looks ridiculous today because many of my photos have been temporarily removed by Photobucket. I've been in touch with them and they have informed me that they are doing the best they can to resolve the issue, so I'm hoping that all photos will be restored as soon as possible.
I apologize for the inconvenience and thank you for your patience! In the meantime, if you were planning on making a recipe today and need access to photos, please check my Facebook page where most recent photos have been uploaded, or feel free to email me at onceuponacuttingboard(at)gmail(dot).com and I can do my best to help you out.
Thanks and have a great day!
UPDATE: I believe the photos are working again now. If they are still not showing up for you, please clear your browser cache and try again - that should fix it. Thanks again!

February 28, 2013
February 22, 2013
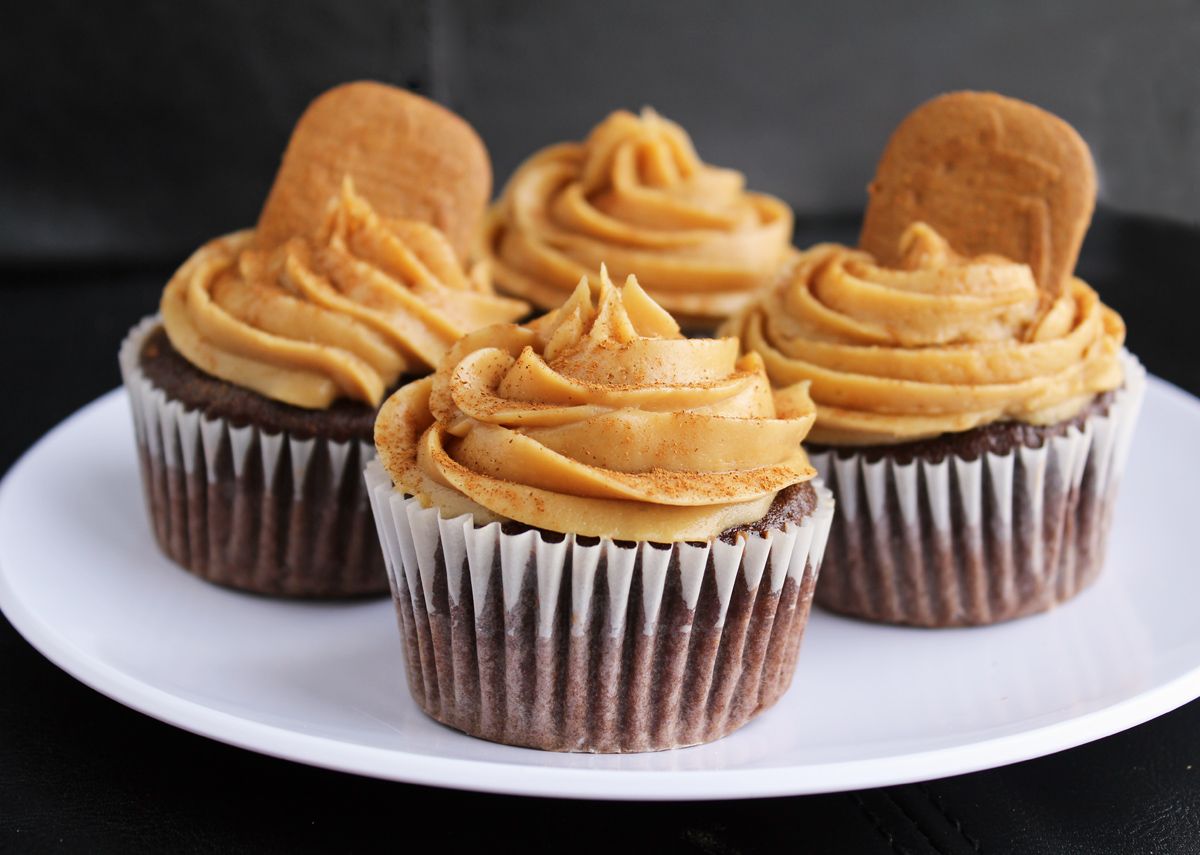
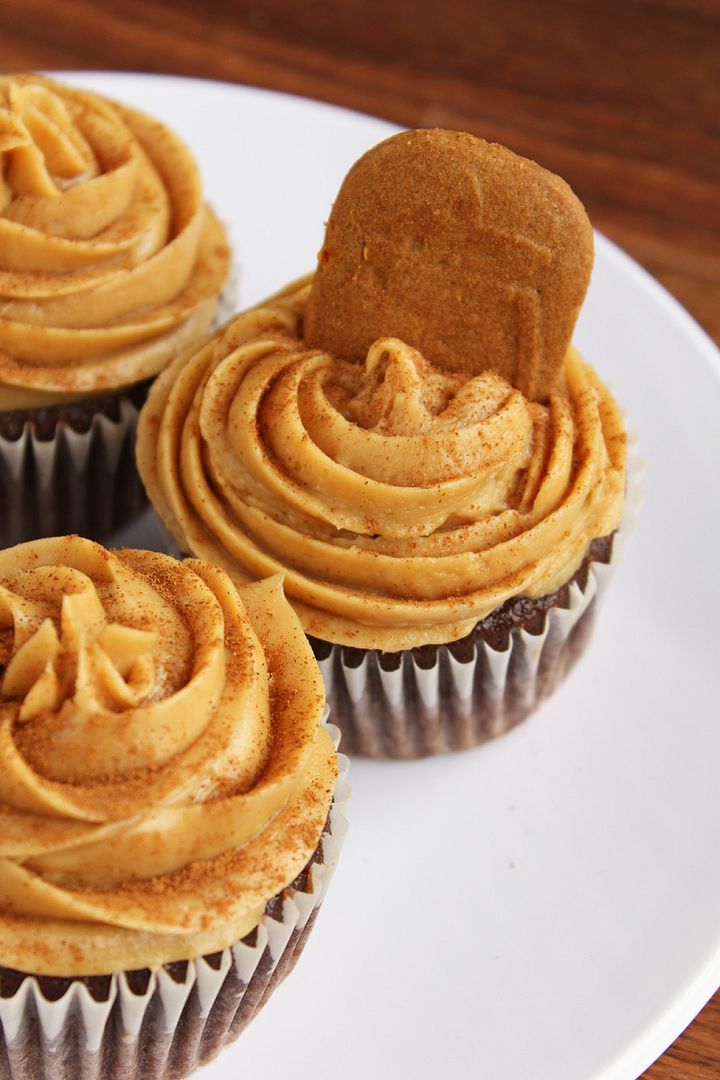
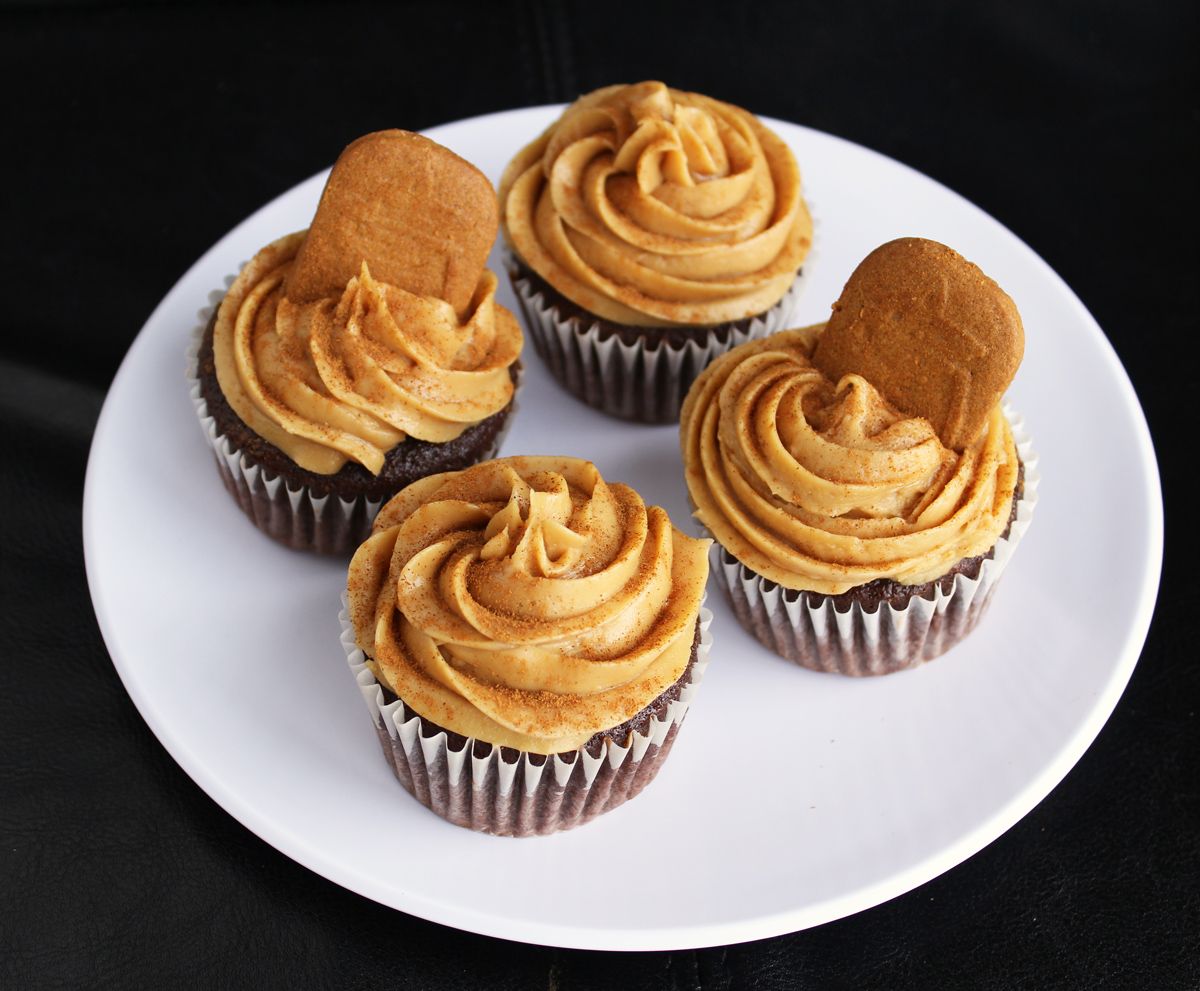
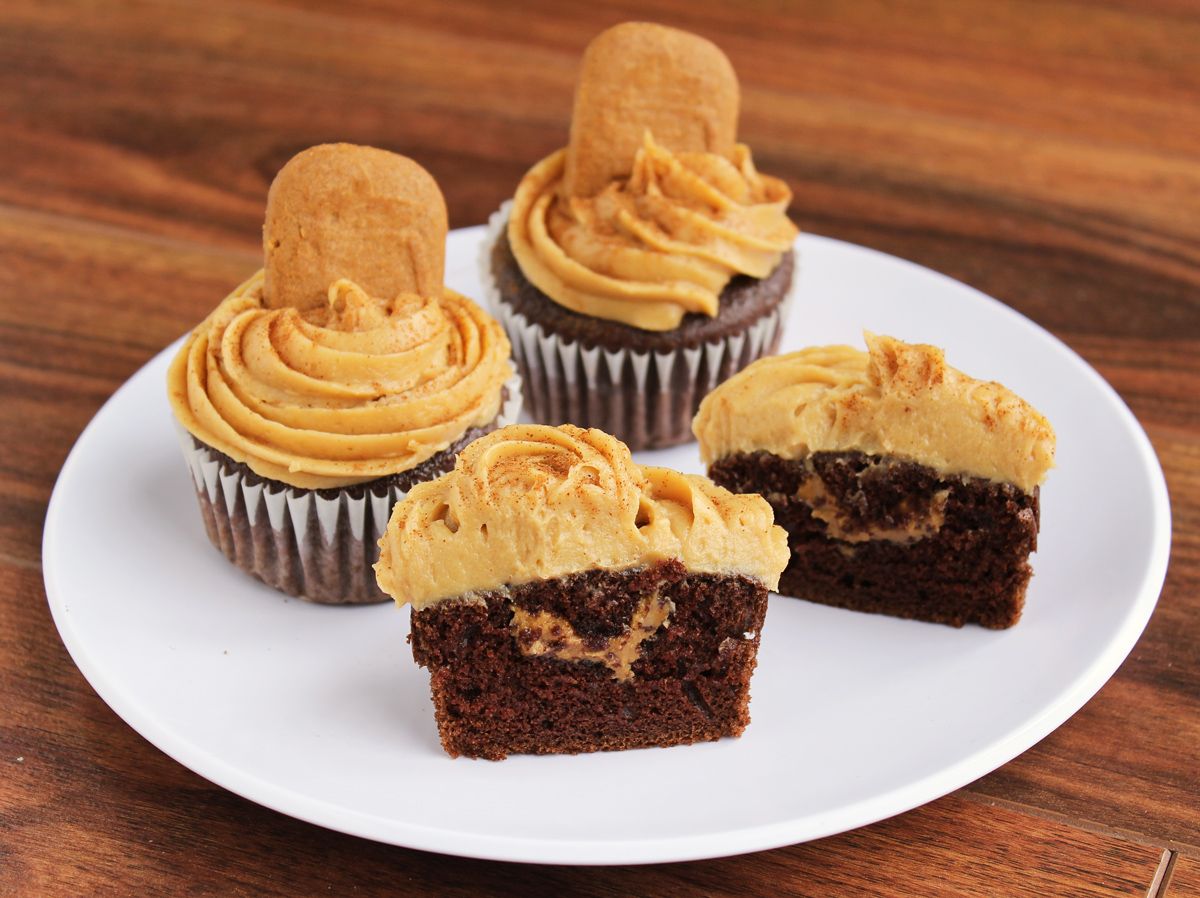
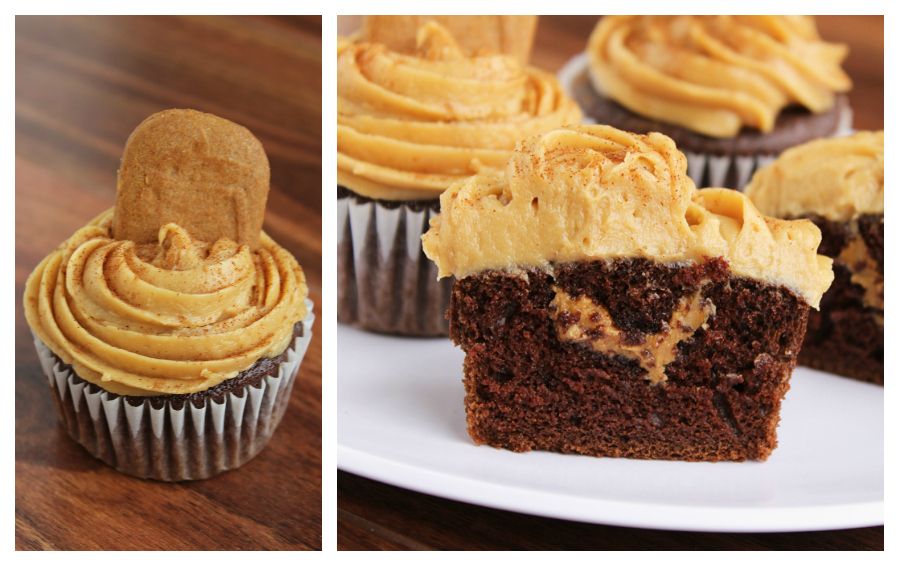
Chocolate Biscoff Cupcakes with Biscoff Cream Cheese Frosting
So this is the first Biscoff recipe on my blog, and I’m sure most of you are probably thinking that I’m the last one to the Biscoff party, which started almost two years ago. The thing is, Biscoff hasn’t really become as popular here in Canada as it has in the United States (or Europe, I assume, as that’s where it originated). In fact, when I sent these cupcakes to work with my boyfriend, he had to call me to ask me again what they were called because he had never heard of Biscoff, and apparently nobody at his work had either. And when I wrote about these cupcakes on Facebook, the first comment I got was asking me what Biscoff is.
So even though I feel like my fellow bloggers are probably already sick of Biscoff because it’s been popular on blogs for a while, in real life I don’t know anyone who’s even heard of the stuff, so I feel obligated to explain what it is! But if you’ve already seen a thousand Biscoff recipes and have gone through fifty jars of the stuff at home, feel free to skip past these next paragraphs :)
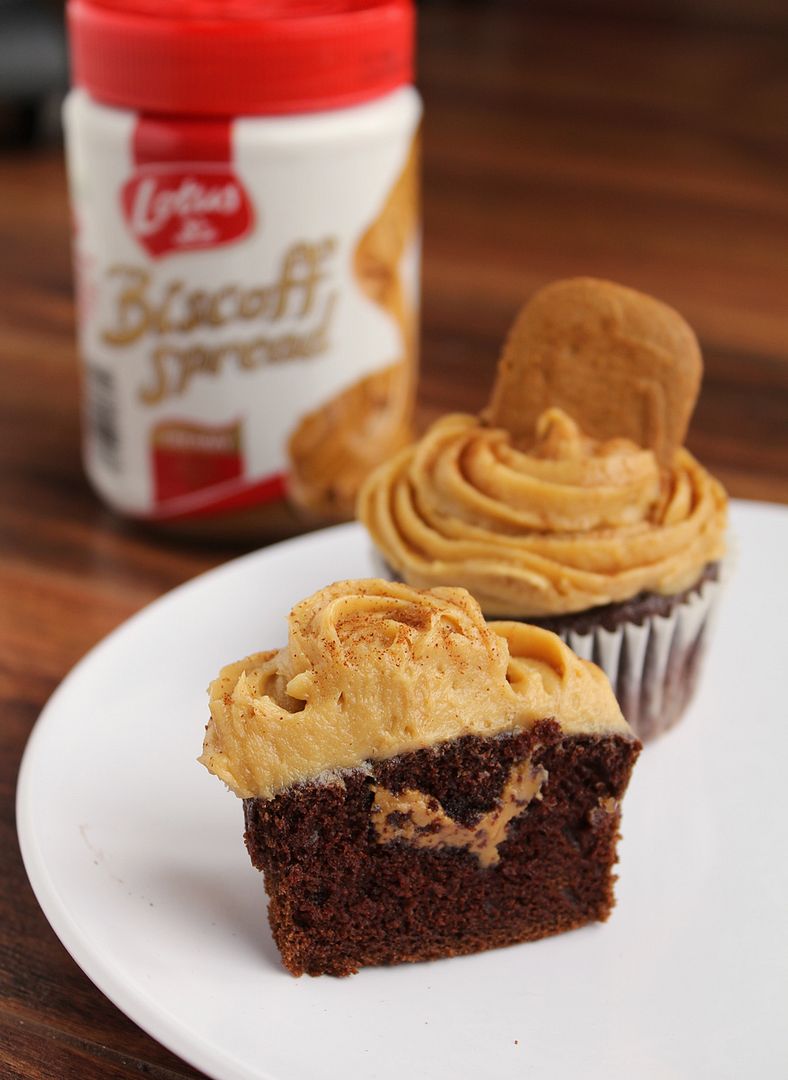
Biscoff cookies (“Europe’s favourite cookie with coffee”, according to their website), also known as Speculoos, are a crisp little Belgian cookie with a cinnamon/caramel/gingersnap-like flavour. They originated in Europe but grew in popularity around the world when airlines like Delta started handing them out on flights. A few years ago, the cookies were turned into a creamy spread with a consistency of peanut butter and taste of Biscoff/speculoos cookies. The main ingredient in the spread is cookies, which is why it’s also referred to as cookie butter. I think a lot of people eat the spread as they would peanut butter, such as on toast or as a dip for apples, but it’s also become really popular for use in baking. There’s a nice little slideshow on Huffington Post of some of the ways you can use Biscoff spread!
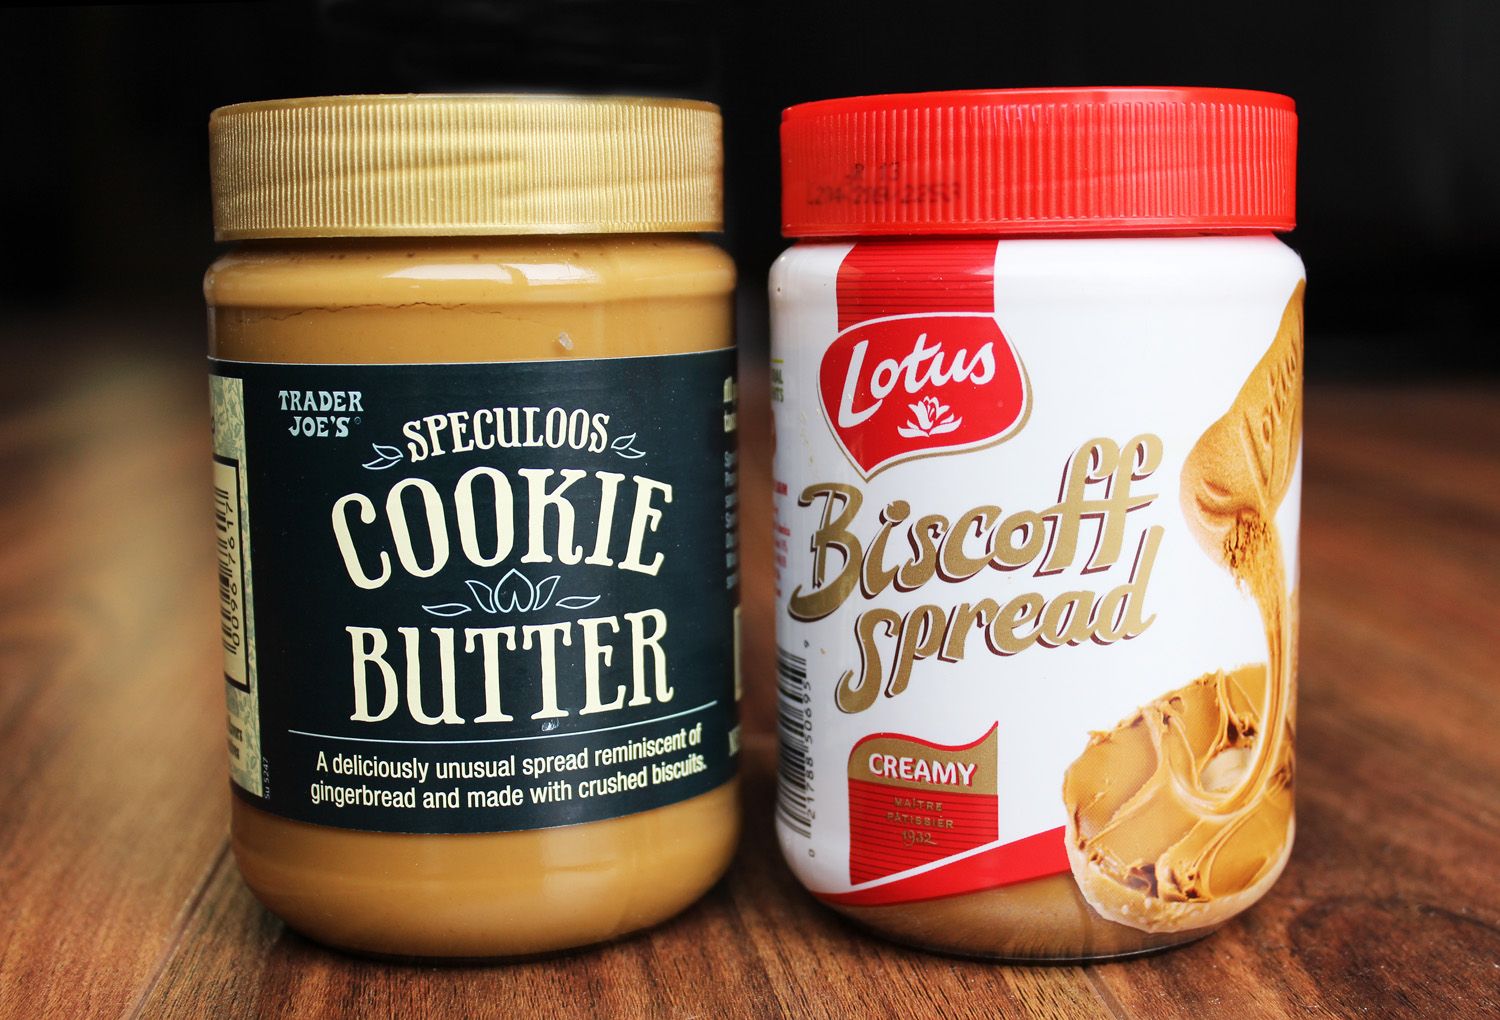
While it’s now available in many grocery stores in the United States, including Trader Joe’s, which has its own version called Speculoos Cookie Butter (pictured above), it hasn’t really appeared much in Canada yet, which is why most of my friends haven’t heard of it. I buy it when I go on trips to the US, but if you don’t live anywhere near the States (or Europe), I’d recommend looking in European grocery stores – I’ve actually spotted Biscoff at an Italian supermarket in Waterloo, Ontario, so it is out there!
I had a hard time choosing what to make for my first experiment with Biscoff. I’ve never really been a big fan of cupcakes, but I made some red velvet cupcakes on Valentine’s Day (which I posted about on Facebook, if you’re interested) and they turned out so well that they changed my mind about cupcakes. Plus they are so fun to decorate!
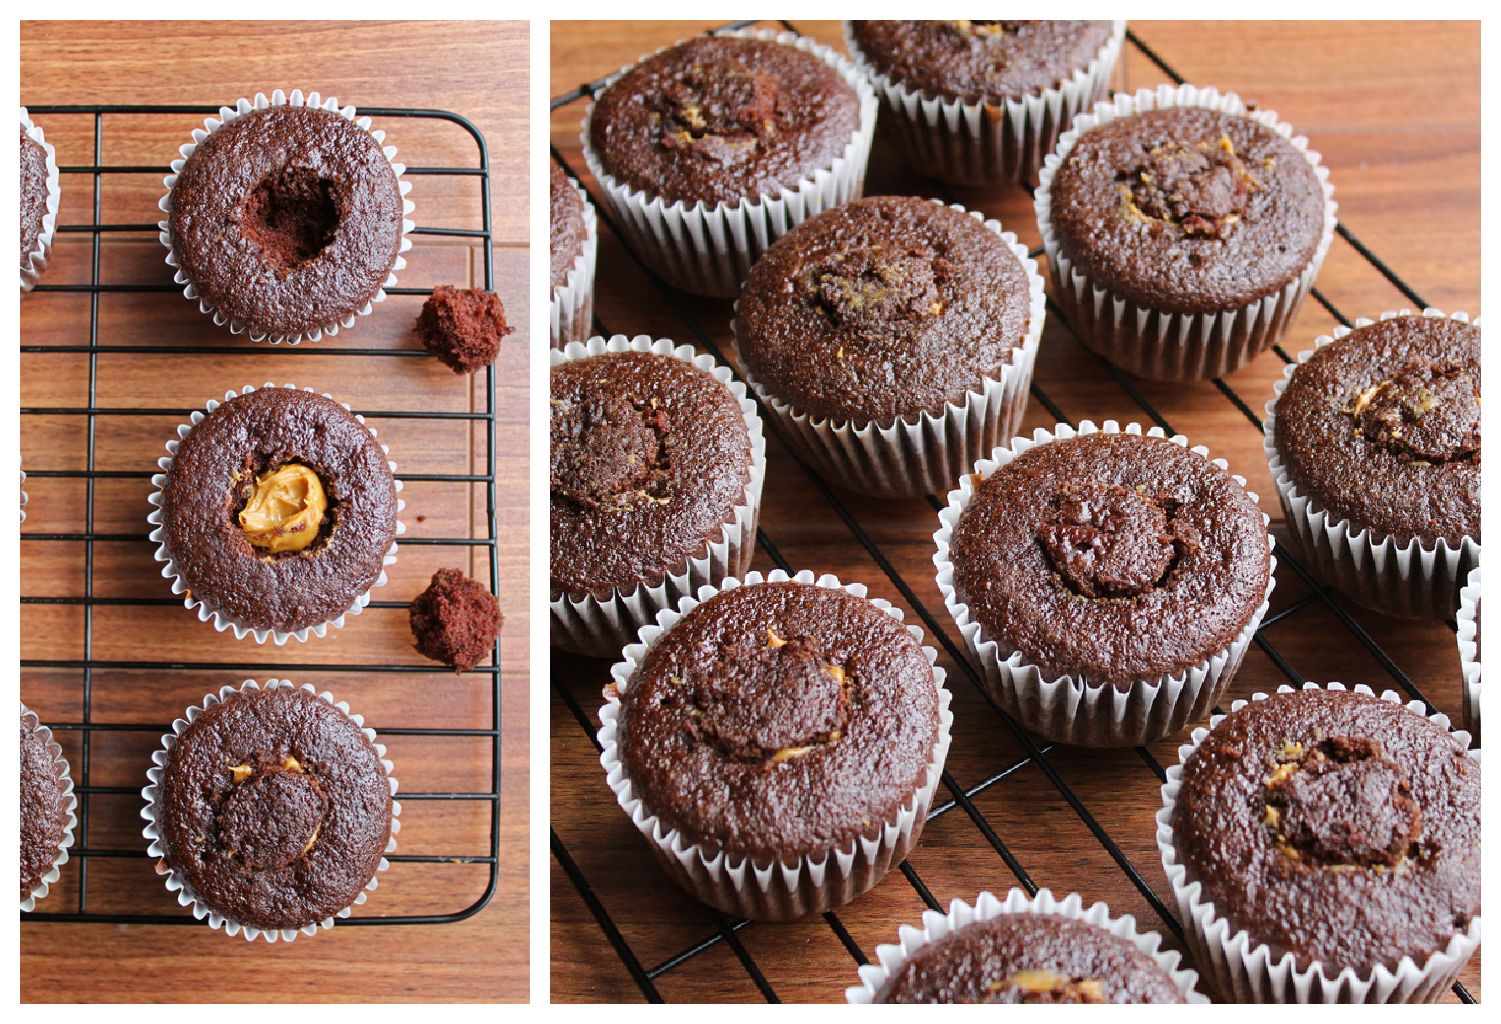
So I decided to make Biscoff cupcakes. My first thought was to make both the cupcake batter and frosting with Biscoff, but I thought that might be a bit too much, so I decided to go with a chocolate base instead. I used Beantown Baker’s idea of stuffing a little Biscoff inside the cupcake for a fun surprise, which was super easy – you just have to cut a hole in the top of the cupcake after they’re done, fill it with a spoonful of Biscoff, and cover it back up. Don’t try putting Biscoff in the center of the cupcake before you bake them – it will just sink to the bottom, trust me! Here’s a little visual of how to fill the cupcakes:
I was so happy with how these turned out! The Biscoff cream cheese frosting was my favourite part and the chocolate cupcake was the perfect complement to it, plus I loved the little surprise of Biscoff in the center! I ate two right after I made them then had to send the rest away to be shared before I got carried away, and I’m told they were very well received at work, even though most people probably didn’t know what they were eating!
I still have a jar and a half of Biscoff to use up, so now that I’ve introduced you guys to it, expect to see a few more recipes here in the near future!
And if you have a favourite Biscoff recipe or way to use it, please feel free to share in the comments, I’d love to hear your ideas!
Chocolate Biscoff Cupcakes with Biscoff Cream Cheese Frosting
Inspired by Beantown Baker, Chocolate cake recipe adapted from Hershey’s Kitchens, Biscoff frosting adapted from Biscoff
Makes about 12 cupcakes
Ingredients:
For the Cupcakes:
3/4 cup + 2 tablespoons all-purpose flour
1 cup sugar
1/4 cup + 2 tablespoons unsweetened cocoa powder
3/4 teaspoon baking soda
3/4 teaspoon baking powder
1/2 teaspoon salt
1/2 teaspoon cinnamon
1 large egg
1/2 cup milk
1/4 cup canola oil
1 teaspoon vanilla extract
1/2 cup brewed coffee
~1/4 cup Biscoff spread for filling
For the Frosting:
8 oz brick of cream cheese
1/2 cup Biscoff spread
1/2 cup icing sugar
1/4 teaspoon salt
1 teaspoon vanilla extract
Directions:
Preheat oven to 350°F. Line a muffin tin with paper liners and spray with non-stick spray.
In a large bowl, whisk together the flour, sugar, cocoa powder, baking soda, baking powder, salt, and cinnamon until well combined. In a separate bowl, whisk the egg, milk, oil, and vanilla extract until smooth. Add the wet ingredients to the dry ingredients and mix well until smooth. Stir in the coffee; batter will be thin. Use a measuring cup to pour batter into liners, filling them only 2/3 full. Bake in preheated oven for 22-25 minutes, until a toothpick inserted in the middle comes out clean. Transfer to a wire rack and let cool completely.
Meanwhile, prepare frosting. Beat the cream cheese and Biscoff together with an electric mixer until smooth, about 2 minutes. Slowly add the icing sugar and mix on low speed until combined. Mix in the salt and vanilla.
Once cupcakes have cooled, use a sharp knife to cut a small cone out of the top of the cupcake. Remove the top and fill with about 1 teaspoon of Biscoff spread. Replace the top and push down to hide the biscoff inside the cupcake and create a flat surface on the top of the cupcake. (see here for pictures of the cone filling method).
Transfer cream cheese frosting to a piping bag (I fitted mine with a Wilton 1M tip) and frost cupcakes. I decorated mine with Biscoff/Speculoos cookies and a dusting of cinnamon.
February 19, 2013
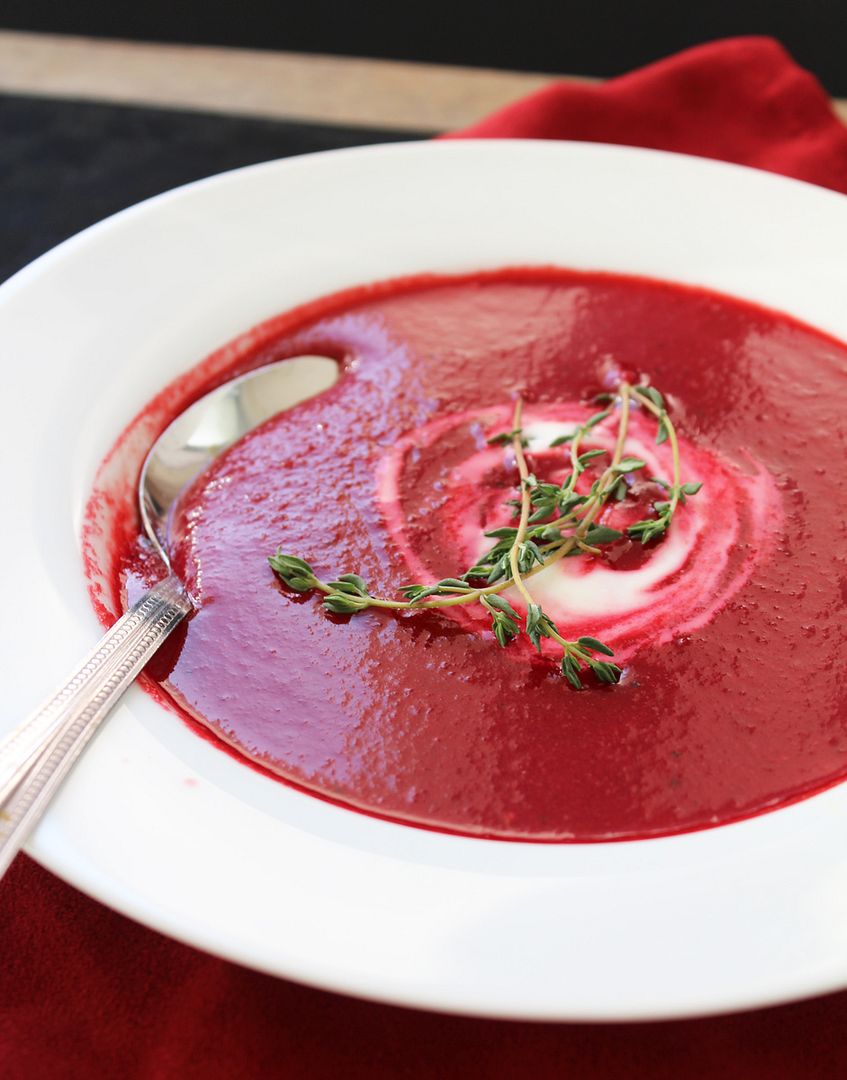
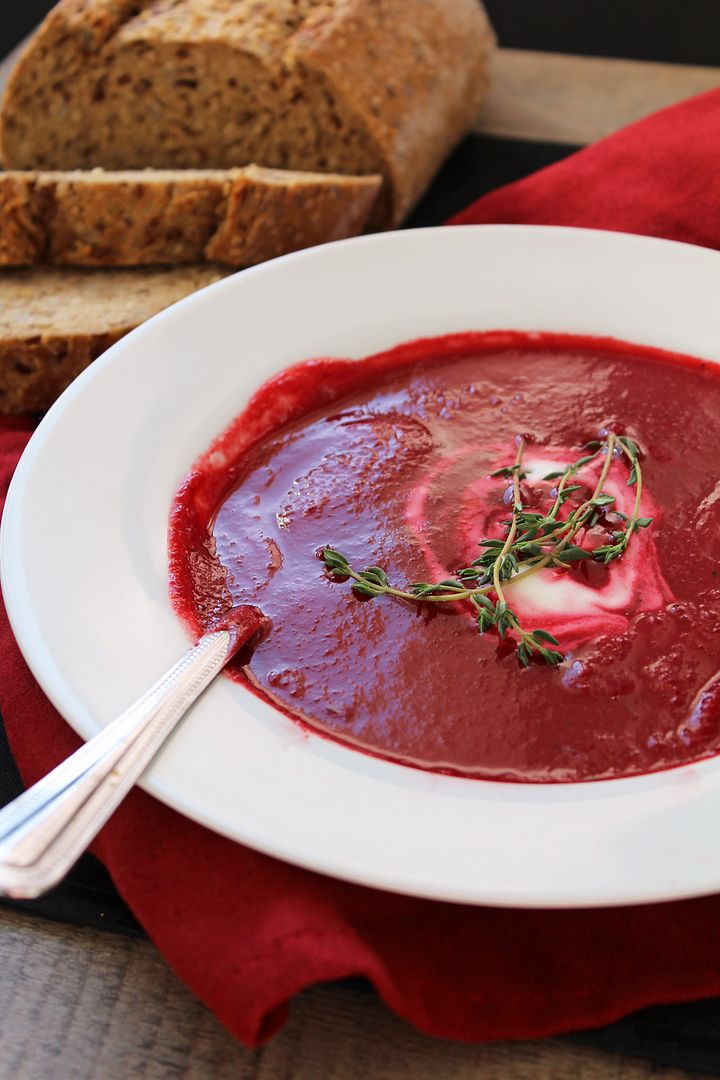
Beet & Potato Soup
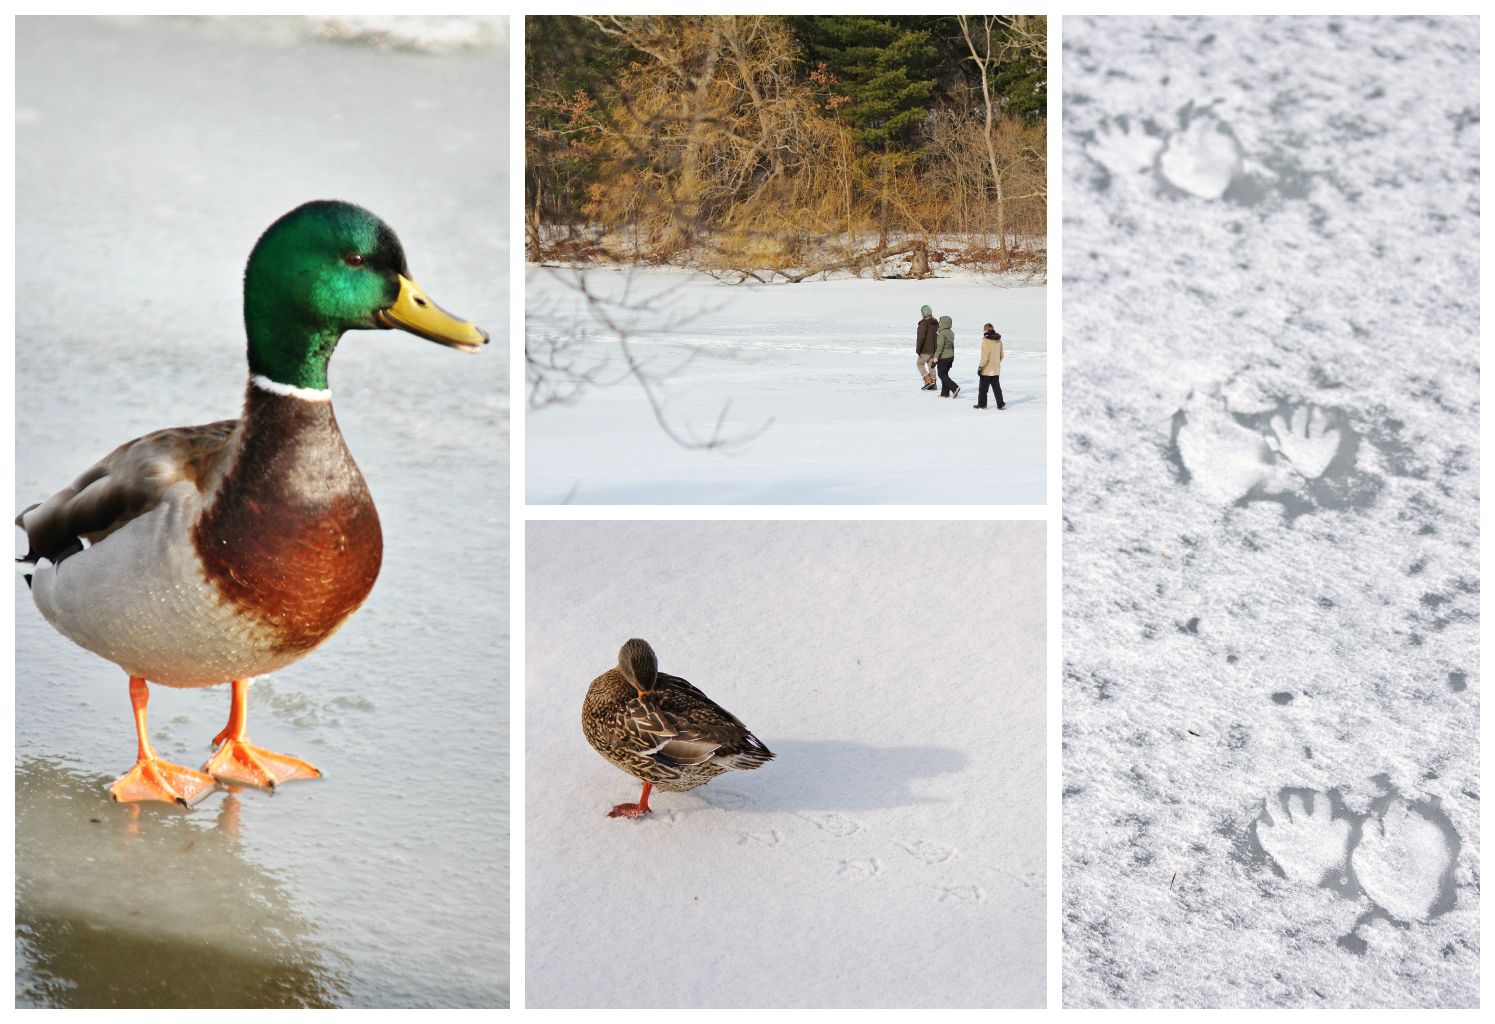
I hope that those of you who had the day off yesterday enjoyed your long weekend! Yesterday was a holiday for many of us here in Ontario - we don’t celebrate President’s Day (obviously, as we don’t have presidents in Canada), but we do celebrate Family Day on the third Monday of every February.
I love the idea of a holiday that celebrates the family and encourages families to spend time together. This was actually the first year that every member of my family had the day off and could get together, so we took the opportunity to go for a wintery family walk along a trail around a frozen pond. Even though I think I risked my life a thousand times because the trail was pretty much all ice and my boots do not seem to have even the slightest bit of traction, it was still a great way to get outdoors and spend some time with my wonderful family! Here’s a little glimpse of our walk – the ducks were my favourite part :)
After spending a day outside in the cold, nothing is more comforting than a warm bowl of thick soup and a hearty loaf of bread. Unfortunately I didn’t have any of this beet and potato soup left to enjoy so I had to settle for an Earl Grey tea latte from Starbucks, but just looking at these photos as I prepared them for this post had me craving this soup so bad!
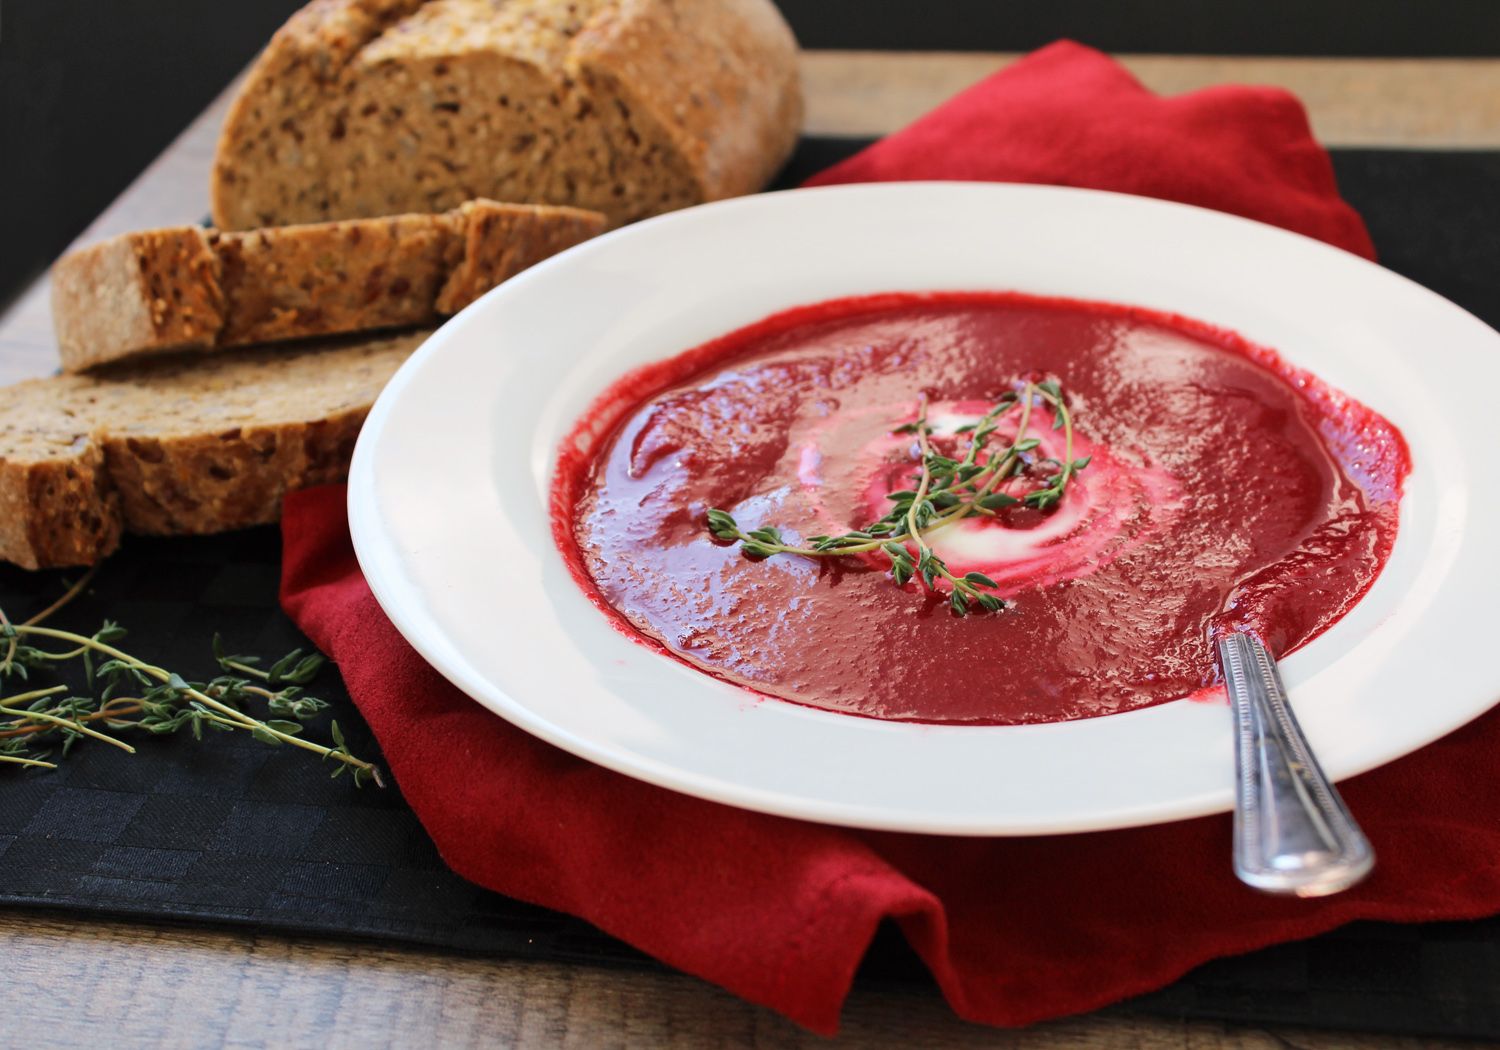
I won't bore you with a long description of this soup except to say that it’s thick and creamy but still healthy, and is a gorgeous red colour! The first time I made this I used chicken broth but thought it didn’t quite work, so the next time I used vegetable broth, and also increased the cumin for more spice and let the soup simmer longer so the flavours would intensify, and it was so much better! If you hate beets, I’m not going to try to convince you to try this because the beet flavour is really front and center, but if you’re a beet lover like me then you will love this!
Beet & Potato Soup
Adapted from Cooking Light
Serves 3-6, depending on serving size
Ingredients:
1 tablespoon olive oil
1 medium yellow onion, chopped
2 cloves garlic, minced
1/2 teaspoon salt
1/4 teaspoon pepper
1 teaspoon cumin
4 cups vegetable broth
1 pound of beets, peeled and quartered
1/2 pound yellow potatoes, peeled and cubed
1 bay leaf
1-2 sprigs of fresh thyme
2 teaspoons fresh lemon juice
1 teaspoon honey or agave
Sour cream or plain yogurt for topping
Directions:
Heat oil in a large saucepan over medium-high heat. Add onion and sauté for about 5 minutes, stirring occasionally, until softened. Add garlic and cook for another 30 seconds. Add salt, pepper, and cumin, stir to coat and cook for another 30 seconds.
Add vegetable broth, beets, potato, bay leaf, and thyme. Bring to a boil, then reduce heat and let simmer for 30-35 minutes, until beets and potato are tender. Remove bay leaf and thyme sprigs. If soup has reduced considerably, add a splash of water.
Puree soup in three batches in a blender. Remove the plastic stopper in the blender lid and cover with a paper towel or tea towel to let steam escape. After pureeing each batch, transfer to a bowl, then once all the soup has been pureed, transfer back to the saucepan to heat through, if necessary. Add 2 teaspoons of lemon juice and taste. Add an additional teaspoon of lemon juice and 1 teaspoon of honey or agave to sweeten, if desired.
Serve each portion with a swirl of sour cream or yogurt. Season with salt and pepper if desired.
February 14, 2013
25 Heart Shaped Foods for Valentine's Day

Happy Valentine's Day!
While some people will likely be going all out today with a romantic dinner, chocolate, and flowers, some will be protesting with an anti-Valentine's Day party, and probably many will just be treating it like any other day, I think we can all agree on the spirit of Valentine's Day - to remind ourselves to show our love and appreciation to all of the important people in our lives, whether it's a significant other, children, parents, siblings, friends, or coworkers. And of course, to drink wine and eat adorable heart-shaped food, right?
In this spirit, here are 25 heart-shaped foods, both sweet and savoury, to enjoy today or any day you feel like treating a loved one (or yourself) to something special. Hope you all have a great day!
Savoury Ideas:

Heart shaped personal pizzas with heart shaped toppings
Heart shaped breadsticks by Mealpod
Heart shaped palmiers by Willow Bird Baking
Green salad with pink goat cheese hearts by Joy the Baker
Caprese salad with heart shaped mozzarella by Education.com
Roasted beet hearts with nut cheese by Naturelita
Heart shaped beet & goat cheese ravioli
Roasted heart potatoes by Haniela’s
Butternut hearts by Sweet Roots
Mozzarella cheese filled hearts with roasted red pepper pesto by Hungry Happenings
Mini grilled cheese hearts by All You
Sweet Ideas:
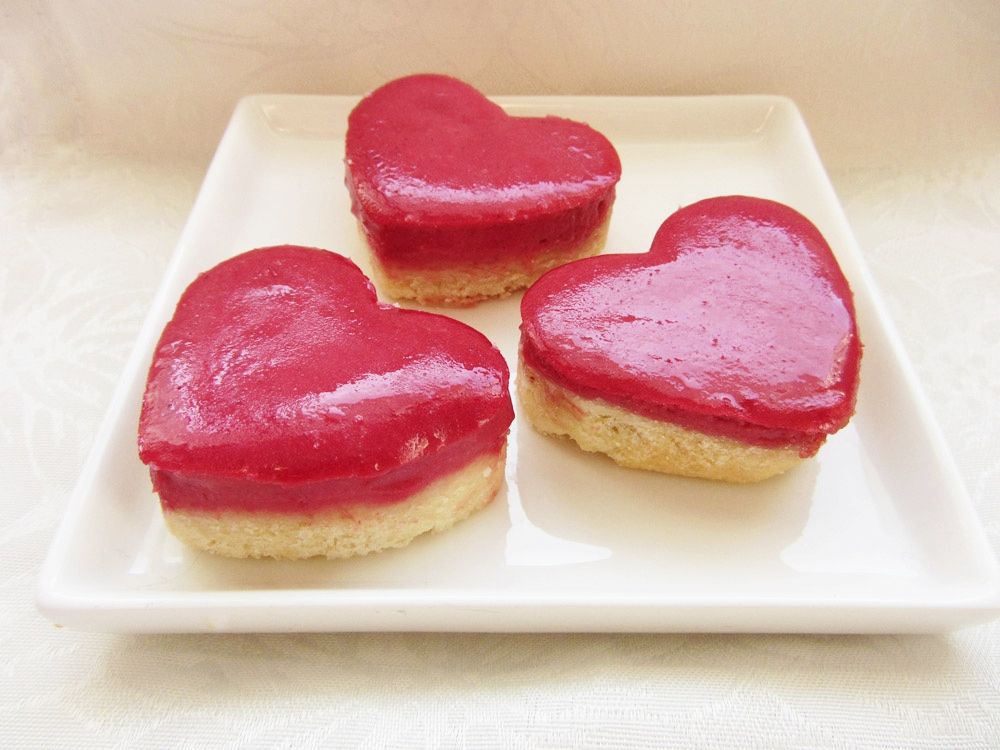
Raspberry shortbread heart cookies
Heart shaped chocolate sandwich cookies by Table for Two
Peppermint candy hearts by A Chow Life
Heart shaped peppermint patties by Erin Cooks
Heart shaped dipped krispies by Joy the Baker
Heart shaped cherry nutella pop tarts by Pink Parsley
White chocolate cherry hand pies by Munchin with Munchkin
Raspberry white chocolate cheesecake bars by All You
Red velvet whoopie pies by Annies Eats

Heart shaped marshmallows by All You
Molten chocolate souffle and lava cake by Knitty Baker
White and dark hearted brownies by Smitten Kitchen
February 12, 2013
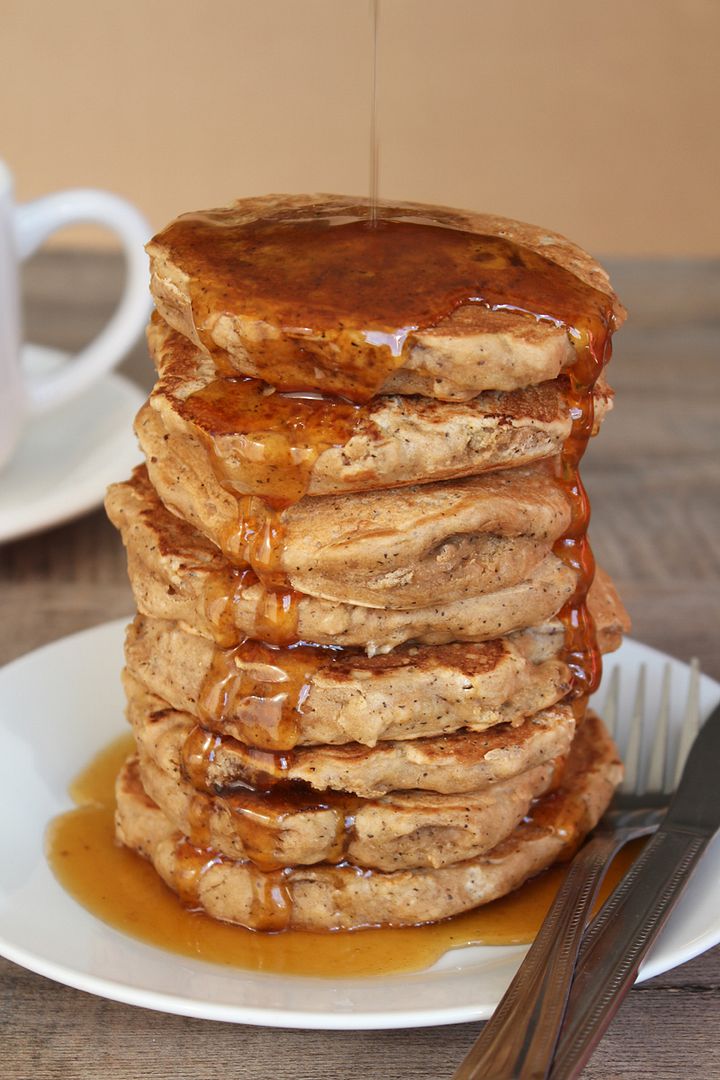
Earl Grey Vanilla Tea Pancakes with Honey Tea Syrup
Happy Pancake Tuesday!
For those who have never heard of it, Pancake Tuesday (aka Shrove Tuesday, aka Fat Tuesday) falls on the day before Lent every year, and is associated with the practise of using up richer “fatty” foods like eggs, milk, and sugar (hence the pancakes) before the fasting season of Lent begins.
I don’t think it serves much of the same purpose today (at least not for me, as I don’t give anything up for Lent), but it’s still a great excuse to eat pancakes for dinner! Pancake Tuesday in my household always meant a big feast of at least four different types of pancakes for dinner, so you can see how it easily became a favourite holiday for me as a kid. Now that I don’t live at home, I still carry on the tradition of pancakes for dinner for myself, but also use it as a chance to test out new and exciting pancake recipes!

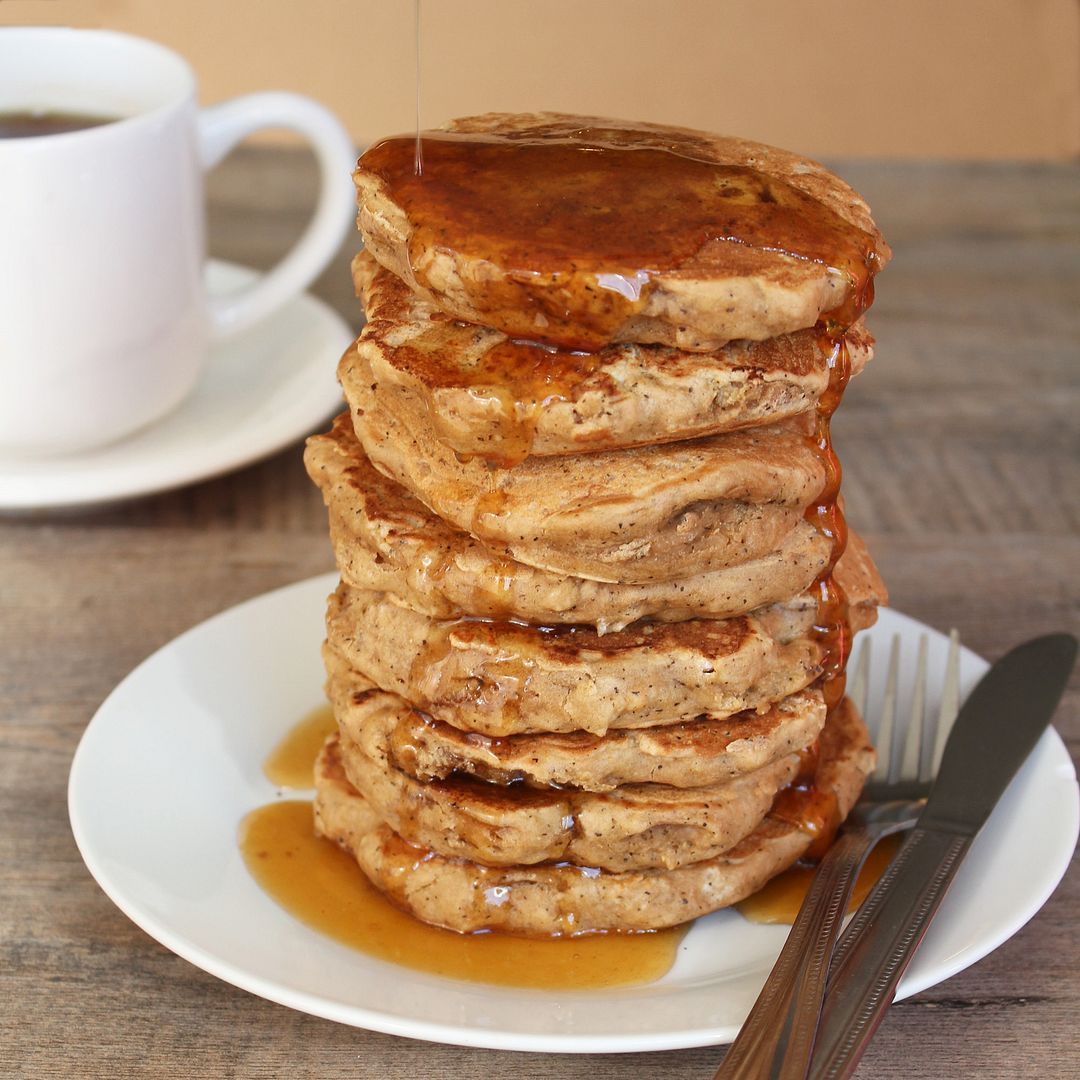
Last year I created coffee-flavoured pancakes with my delicious caramel latte pancakes, inspired by my favourite Starbucks latte. This year I decided to create pancakes inspired by my favourite tea drink, the London Fog.
A London Fog is a tea latte made with steamed milk, Earl Grey tea, and vanilla syrup. Apparently Starbucks no longer calls it a London Fog and just uses the much more boring name of Earl Grey Tea Latte, but at Second Cup and Williams you can still order a London Fog, which I think sounds so much classier!
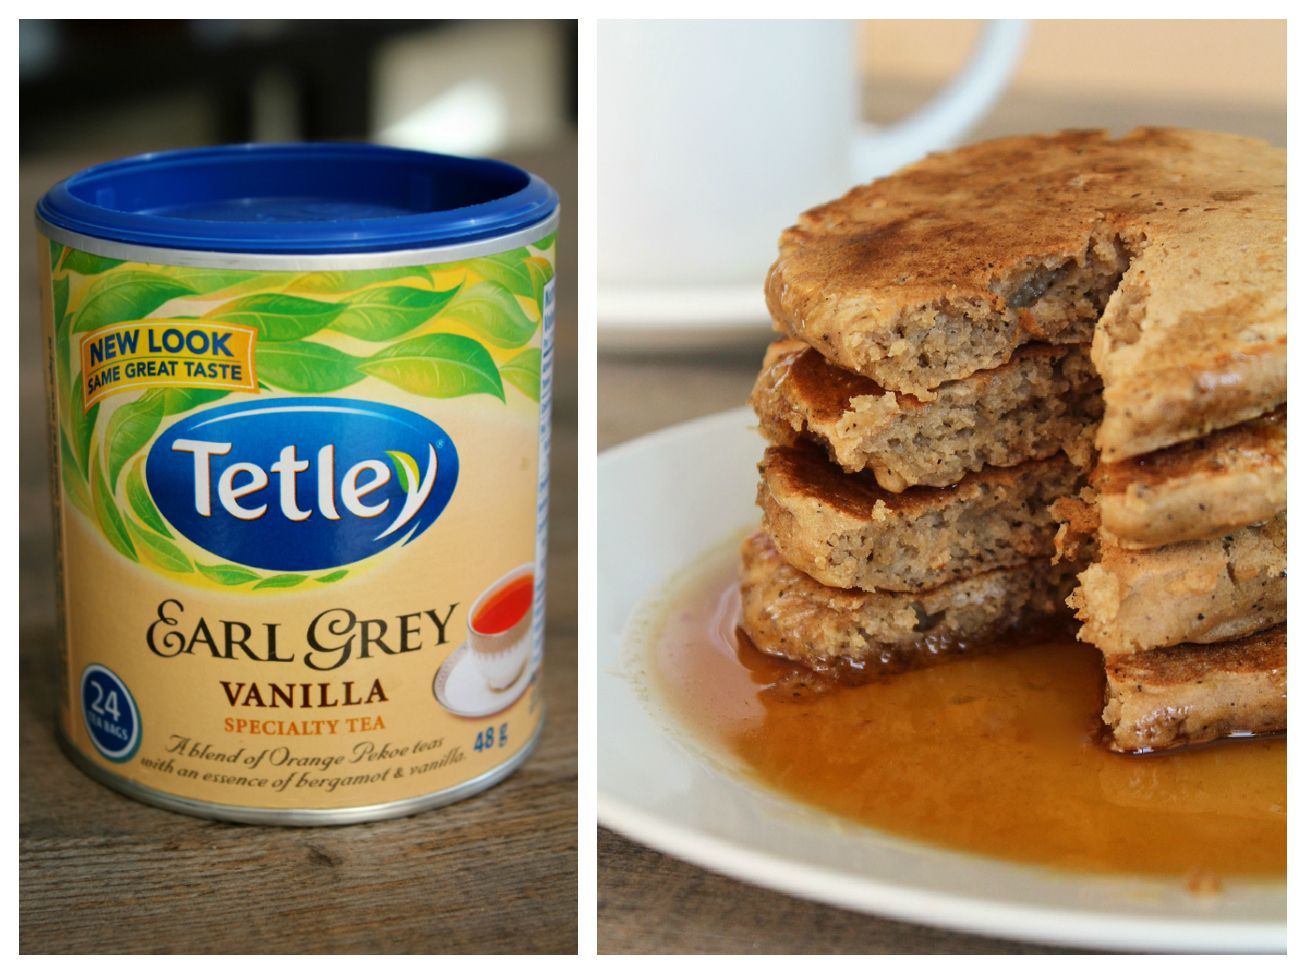
To recreate those flavours in pancakes, I knew I needed to infuse Earl Grey Vanilla tea (if you can’t find the vanilla flavour, just use regular Earl Grey) and vanilla extract into the pancakes. Baking with tea can get tricky because unlike coffee, it can be difficult to get a strong tea flavour to come out in the final baked good.
In my first attempt at these, I steeped vanilla almond milk with the tea before mixing the milk into the batter. They turned out well with a lovely Earl Grey fragrance, but the tea flavour wasn’t quite strong enough. In my second attempt, I still steeped the milk but also added a bag of tea to the dry ingredients and infused tea into a honey vanilla syrup to serve with the pancakes.
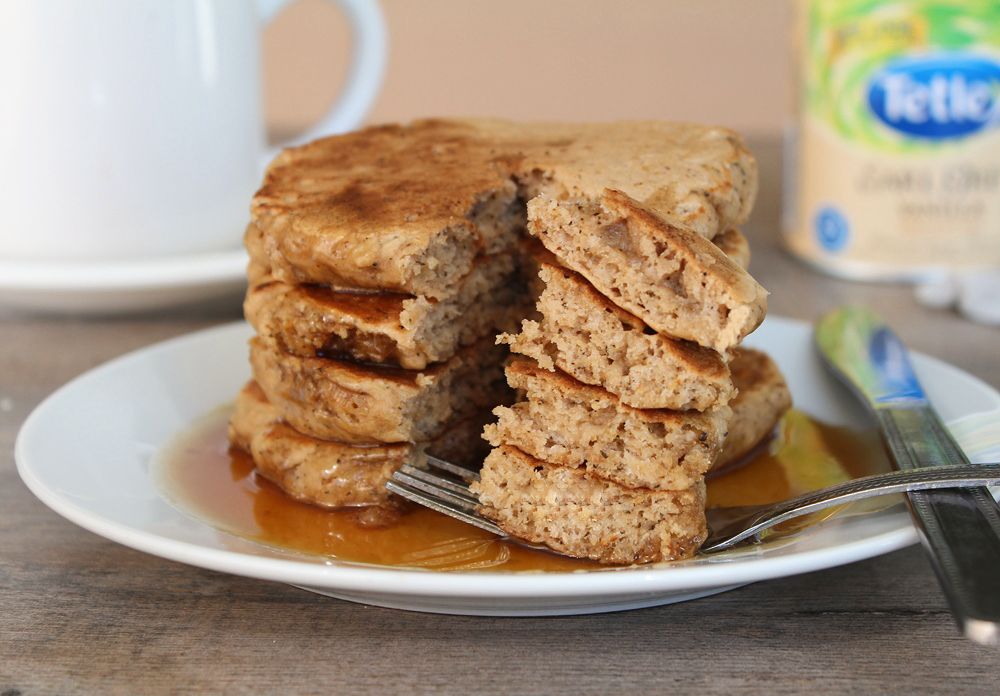
The end result was a light and fluffy stack of pancakes that smells just like a London Fog and has a subtle but very nice tea flavour that I loved! I think the honey syrup makes all the difference in making these resemble tea, so don’t skip it! I made these for breakfast Sunday morning and they made our apartment smell so nice – even later in the afternoon my sister kept commenting that she would get a whiff of tea wherever my pancakes had been (I had to carry them to a few different spots for photographs)! And I saved just enough leftovers to eat for dinner tonight, which I’m quite looking forward to!
Sorry for the somewhat long post, and if you skipped by everything above just to see what the main point was, it’s that tonight it is perfectly acceptable, if not strongly encouraged, to eat pancakes for dinner – Happy Pancake Tuesday!
Earl Grey Vanilla Tea Pancakes with Honey Tea Syrup (aka London Fog Pancakes)
Makes about 9-10 pancakes
Ingredients:
For the Syrup:
1/4 cup honey
2 tablespoons water
1 Earl Grey Vanilla tea bag
1/2 teaspoon pure vanilla extract
For the Pancakes:
1-1/2 cups vanilla almond milk
4 Earl Grey Vanilla tea bags, divided
1-1/2 cups all-purpose flour
2 teaspoons baking powder
2 tablespoons sugar
1 large egg
2 tablespoons canola or vegetable oil
2 teaspoons pure vanilla extract
Directions:
First prepare the honey tea syrup. Bring honey and water to a simmer in a small saucepan. Add teabag and remove from heat. Let steep for at least 5 minutes. Remove teabag, scraping off as much honey as you can (discard) and stir in the vanilla. Transfer to a small container and place in the refrigerator to cool and thicken.
Next prepare the steeped almond milk. Add vanilla almond milk and 3 tea bags to a small saucepan. Bring to a simmer, then reduce heat and let gently simmer for 3-5 minutes. Remove teabags, squeezing the liquid out as you remove them (discard tea bags). Let milk cool in the refrigerator.
Mix the dry ingredients for the pancakes: Whisk together the flour, baking powder, and sugar. Stir in the contents of 1 tea bag. My tea was very finely ground, but if yours is not, grind it first in a food processor.
Once the milk has cooled, prepare the wet ingredients by whisking together the egg, milk, vegetable oil, and vanilla extract.
Add the wet ingredients to the dry ingredients and gently fold together until just incorporated. Do not overmix. Heat a large non-stick skillet or griddle over medium heat. Spray with non-stick cooking spray if desired (I find that I don’t need to). Spoon 1/4 to 1/3 cup batter (depending on desired size – I used 1/3 cup measuring cup but didn’t fill it all the way) onto the pan and use your fingers to spread it out a little into a circle. Cook until bubbles begin to form on surface, a couple of minutes, then flip over and repeat until golden brown on both sides. Repeat with remaining batter.
Serve pancakes warm with honey syrup.
February 09, 2013
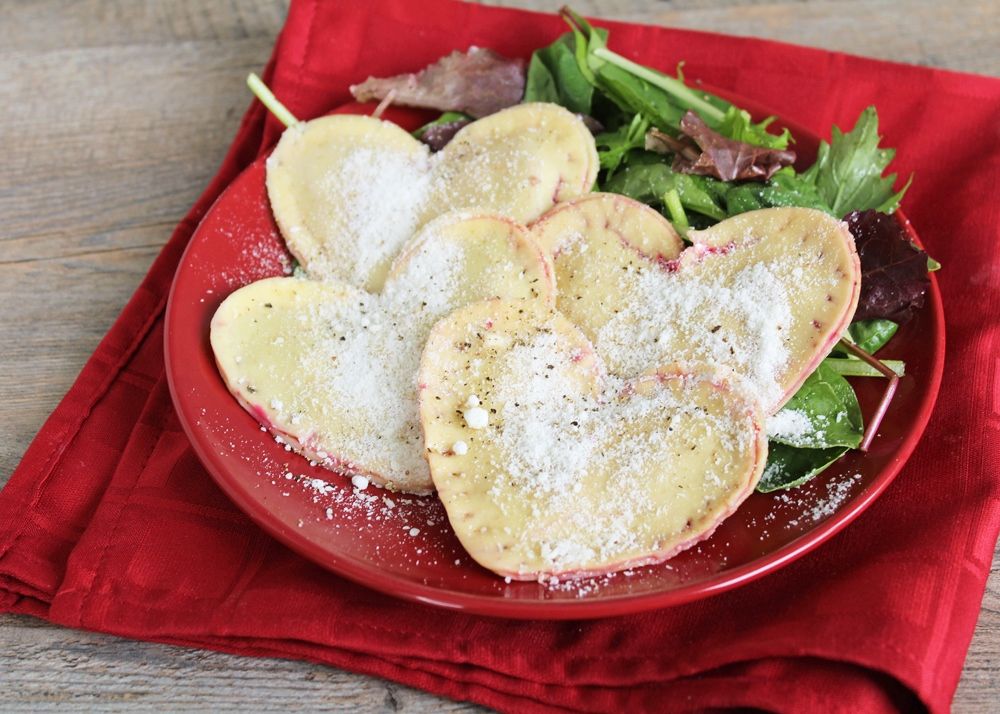
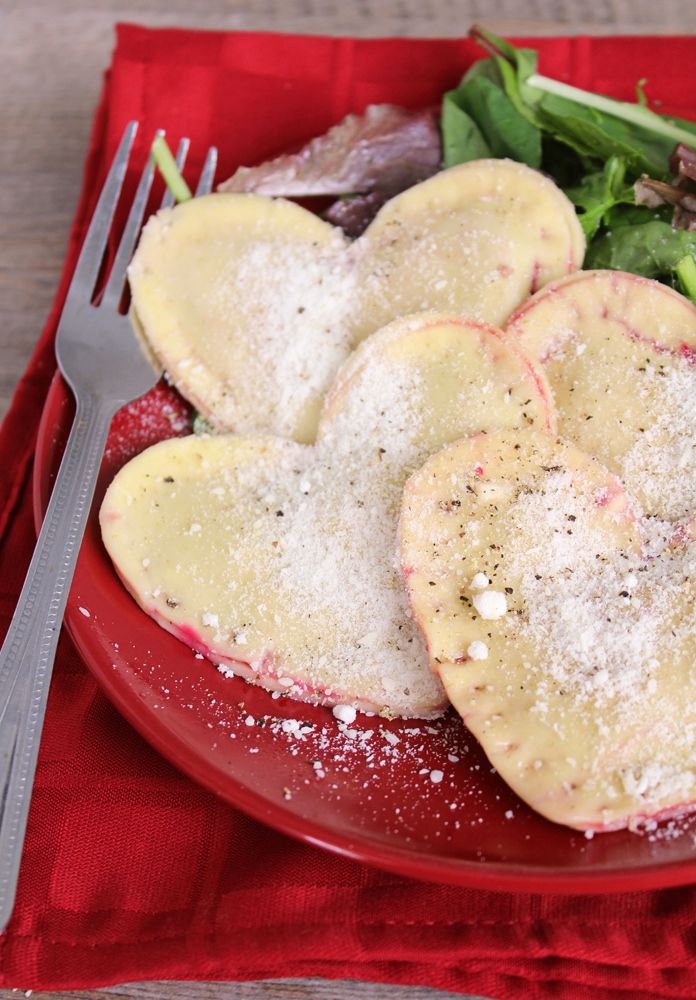
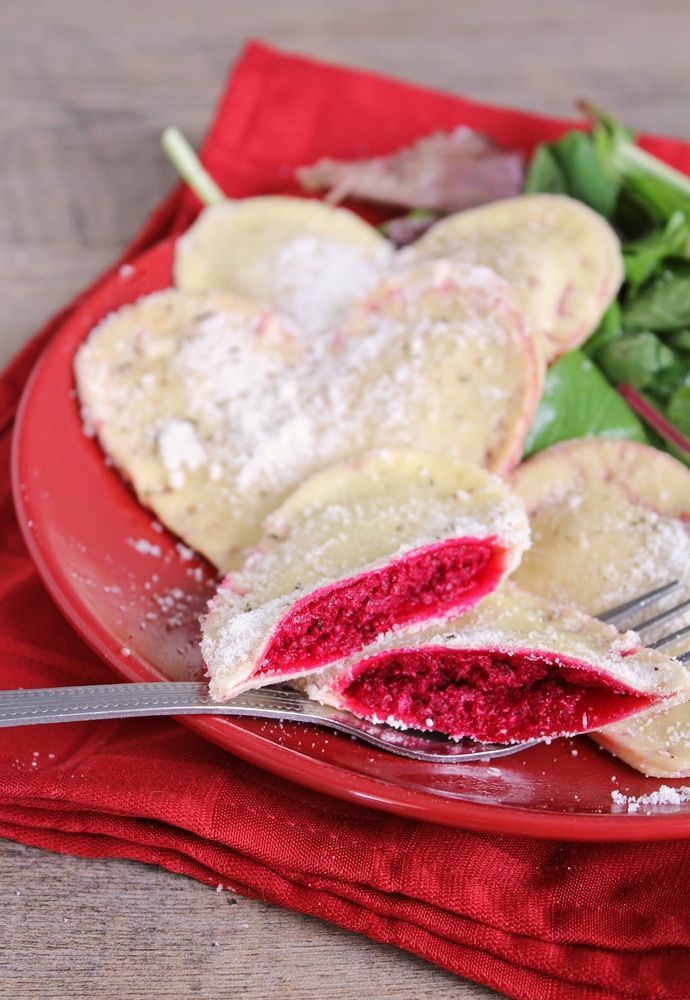
Heart Shaped Beet & Goat Cheese Ravioli
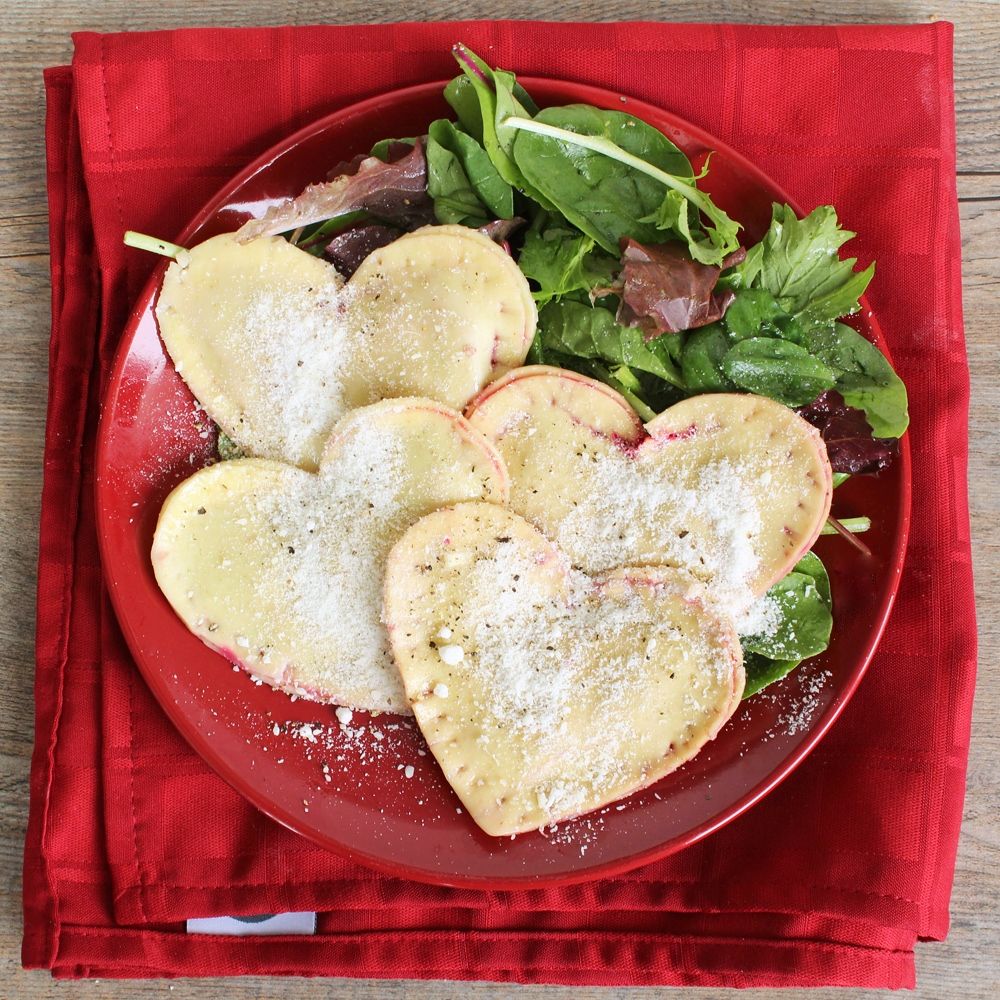
As I mentioned on Facebook yesterday, much of Ontario had a snow day yesterday, including Waterloo region, where we got an estimated 30cm (1 foot) of snow. Not nearly as bad as what areas like Connecticut are currently facing, but still one of the biggest snowfalls we’ve seen here in a while! I was happy to stay home and make myself a warm lunch and decided to use the time I saved not going into school to put a little time and effort into something extra special – these heart shaped ravioli!
I had wanted to make heart shaped ravioli for Valentine’s Day anyway but I knew I would want it to have beets in the filling for their gorgeous colour, and since my boyfriend isn’t particularly fond of beets, I decided to just go ahead and make them for myself. We don’t give each other Valentine’s gifts anyway, so I thought it was perfectly acceptable to give myself an early gift!
Now I won’t lie and say that these are super easy and you should all make them for Valentine’s Day dinner because they’ll take no time at all. Maybe that would be the case if you’re an expert ravioli maker, but this was only my second time making ravioli and it was definitely frustrating at times and took more time to prepare than an average dinner. But I will honestly say that in the end it was totally worth it!
I did make a few mistakes that you can learn from so you won’t run into as many issues as me:
1) Keep your pasta sheets damp so they don’t dry up and harden – that will make it very difficult to form the ravioli!
2) Figure out how much filling you can comfortably fit in a ravioli by doing a practice one before you go and spoon all the filling out only to realize you used too much and have to go back and redo it.
3) Make sure you completely seal the edges of the ravioli so that the filling doesn’t seep out while boiling!
I used storebought fresh pasta sheets to save time, but if you are really ambitious you could make your own pasta - Reclaiming Provincial even makes a beet pasta dough, which makes the end product so gorgeous!
The filling is a simple mixture of roasted beets and herbed goat cheese with a splash of lemon juice, and while it takes some time to wait for the beets to roast, the filling is super easy to make and is delicious even on its own! So if you don’t feel like making ravioli but love beets and goat cheese (two of my favourite ingredients!), you could just make the filling and use it as a sandwich or pizza spread, on crostini, or even as a dip!
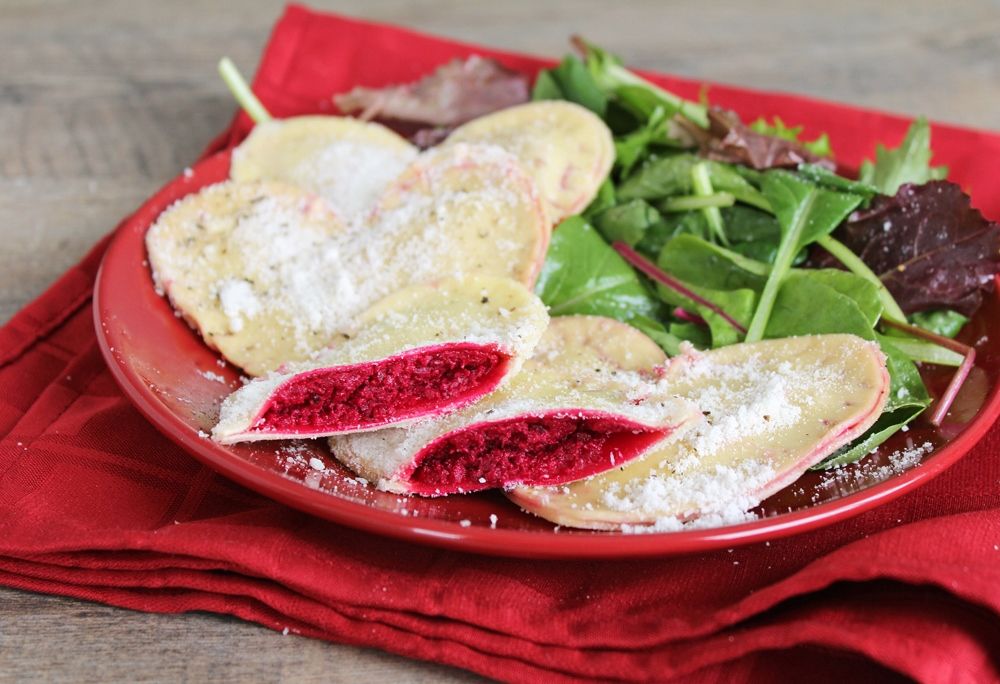
If you do go ahead and make the ravioli, I highly recommend serving it with a side salad. I kept the ravioli ‘sauce’ very simple (just olive oil and parmesan cheese) to let the filling shine, but without a lot of sauce, I find that ravioli on its own can be a bit boring, especially when you get the edge parts without the filling. I still loved the ravioli, but when I ate it overtop a salad it was so much better – the vinegar in the dressing really brightened things up and the salad added flavour and texture so you don’t get bored eating the parts that are just plain pasta!
And of course, these don’t have to be for just Valentine’s Day (this goes to those of you who don’t care much for the “holiday”) – they are a great way to show your appreciation to someone (or yourself) on any special occasion, snow days included!
Oh and if any of you pros out there have other tips for making the ravioli process easier, feel free to share them!
Heart Shaped Beet & Goat Cheese Ravioli
Makes 20-25 ravioli
Ingredients:
1/2 lb red beets (1-2 medium beets)
2 oz herbed goat cheese
1/2 tablespoon fresh lemon juice
Salt and pepper
8 fresh lasagne sheets (9x6”) or equivalent homemade pasta sheets
For serving:
Olive oil
Parmesan cheese
Field greens
Red wine vinegar
Salt & pepper
Directions:
First prepare the ravioli filling. Preheat oven to 400°F. Scrub beets and pierce all over with the tines of a fork. Wrap in aluminum foil and roast in preheated oven for 45 minutes to 1 hour, until tender. Let cool slightly, peel and roughly chop, then add to a food processor. Add the goat cheese and lemon juice and process mixture until smooth. Season with salt and pepper to taste.
Next prepare the pasta. I used fresh lasagne sheets from an Italian market, which saved me lots of time, but if you want to make your own pasta, follow either the recipe from Annie’s Eats for plain pasta or Reclaiming Provincial for a beet pasta dough. While you’re working with the pasta, it’s important to keep the sheets you’re not using covered with a damp cloth so they don’t dry out and harden. I let that happen with some of mine and it cracked when I tried to work with it later. Use a heart shaped cookie cutter (mine was about 3” wide) to cut out heart shapes from pasta dough.
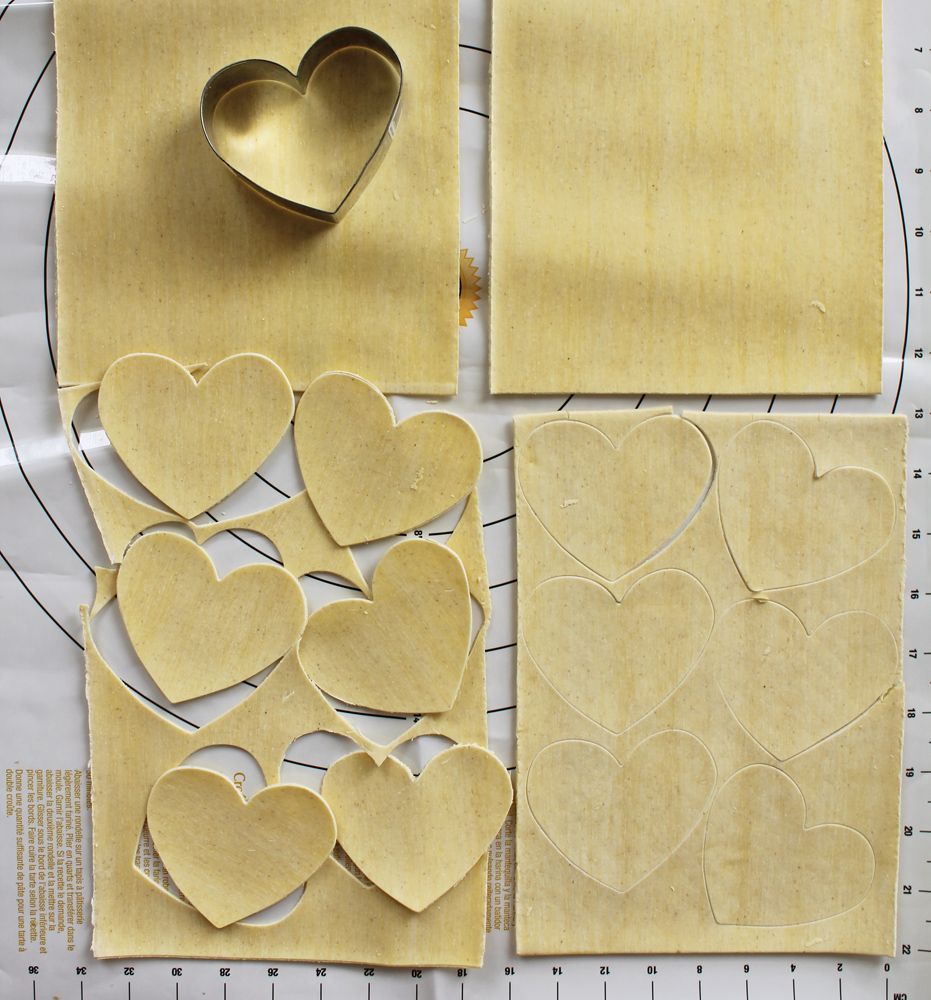
Spoon a small amount of filling into the center of half the hearts. The amount you need will depend on the size of your cookie cutter. I started with about 2 teaspoons (pictured) but realized that was too much when I started to try to form the ravioli, so I removed some (after the picture) and was left with about 1 teaspoon of filling for each heart. I highly recommend only filling one to start and proceeding with the next step of shaping the ravioli to get an idea of how much filling is needed before you fill the rest.
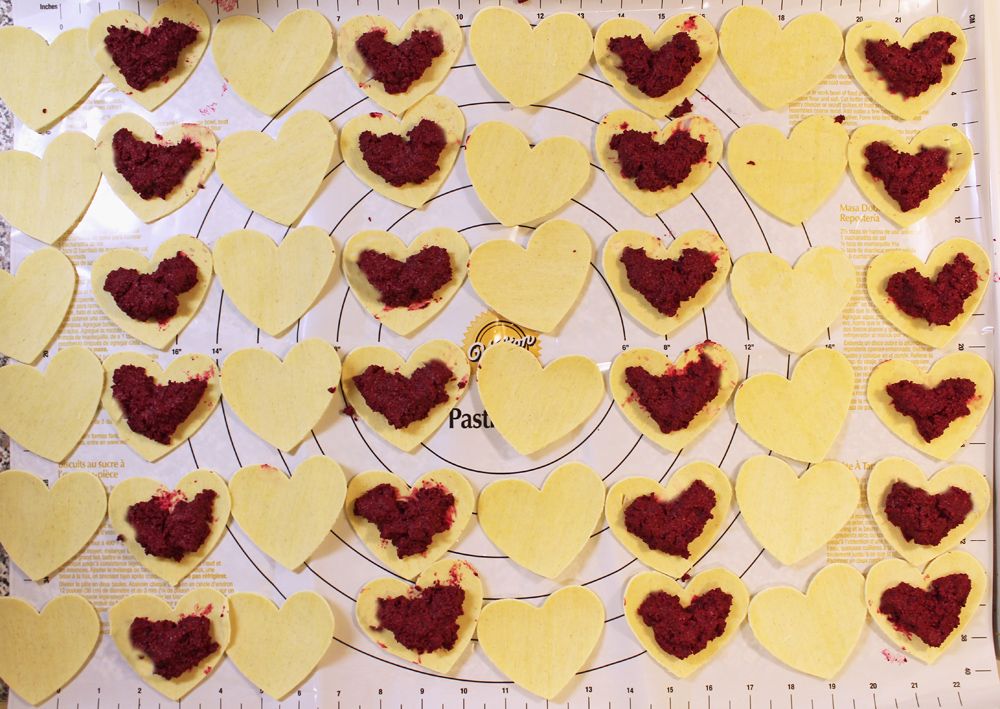
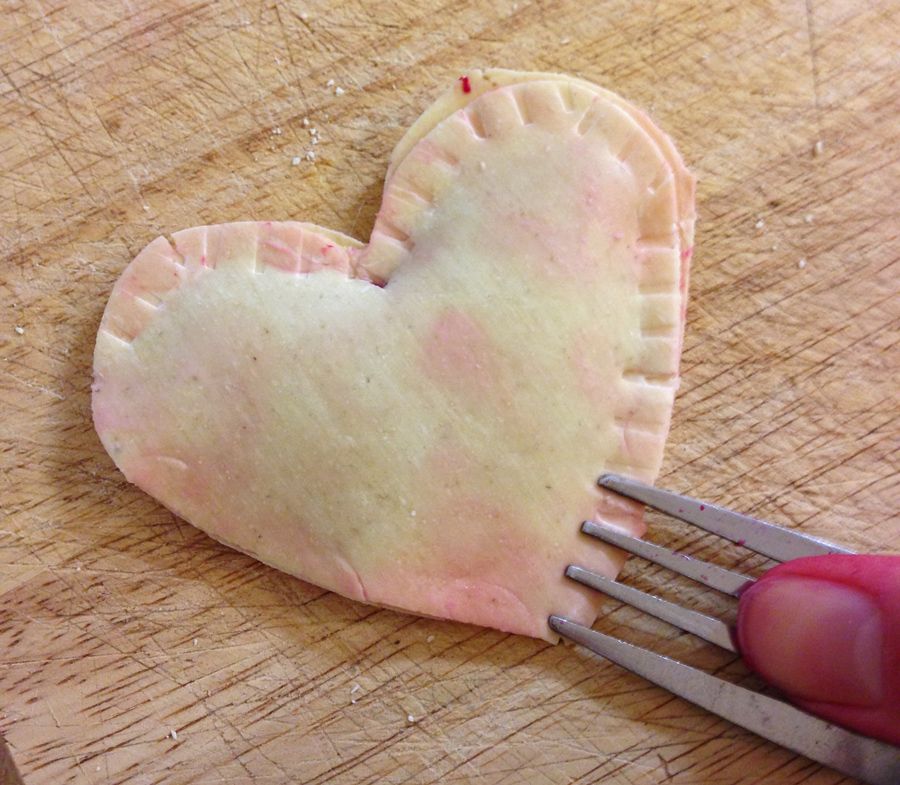
Use a pastry brush or your finger to wet the edges of each heart and place a plain heart on top of the filling. Press the edges together with your fingers to seal, then go over the edges pressing with the tines of a fork, on both sides of the ravioli, to ensure the filling is really sealed in there. You don’t want it to leak out when you’re boiling them! This happened to a few of mine that weren’t properly sealed.
Bring a large pot of salted water to a boil. Cook the ravioli in the boiling water until al dente, about 3-5 minutes. I did this in batches of about 5 ravioli as I filled them so they didn’t sit out too long.
To serve, toss desired amount of field greens with a bit of red wine vinegar, olive oil, and salt and pepper. Toss desired amount of ravioli (4-5 per person should be a good amount) with a drizzle of olive oil. Serve ravioli overtop of salad and sprinkle with parmesan cheese.
February 06, 2013
Raspberry Shortbread Heart Cookies
I’ve been so focused on the Super Bowl lately that I completely forgot that two of my other favourite occasions (food-wise anyway) are fast approaching: Pancake Tuesday and Valentine’s Day!
I know that some people feel strongly against Valentine’s Day as a holiday, but I love any chance to bake adorable treats as a way of showing my love toward my family and friends. So even though I just wanted to sit down when I got home from a long day yesterday, instead I baked you some heart-shaped cookies!
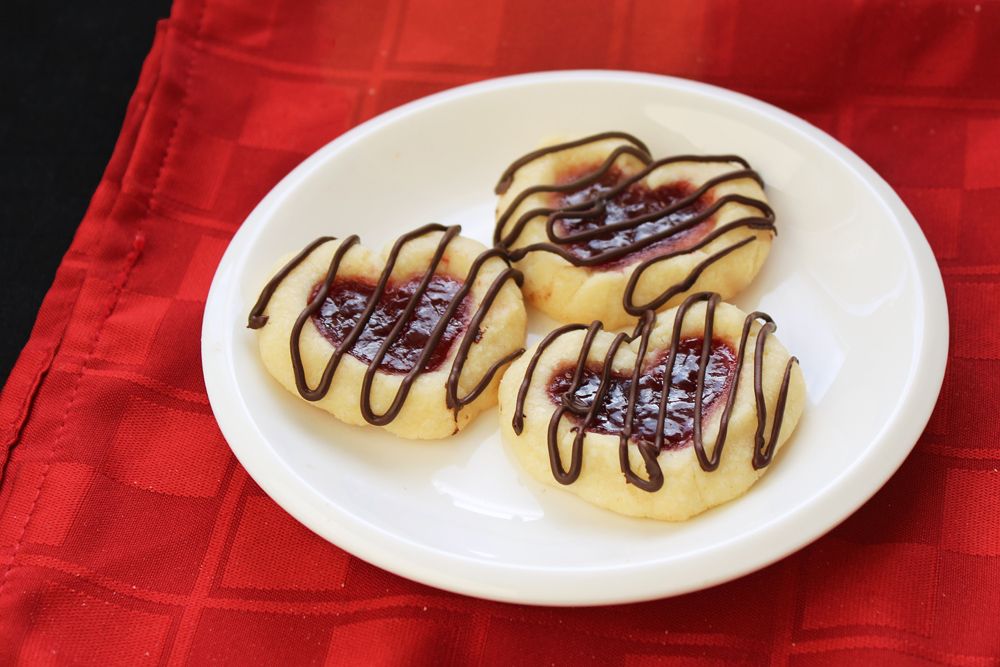
I first saw these double thumbprint heart cookies from Better Homes and Gardens on Munchkin Munchies and thought they were such a great idea. Surprisingly, I haven’t seen them anywhere else on the web, so I wanted to share my own version of them!
I ended up using a shortbread thumbprint cookie recipe from All Recipes instead of the original cookie recipe from Better Homes & Gardens because I’ve tried this one many times and know that it turns out well.
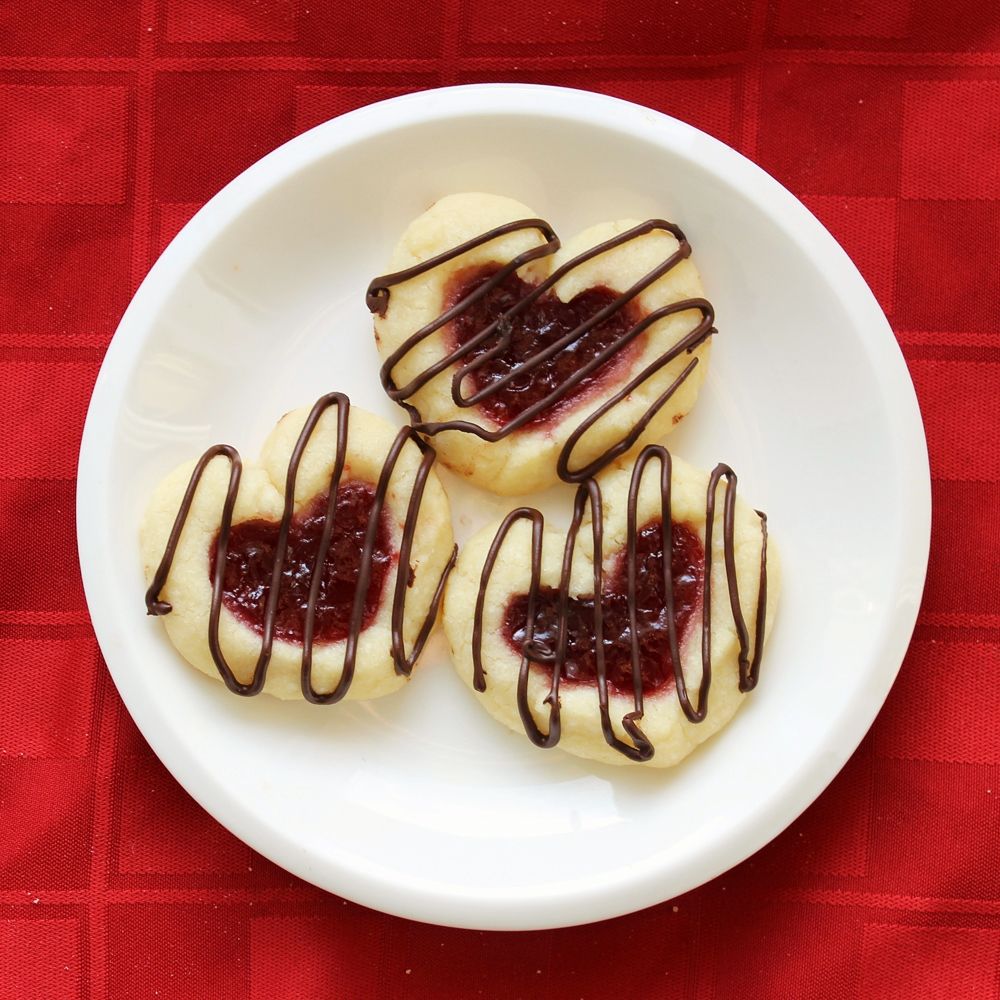
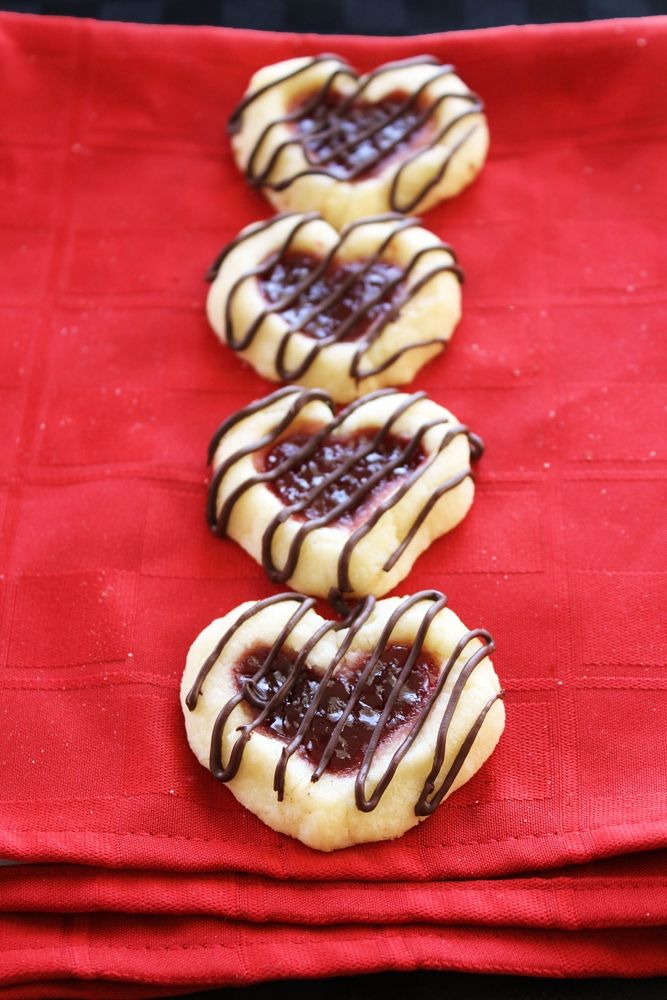
These are really easy to make – they’re just like regular thumbprint cookies but instead of making one thumbprint, you make two to shape the cookie into a heart! Then you just fill each heart shaped indentation with jam and bake them – I like to add the jam before baking so it cooks down a little and stays put in the cookie, but you could try adding it afterwards if you like the looks of fresh jam better.
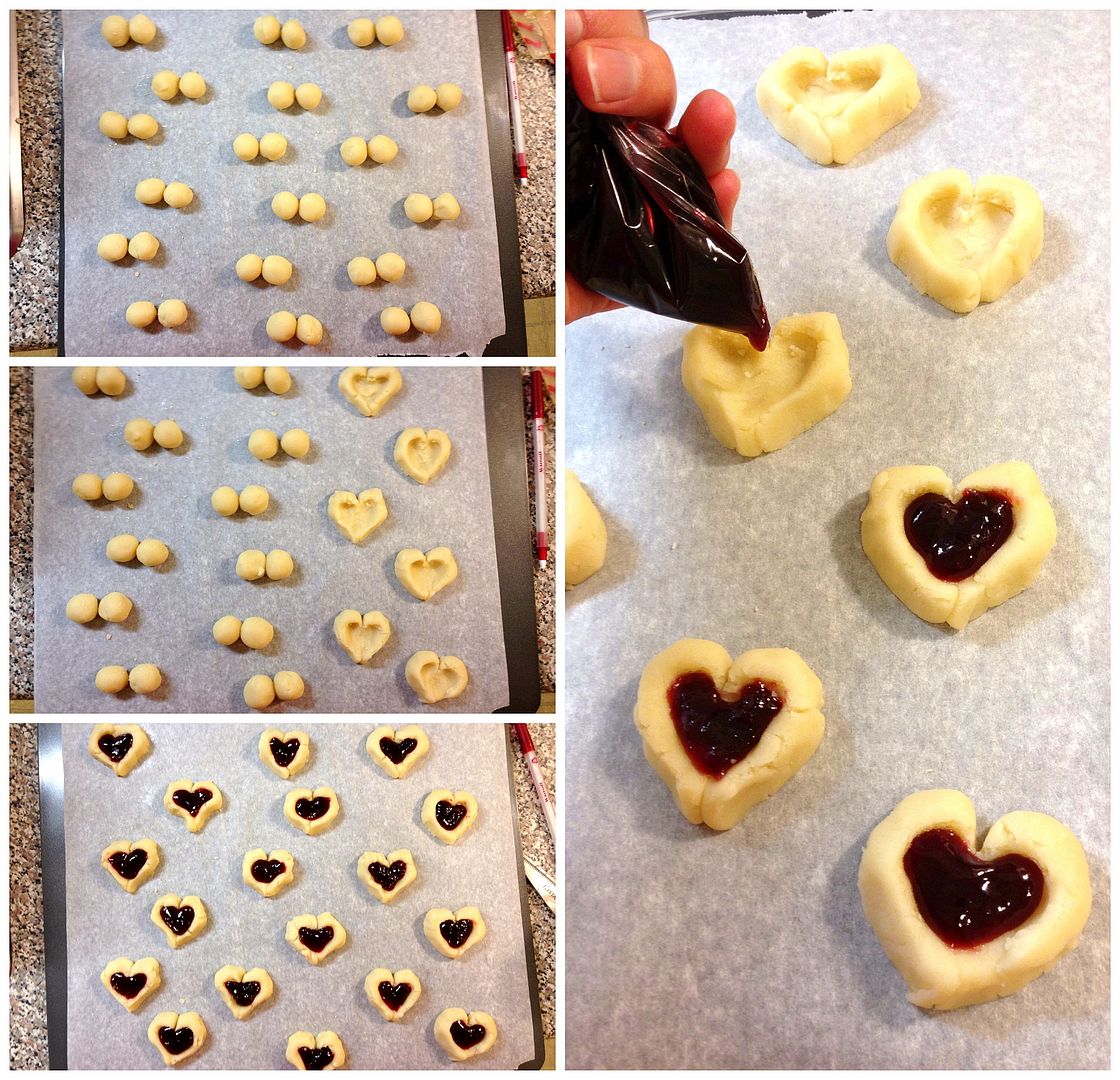
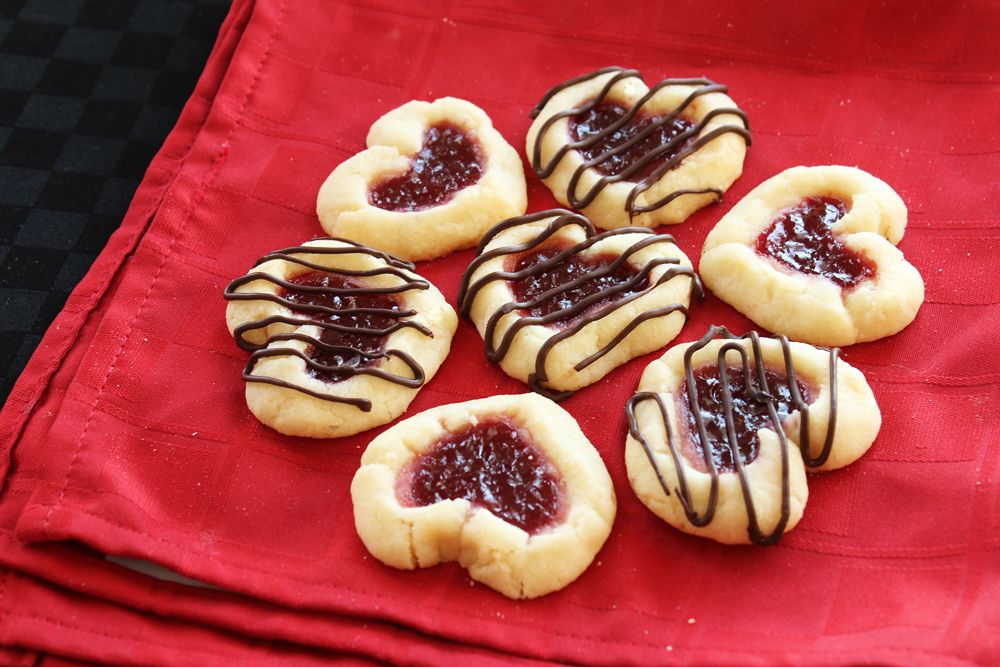
I left a few cookies plain, as you can see below, but decided to add a drizzle of dark chocolate to most cookies to make them extra pretty! And it turned out that I also preferred the taste of the cookies that had the chocolate – it was just enough to provide a nice complement to the shortbread and raspberry jam.
Even if you’re one of those Valentine’s-hating people, you can’t possibly hate heart-shaped cookies, can you? Just give these to your friends as a way of showing your appreciation toward them, or keep them all to yourself if you like, I won’t tell!
Raspberry Shortbread Heart Cookies
Makes about 18 cookies
Ingredients:
1/2 cup unsalted butter, softened
1/3 cup granulated sugar
1/2 tsp vanilla extract
1 cup all-purpose flour
1/4 cup seedless raspberry (or strawberry) jam
1/4 cup dark or semisweet chocolate chips
Directions:
In the bowl of a stand mixer (or a medium bowl), cream together the butter and sugar until smooth. Mix in the vanilla extract until combined. Mix in the flour until dough comes together. Roll dough into 3/4-inch balls, and place pairs of balls side by side (touching) on a parchment-lined cookie sheet. Use your thumbs or fingers to press two indentations in each pair of doughballs, pressing in the center to form a heart shape. You will need to shape the bottom of the cookie to form a perfect heart. Once all pairs of cookies have been formed into hearts, space them about 2 inches apart.
Transfer jam to a ziplock bag and snip off the corner. Use bag to pipe jam into each heart-shaped indentation, filling the indentation to the very top (the jam will cook down a little when it bakes). Transfer cookies to the freezer for about 10-15 minutes – this step is important because the cookies will have warmed up from being handled and could spread too much in the oven unless you cool them down. Meanwhile, preheat oven to 350°F.
Bake cookies in preheated oven for 14-16 minutes, until bottoms are light golden brown. If they have spread too much after baking, you can try to gently push them back into a heart shape immediately after removing from oven. Let cool 2 minutes on cookie sheet, then transfer to a wire rack to cool completely.
Once cookies are cooled, melt chocolate chips in microwave and transfer to a ziplock bag. Snip off a very tiny corner, and use to drizzle chocolate over the cookies.
February 01, 2013
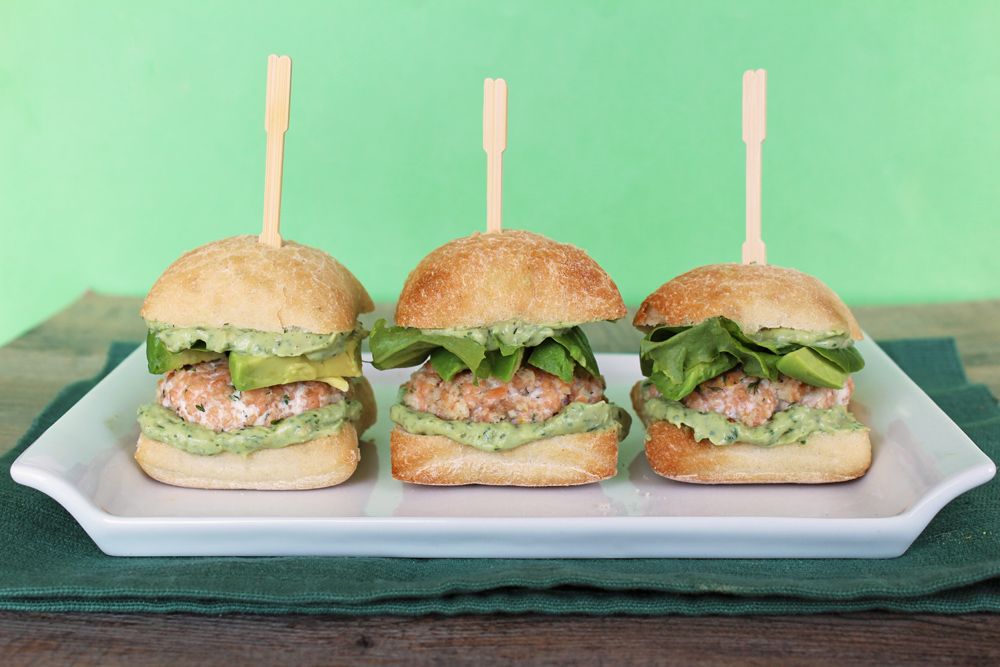
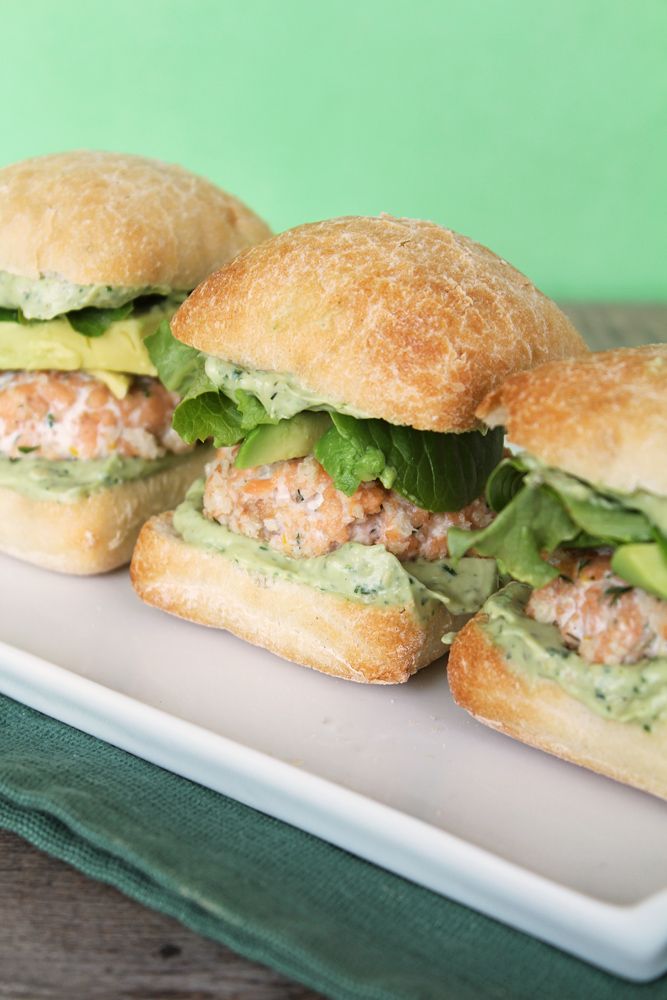
San Francisco Inspired Green Goddess Salmon Sliders
With the San Francisco 49ers in the Super Bowl this weekend, I wanted to make something San Francisco-inspired to cheer them on. I've never been to California (though it's definitely on my list of places to visit), but I when I think of the Bay area, two things that come to mind are seafood and avocados. After a little research into foods that represent the area, I found out that Green Goddess dressing (named for its green colour that comes from the addition of lots of herbs) was apparently created in San Francisco.
So I decided to combine all of this together into salmon burgers with an avocado green goddess sauce. And since I associate the Super Bowl with snacking on appetizer-sized food, I made them into mini sliders instead of full sized burgers (which also happen to be much cuter!)
I only had frozen salmon to work with, so these didn't turn out as great as they would be with fresh salmon, but they were still delicious - I loved the combination of flavours and all the green goodness going on!
If you have some nice salmon and don't like the idea of pulsing it up into a burger, feel free to just broil it and serve it like these salmon sliders from How Sweet It Is. I wanted to make burgers to infuse some of the green goddess flavours into them, but leaving the salmon as is would be a lot easier!
If you don't like salmon at all, you could just make the sauce and serve it as a dip for veggies (leave out the worcestershire or use vegetarian worcestershire for a vegetarian dip). Or if you want something a little thicker to serve with chips, try this green goddess guacamole from The Fig Tree!
And if you want something 49ers-inspired to wash things down with, try a beer from Anchor Brewing (if it's available where you live), or check out these gorgeous Kaepernick Sparklers from Daydreamer Desserts!
Go Niners! :)
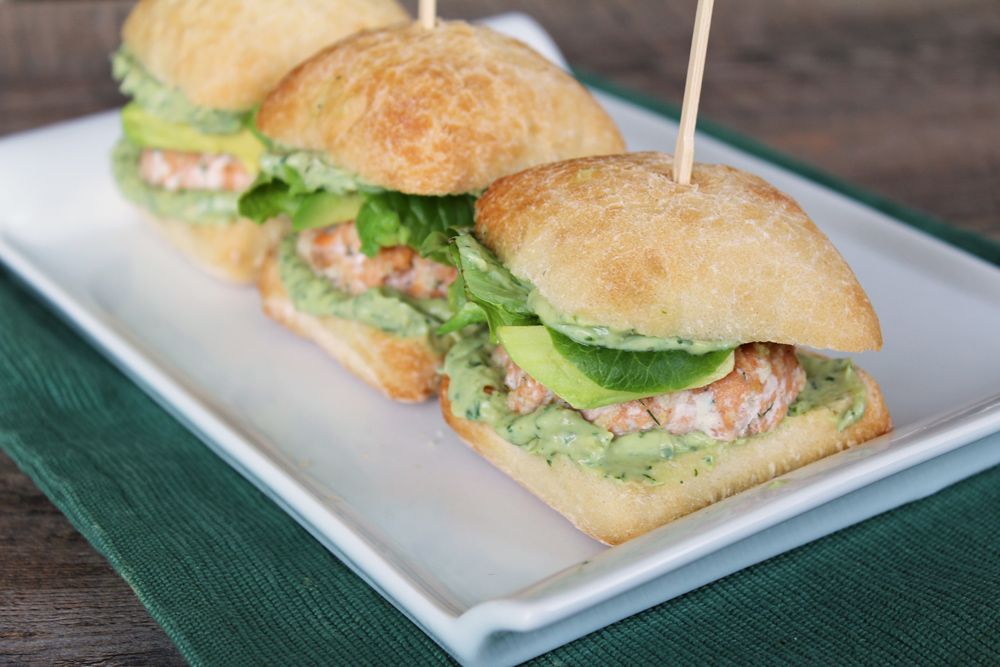
Avocado Green Goddess Salmon Sliders
Makes 10 mini sliders
Ingredients:
For the Green Goddess Sauce:
1 ripe avocado, chopped
1/2 cup light sour cream
2 tablespoons chopped tarragon
2 tablespoons chopped parsley
2 tablespoons chopped dill
1-2 tablespoons fresh lemon juice
2 teaspoons capers, drained
Dash worcestershire sauce
1/4 teaspoons each salt and pepper
For the Burgers:
1 pound fresh salmon fillets, skin and bones removed*
2 tablespoons minced shallots
1 tablespoon chopped parsley
1 tablespoon chopped dill
1 teaspoon lemon zest
1/2 teaspoon salt
1/4 teaspoon ground pepper
1/4 cup panko breadcrumbs
For Assembling:
Mini slider buns (I used mini ciabatta buns)
Lettuce
Sliced avocado
Tomato (optional)
Directions:
First prepare the sauce. Add all ingredients for the green goddess sauce to the bowl of a food processor and blend until smooth. Taste and adjust any amounts to your liking if needed. Refrigerate until ready to use.
Next prepare the salmon patties. Cut salmon into chunks, and add to food processor along with shallots, parsley, dill, lemon zest, salt, and pepper. Pulse just until combined. If you prefer to have some larger chunks of salmon in your burger, then leave half to three quarters of the salmon out of the mixture, chop into ¼” pieces, and add to the mixture after processing. Add panko breadcrumbs so that mixture will form patties. Gently form patties 3/4-inch thick and wide enough to match the size of your slider buns. Place on a parchment-lined baking sheet and refrigerate for at least 30 minutes.
Finally, cook the burgers. You can either heat a large skillet over medium-high heat, lightly grease, and cook the burgers for 3-4 minutes per side, until cooked through, if you want a crispier browned exterior. I baked mine just because it was easier. To bake the patties, bake at 400°F for about 20 minutes, until cooked through. Note that pan-frying them is the ideal method.
Assemble burgers by topping buns and patties with the green goddess sauce, along with lettuce, tomato, and sliced avocado.
*Note: my grocery store only had very expensive and not very fresh looking salmon, so I used frozen wild salmon fillets instead and thawed them. I find that frozen salmon doesn’t taste as good as fresh and has a fishier smell and taste, so fresh salmon is preferable.
Subscribe to:
Posts (Atom)