July 30, 2013

White Bean Dip with Roasted Jalapenos & Goat Cheese

White Bean Dip with Roasted Jalapenos & Goat Cheese

I feel like I’ve been spending a lot of long hours in my windowless cave office lately (as I struggle to learn a data analysis software program that makes absolutely no sense – why are you so confusing, SAS, why??), so I’ve been needing a lot of snacks to get me through the day. One of my go-to healthy snacks that I eat all the time is carrots with hummus – it’s so easy (and cheap!) to whip up a batch of hummus that I then throw in a container and bring to school along with a bag of baby carrots through the week.

I’ve tried a lot of different hummus recipes in the past and have loved them all, but this time I decided to do something a little different and use regular white beans instead of chickpeas and omit the tahini. So it’s just a regular bean dip instead of hummus, but it’s still just as smooth and creamy!

White Bean Dip with Roasted Jalapenos & Goat Cheese

Because white beans are pretty flavourless, I kicked things up by adding roasted jalapenos and cumin for spice, goat cheese for a bit of richness and tang, and some lime juice, cilantro, and honey for added flavour and balance. The first time I made this, I used two jalapenos and the dip was pretty spicy (but still good!), so the next time I only used one and then I could barely detect the spice at all. So I think one and a half would be the perfect amount for me, but you can definitely adjust the amount to your liking! I’d recommend roasting two jalapenos (they’re super cheap anyway), then start by adding one chopped pepper to the dip and keep throwing more in as you taste if it’s not spicy enough.

This goes great with pita chips (or ranch popped rice chips, shown here) or veggies, and while it may not make the jumble of numbers and words on your screen make any more sense, it will at least give you the energy to stay in your office and keep staring at them so it looks like you know what you’re doing!

White Bean Dip with Roasted Jalapenos & Goat Cheese

Before I go, I just wanted to thank everyone for their kind comments on my blogiversary post and for entering the Starbucks gift card giveaway!  A winner has been randomly selected and contacted - thanks again!

White Bean Dip with Roasted Jalapenos & Goat Cheese

White Bean Dip with Roasted Jalapenos & Goat Cheese

Ingredients:

1 (540mL) can white kidney beans
1-2 jalapenos (1 will make the dip quite mild and 2 might be fairly spicy, but it can depend on the pepper)
2 oz plain goat cheese
1.5 tablespoons fresh lime juice
1/4 cup chopped cilantro
1/2 teaspoon honey
1/2 teaspoon cumin
1/2 teaspoon salt
1/4 teaspoon pepper
2 tablespoons extra virgin olive oil

Directions:

Preheat oven to broil (500°F) and move oven rack to top third of oven, a few inches away from the top. Spray jalapeno(s) with cooking spray or rub with a bit of olive oil, and place on a baking sheet. Roast under the broiler until all sides begin to get black patches – time will vary but mine took around 5-10 minutes total. Keep an eye on them and turn a few times to brown them evenly. Remove from oven (use tongs or mitts) and place in a bowl covered in saran wrap to let them steam and loosen the skin for 10 minutes. Remove skins (they should peel off), slice lengthwise, remove seeds, and roughly chop.

Add all ingredients except the olive oil to the large bowl of a food processor. Cover with the lid and add the olive oil to the feed tube so it will slowly drain into the dip. Process until dip is smooth and oil is mixed in. Taste and adjust any amounts to your liking, if necessary. Store in the refrigerator but let warm up to room temperature before eating. Serve with carrots, other veggies, or pita chips.

July 25, 2013

Caramel Latte Cheesecake Squares for my 2nd Blogiversary (+ a Giveaway!)

Caramel Latte Cheesecake Squares

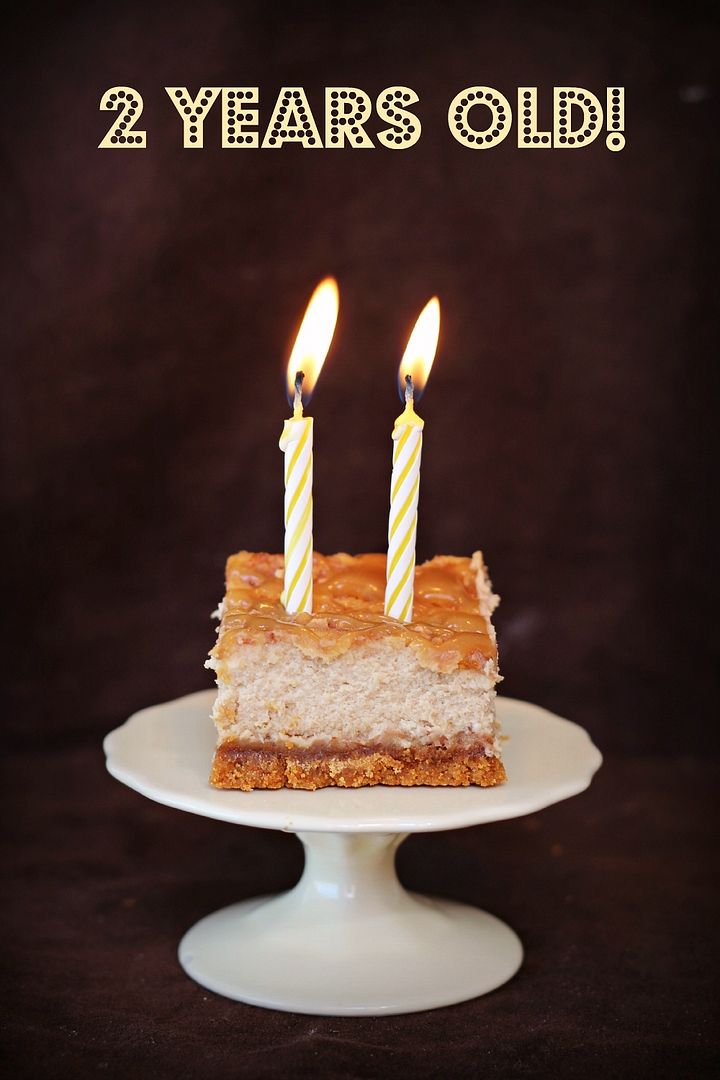
It’s my second blogiversary!  Well, technically it was yesterday, but due to a minor disaster with my planned dessert and my subsequent freak out, I’m celebrating a day late.

I spent a long time trying to choose the perfect dessert for a two year anniversary/birthday.  I wanted something cupcake-like because I feel like cupcakes are worthy of a celebration, but I had a hard time thinking of a recipe idea considering I’m actually not the biggest cupcake fan.  So when I remembered these 
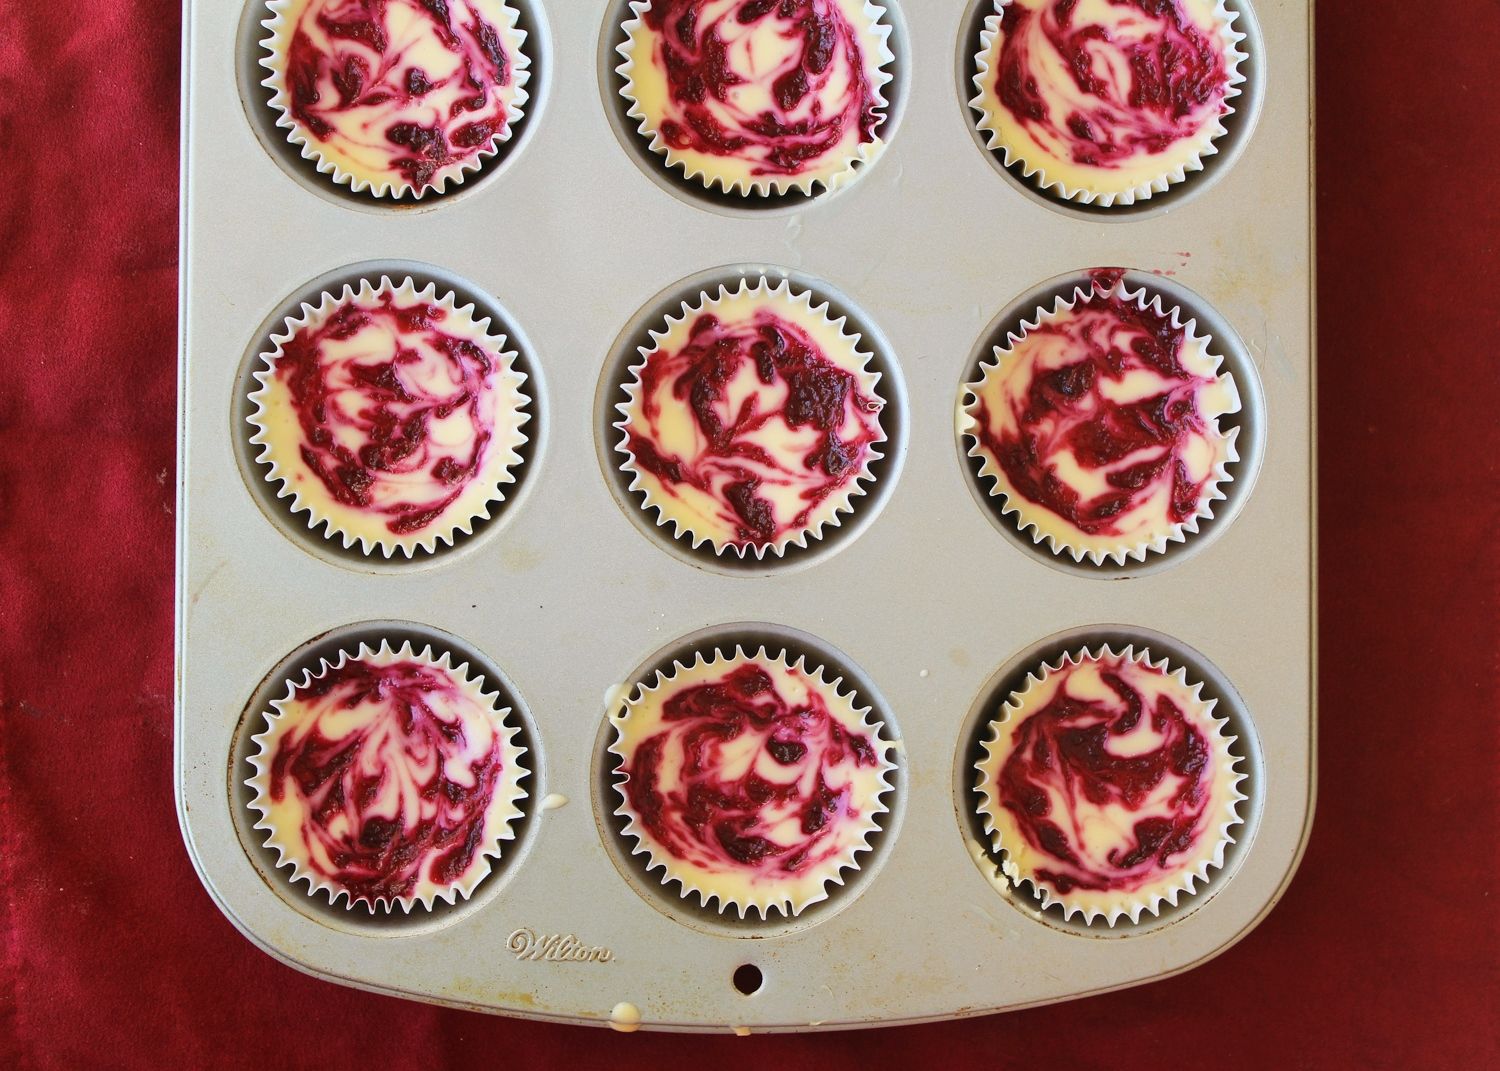
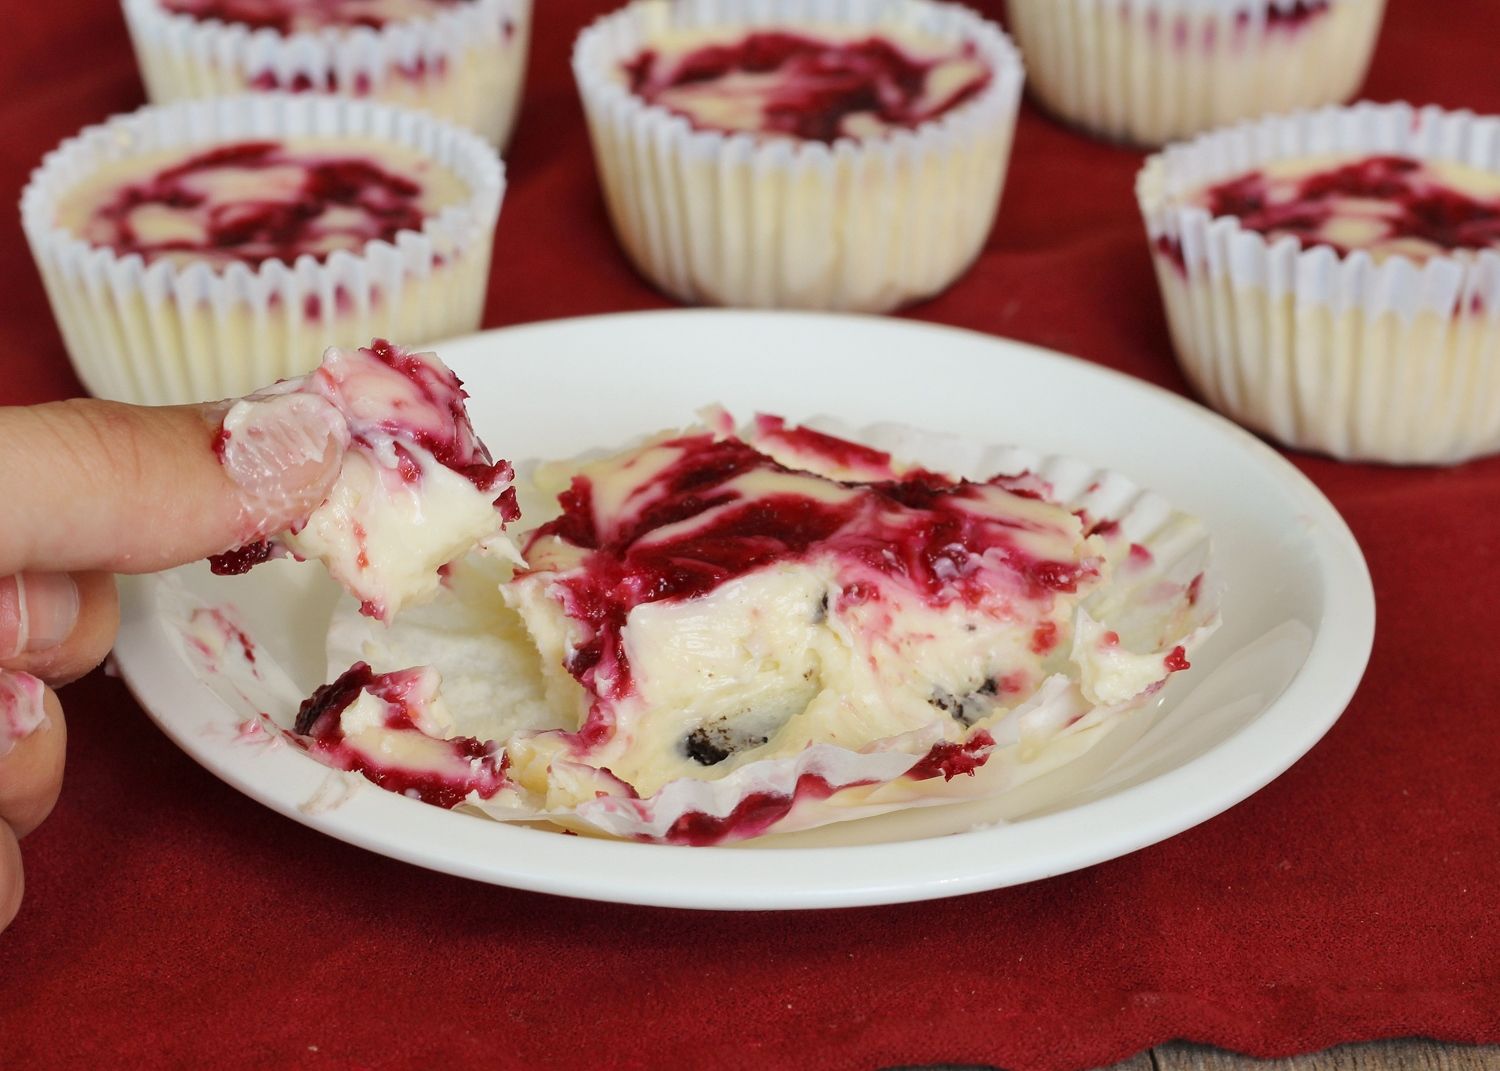
raspberry swirl cheesecake cupcakes based on a Martha Stewart recipe I thought I’d found the perfect solution; mini cheesecakes baked in a cupcake pan – perfect!

cherry swirl cheesecakes

I decided to use a chocolate crust and a cherry swirl instead of raspberry, so I went out and spent a lot of money on cream cheese (cream cheese is expensive here – almost $4.50 each if you can’t get it on sale) and cherries, and went to work making my little cheesecakes Tuesday night.

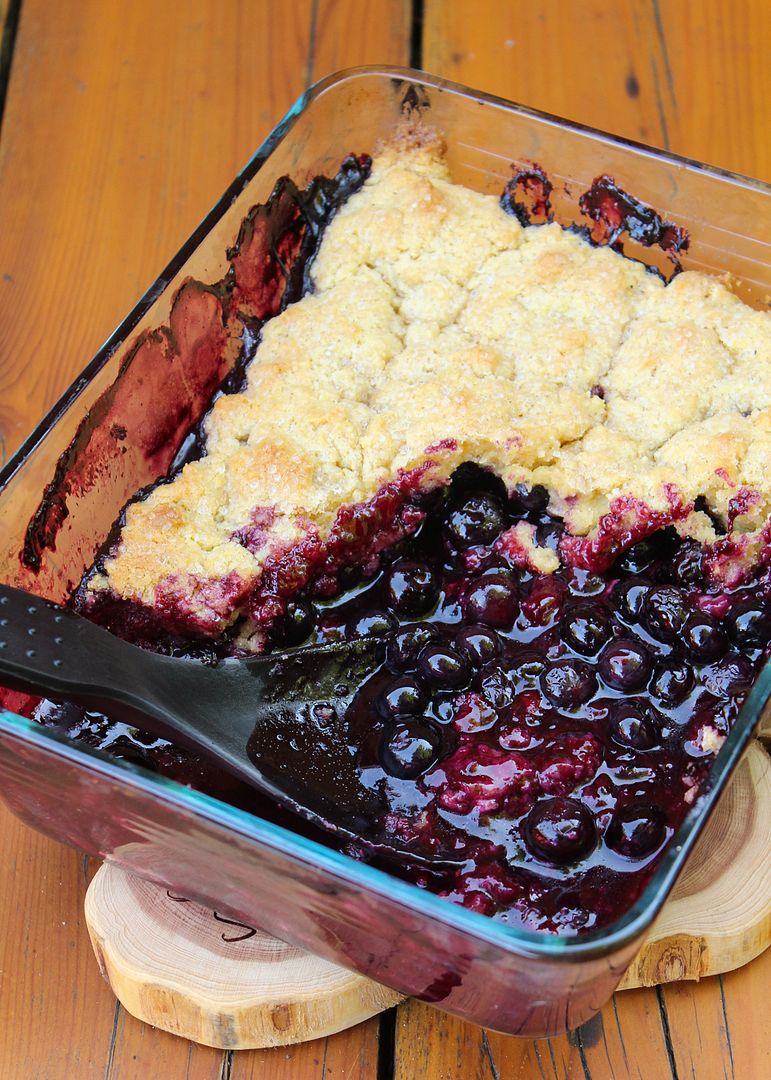
They looked beautiful coming out of the oven, but when I took them out of the fridge Wednesday morning, I discovered that they were still mushy with an almost pudding-like texture (see picture below). I’m not quite sure what went wrong, but I suspect it may have had to do with the fact that I was making these late at night and somehow got it in my head that halving a recipe for 32 cheesecakes meant I should make 12. Don’t judge!

failed cheesecakes

I was so sad to not only have wasted my time and money, but that I wouldn’t have a dessert ready for my blogiversary. I considered just skipping the celebration because I’ve been super busy with school this week anyway, but I thought about it and realized that if there’s one thing that the last two years of blogging have taught me, it’s that things won’t always go as planned, but instead of giving up or getting upset, you just have to keep moving forward and things will often turn out just as well if not better (and you usually learn something along the way too).

Caramel Latte Cheesecake Squares

If I gave up every time a recipe didn’t work out the first time; if I worried too much about losing readers every time I was too busy to share a post one week; if I cried every time an anonymous person left me a mean comment; if I criticized myself every time I compared myself to bigger and prettier blogs; then I would have quit a long time ago.

The truth is I love my little space I’ve built on the internet, I love having a motivation to try new things in the kitchen every week, I love the warm and friendly comments I receive from my amazing readers, and any of the failures and criticisms I’ve experienced along the way have all helped me to learn and grow.

Caramel Latte Cheesecake Squares

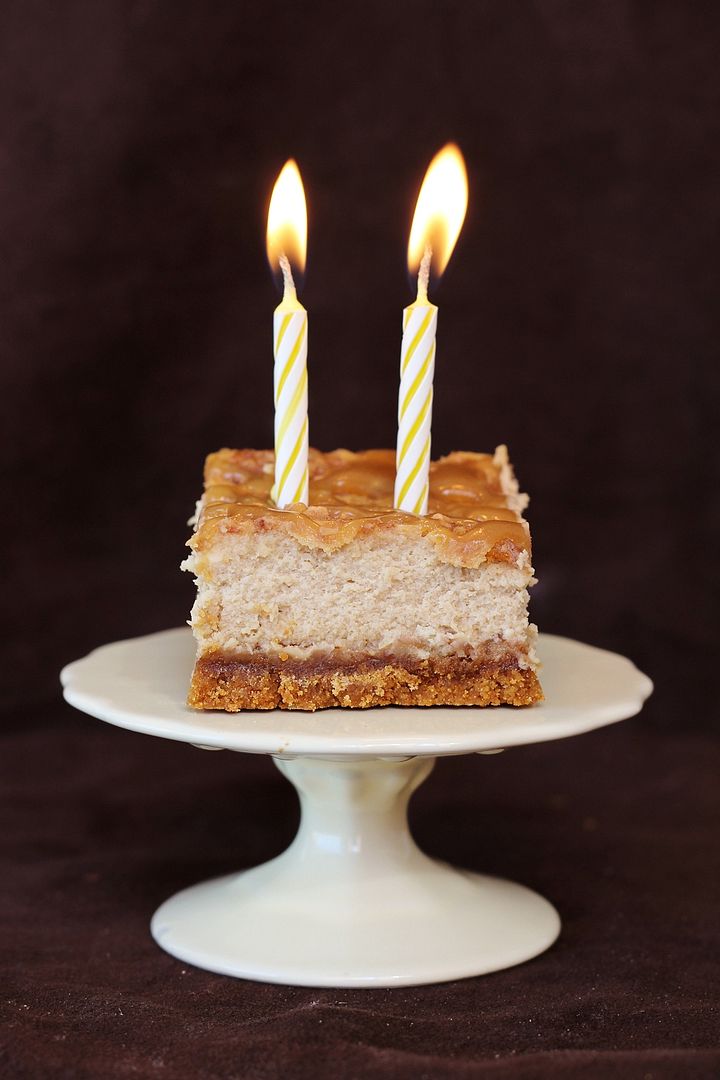
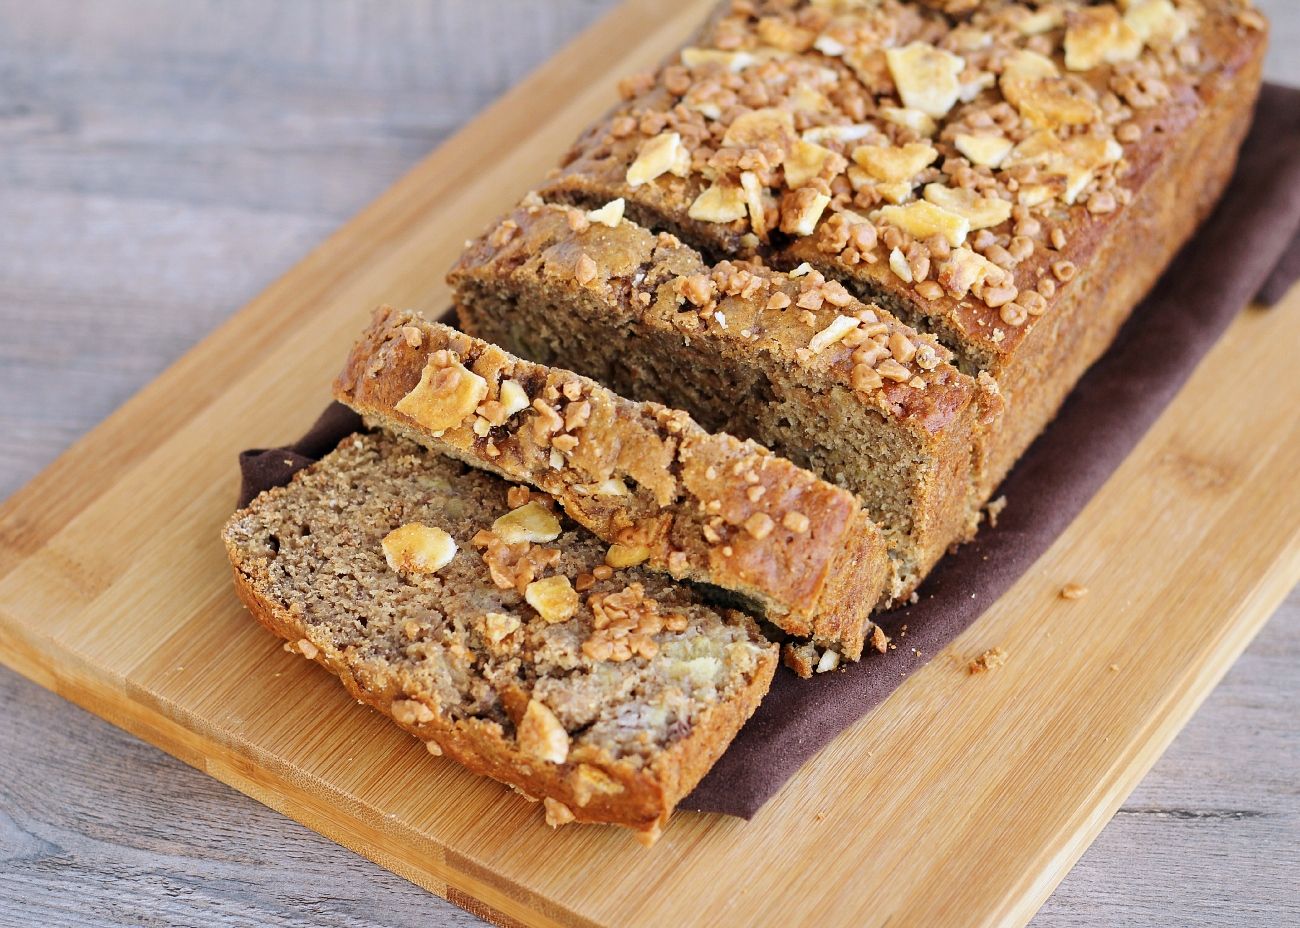
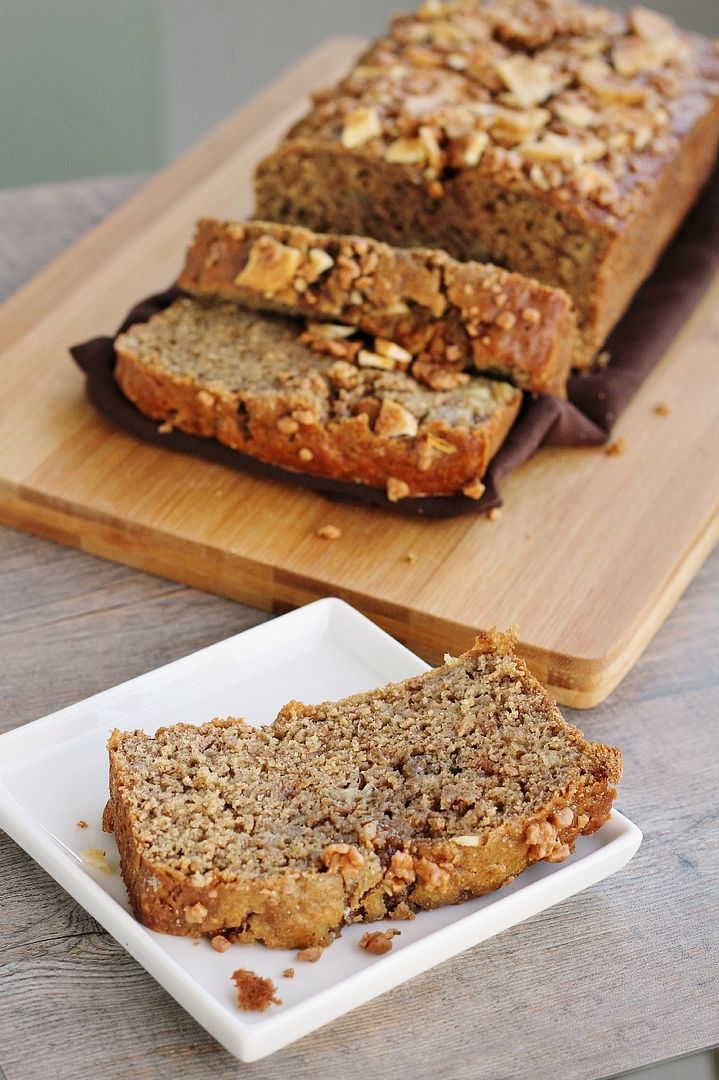
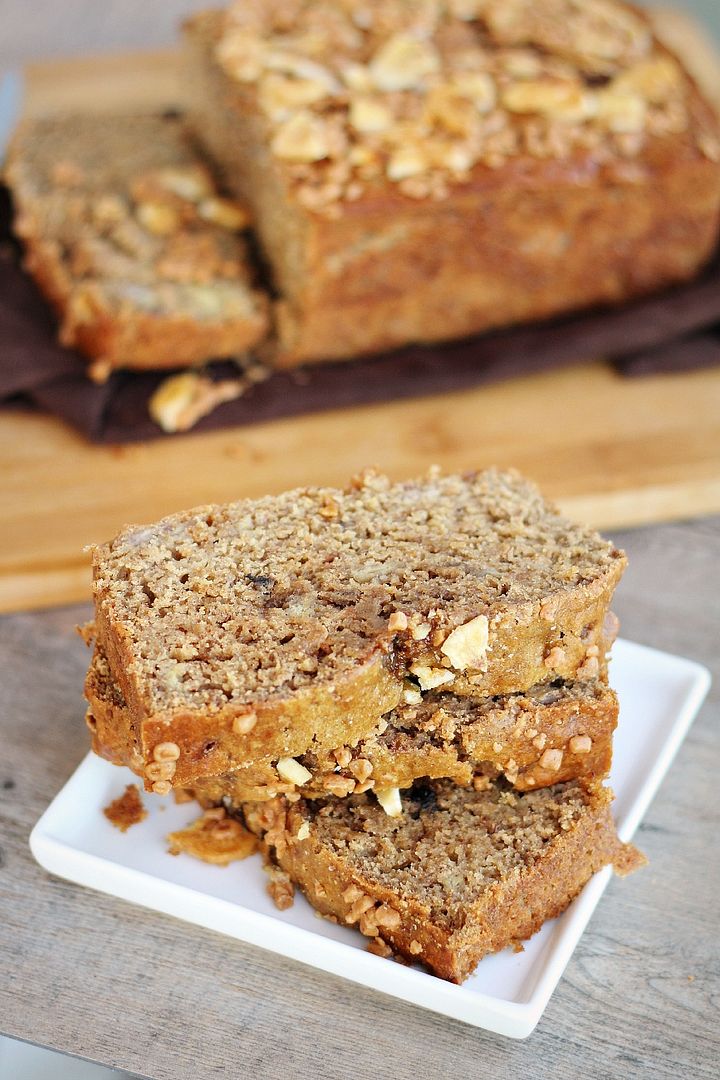
So I picked myself up and went for a new dessert. Still cheesecake-themed, but using a recipe I know works as a base this time, and going with new flavours that I know I love - caramel and coffee!

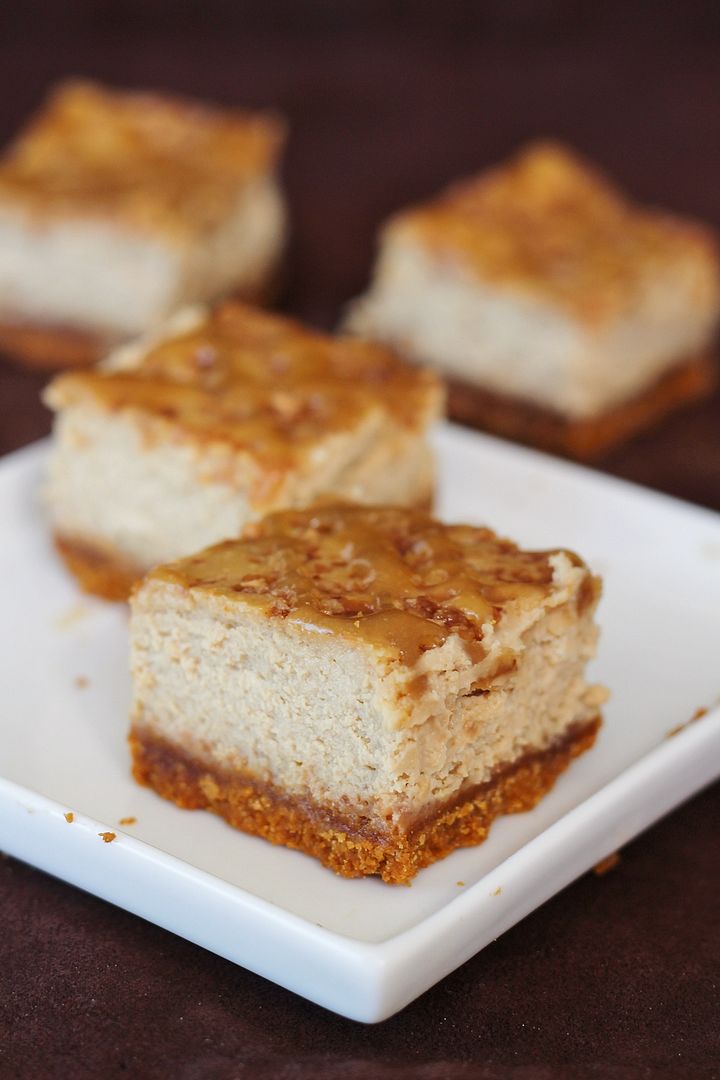
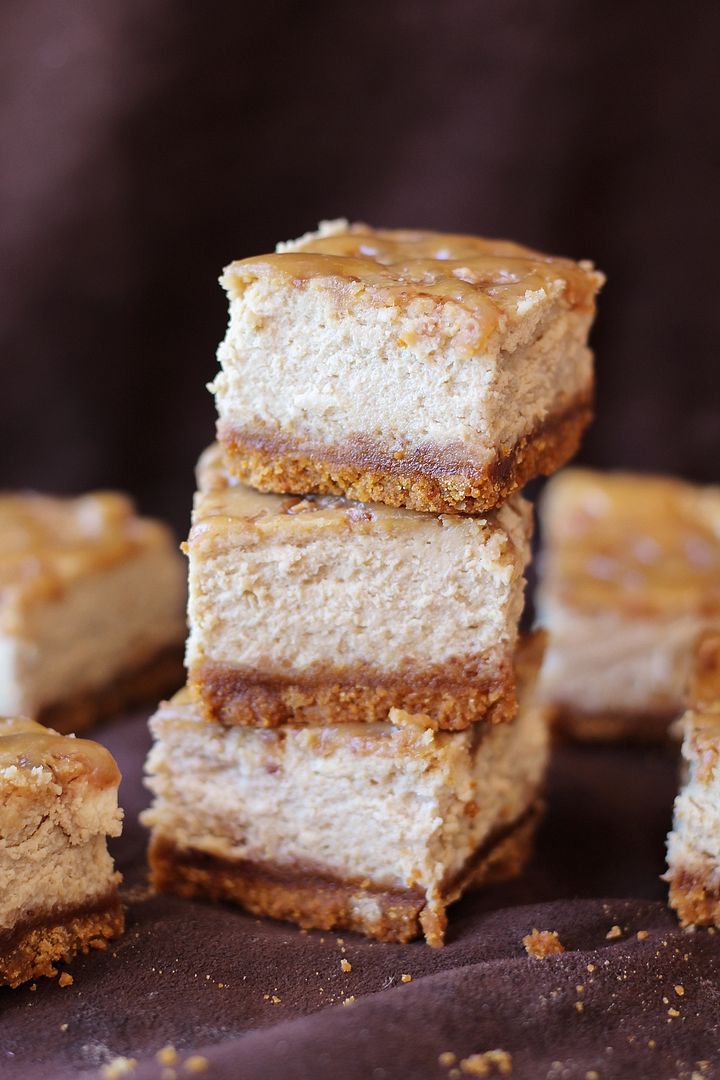
These creamy cheesecake bars have a standard graham cracker crust, but with toffee bits melted over the crust and sprinkled on top of the cheesecake, espresso mixed into the cheesecake, and a drizzle of caramel sauce overtop, giving them a lovely caramel latte flavour.  I'm so, so glad I pushed forward and made these because they may be one of my new favourite cheesecake bars!

Caramel Latte Cheesecake Squares

And what goes better with caramel latte cheesecake than a caramel latte or frappuccino – or any of your other favourite Starbucks drinks! To celebrate my blogiversary and give back to my loyal readers in a small way, I’m giving away a $30 gift card to one of my favourite places in the world, Starbucks!

I’m trying something new with this giveaway and using Rafflecopter, which many of you are likely familiar with, in an attempt to make things easier on all of us. Just use the widget below to enter and let me know if you have any problems - Canada or US entries only please.  The giveaway will close Monday July 29th, 2013, at midnight EST and I'll contact the winner soon after that, so be sure to use a valid email address/Facebook account. The e-gift card will be sent by email, so please make sure you have a working email account and access to a printer if you win!
(the rafflecopter will load immediately below this sentence; if you have a slow internet connection like the ridiculously slow one at my office today, just wait for it to appear!)

a Rafflecopter giveaway


Thanks for celebrating with me and for reading this blog – I truly appreciate all of you!

Oh and by the way, it's also my twin sister Genevieve's blogiversary at Vanilla & Spice today!  If you haven't checked out her blog before (it's full of healthy vegetarian recipes), be sure to stop by and say hi!

Caramel Latte Cheesecake Squares

Caramel Latte Cheesecake Squares

Adapted from Food & Drink and these cheesecake bars

Makes one 8x8 pan; 16-20 squares depending on how you slice them

Ingredients:
For the Crust:
1-1/2 cups graham cracker crumbs
2 tablespoons light brown sugar
2 tablespoons all-purpose flour
1/8 teaspoon salt
1/4 cup unsalted butter, melted and cooled
1/2 cup toffee bits

For the Cheesecake:
16 oz (2 bricks) cream cheese, softened
1/3 cup brown sugar
1/4 cup granulated sugar
2 large eggs
1/4 cup sour cream
2 teaspoons vanilla
1 tablespoon instant espresso
1/4 cup toffee bits

For the Caramel Sauce:
1 tablespoon unsalted butter
1/4 cup brown sugar
1 tablespoon milk
1/4 teaspoon vanilla extract

Directions:

Preheat oven to 325°F.

Line an 8-inch square baking pan with aluminum foil, leaving a few inches of foil draping over the sides of the pan (which will help with removal later).

Make the crust: Whisk together the graham cracker crumbs, brown sugar, flour, and salt in a medium bowl.  Pour the melted butter over the mixture, and stir together with a fork until all crumbs are moistened.  Transfer the mixture into the prepared pan and press evenly to form the crust.  Bake in preheated oven for 12-15 minutes, until crust is beginning to brown.  Remove from oven then pour the 1/2 cup of toffee bits in an even layer over top, pressing down lightly. Transfer to a cooling rack to cool for about 20-30 minutes.

Meanwhile, prepare cheesecake filling.  In a large bowl or bowl of an electric mixer, beat the cream cheese until smooth, about 3 minutes.  Beat in the two sugars until well combined, about 1 minute.  Beat in eggs one at a time, fully incorporating each egg into the mixture. Beat in sour cream until just combined.  Mix the vanilla extract and instant espresso together in a small bowl, then add to cheesecake mixture and mix until combined.

Pour cheesecake mixture over cooled crust, then sprinkle 1/4 cup toffee bits evenly on top (I used a bit more to fill in some gaps).  Place in middle rack of the preheated oven and bake for 40-45 minutes, until edges are set but the middle jiggles slightly (as a whole) when you shake the pan.  Transfer to a cooling rack and let cool to room temperature, about 2 hours.  Transfer to a refrigerator (I don’t cover mine) to cool completely, for at least 4 hours or preferably overnight.

Meanwhile, prepare caramel sauce by adding the butter and brown sugar to a small saucepan. Bring to a boil over medium-high heat and cook 1 to 2 minutes, until slightly thickened. Slowly stir in the milk and continue to simmer until thickened slightly. Remove from heat and stir in the vanilla extract.  Transfer to a small container and set aside until cheesecake has cooled to room temperature.  Drizzle caramel sauce over the cheesecake (I transferred mine to a small ziplock bag and snipped off the corner to drizzle with more accuracy) before refrigerating it (you could also do this step the next day after it has  been refrigerated).  *If you already have storebought caramel sauce at home and wish to use it instead, that would work fine too - I didn't have any so it was easier for me to just make some, which only takes about 5 minutes.

Slice cheesecake into bars.  Keep refrigerated.

July 23, 2013

Buffalo Chickpea Quinoa Burgers

Buffalo chickpea quinoa burgers

When I made these lemon & feta chickpea quinoa burgers for my boyfriend Ryan and I last month, I was worried that he wouldn’t even be willing to try them because he doesn’t eat a lot of veggie burgers and isn’t the biggest lemon fan.  Fortunately, he not only tried them, but actually quite liked them!   Of course, he commented that they’d be much better if I’d made them with buffalo or chipotle sauce instead of lemon though.

Buffalo chickpea quinoa burgers

I love all things lemon but I’m also a big buffalo sauce fan, so I decided to give Ryan’s “manlier” version a try.  We love these buffalo chicken burgers, but finding a protein-packed vegetarian substitute to replace them with once in a while was a pretty good idea.

Turns out he knew what he was talking about, because I think I liked these even better than the lemon version!

Buffalo chickpea quinoa burgers

I used the same combination of chickpeas and quinoa as the base of the burger; with shallots and garlic added in for flavour and crunch; oats, breadcrumbs, and an egg to bind them; and buffalo sauce mixed into the patty and served on top for maximum buffalo flavour.  Combined with some blue cheese, lettuce, and avocado as toppings, these were hearty and full of flavour, and we both loved them!  Lesson learned: I should perhaps start listening to my boyfriend’s ideas more often.  Just don’t tell him I admitted that :)

Buffalo chickpea quinoa burgers


Buffalo Chickpea Quinoa Burgers


Makes 5 burgers

Ingredients:

For the Burgers:
1/4 cup uncooked quinoa
1 (540mL) can of chickpeas, drained and rinsed
1/2 cup rolled oats
1/4 cup minced shallot
2 garlic cloves, minced
1/4 cup buffalo sauce (your favourite brand, such as Frank's Red Hot Buffalo Wing Sauce or PC Buffalo Wing Sauce)
1 large egg, lightly beaten
1/2 teaspoon salt
1/4 teaspoon pepper
1/4 cup breadcrumbs

For Assembly:
5 whole grain hamburger buns
Crumbled blue cheese
Additional buffalo sauce
Lettuce
Ripe sliced avocado (optional)

Directions:

Bring 1/2 cup water to a boil.  Add quinoa, cover, reduce heat and let simmer 15 minutes.  Remove from heat and keep covered for 5 minutes.  Fluff with a fork and let cool slightly.

Meanwhile, add chickpeas to the bowl of a food processor or mini chopper and pulse until they are broken down into crumb-sized pieces.  Transfer to a large bowl.  Add oats to same food processor and pulse a few times to break them down into fine crumbs (but not a powder).  Add to chickpeas in large bowl.  Add to the bowl the shallots, garlic, buffalo sauce, egg, salt, and pepper.  Add the cooked quinoa.  Mix everything together with a large fork until well combined.  If mixture is still too wet to form patties, add the 1/4 cup of breadcrumbs (or enough to hold the mixture together).  Divide and shape into 5 patties.

Heat a non-stick skillet over medium-high heat and cook patties for about 4-5 minutes per side.

Assemble burgers by placing patty on bun, topping with additional buffalo sauce, a bit of blue cheese (be careful not to add too much so it’s not overpowering – I though the amount I used (in the pictures) was too much), lettuce, and avocado or tomato if desired.

July 19, 2013

Frozen (Spiked) Strawberry Lemonade

Frozen Spiked Strawberry Lemonade

From what I've been reading from others, Southern Ontario isn't the only place experiencing a major heat wave this week!  Temperatures have been in the 30s with humidex ratings in the 40s (above 100F) all week, so as soon as you step outside you're completely smothered in heat to the point where it sometimes feels hard to breathe.  Apparently it's even been hot enough to bake cookies in your car, though I'm not sure I'd want to eat those cookies...

I don't actually mind that much since I've been begging for warm weather since April, but I also work in an air conditioned office and come home to an air conditioned apartment, so I have no reason to complain.  For those who've been suffering through the heat this week though, you deserve this frozen strawberry lemonade today!

Frozen Spiked Strawberry Lemonade

This drink is the perfect way to cool down and reward yourself for a hard week's work on a Friday evening.  It's made with pink lemonade concentrate and frozen strawberries to give it a lovely strawberry lemonade flavour that's not too sour or sweet.  I added coconut rum hoping to taste the coconut but it didn't really come through, so next time I'd probably just use regular rum - either works though, or you can just leave it out, though I highly recommend it!

Frozen Spiked Strawberry Lemonade

I used a spoon to get all the ice-cold slushy parts into my mouth asap, but you could drink this with a thick straw or just out of the glass if you prefer.  Either way, it likely won't last long!

Hope you all have a great weekend and stay safe out there in this heat!

Frozen Spiked Strawberry Lemonade

Frozen Strawberry Lemonade with Rum

Inspired by Cooking Light

Makes 2 drinks

Ingredients:

1 cup ice
1 cup frozen strawberries
1/3 cup frozen pink lemonade concentrate
1/4 cup rum (I used Malibu rum which isn’t very strong so next time I might add more, but with regular rum it should be fine – adjust amount to your own liking)

Directions:

Add all ingredients to a blender and blend until slushy. Divide among two glasses and garnish with a lemon wedge if desired. Serve with a spoon or straw if desired (drinking it out of the glass would work fine too).

July 16, 2013

Blueberry Maple Cornmeal Cobbler

Blueberry Maple Cornmeal Cobbler

This past weekend, my family got together to do some cherry and blueberry picking, which was my first time berry picking in years (when you don't have a car, berry fields are kind of inaccessible).  Fortunately, blueberries and cherries are probably the easiest things to pick - no prickly thorns to watch out for and no crouching down getting your shorts covered in berry stains.  It was crazy hot out, but it was pretty nice ending up with bags full of fresh berries with fairly minimal work involved.

Blueberry picking in Ontario

Of course, I now have a ton of blueberries to eat, but that's not going to be much of a problem for me because they're one of my favourite berries to eat on their own.  If you like your blueberries more in dessert form (or if you just love blueberries in any form), this is the dessert for you!

I love crisps and cobblers because they're such the perfect summertime dessert - they can be thrown together quickly and with minimal dishes, there's only one dish in the oven to worry about, they highlight summer berries, and they're a fairly light tasting way to end a meal out in your backyard on a summer evening.

Blueberry Maple Cornmeal Cobbler

Which is exactly how we enjoyed this blueberry maple cornmeal cobbler on Saturday night.

And because I made this for my family to enjoy, I didn't style and photograph it the way I normally would for a blog post, making sure I have optimal lighting, accessorizing with napkins, and cleaning up the sides of my bowl from berry stains.  Instead, what you see is exactly what we saw before we all devoured our servings. 

Blueberry Maple Cornmeal Cobbler

The only difference you may see in your own version is that your biscuit topping will probably be a bit puffier because unlike me, you probably know how to follow recipe directions.  I realized only 15 minutes after I had put the cobbler in the oven that I completely forgot to add baking powder to the biscuit dough.  I had a minor little meltdown thinking it would turn out to be a disaster, but luckily, it still turned out wonderfully!

I had reduced the amount of sugar in the blueberry filling and added pure maple syrup (plus some cinnamon) for flavour, and I loved the hint of maple in the sweet, warm berries.  I also loved the crunch of cornmeal in the topping that paired so well with the blueberries, along with the crunch from the turbinado sugar on top that also added a lovely sparkle to the dish!  The original recipe called for forming biscuits and placing those on top, but I just dropped my dough across more evenly so every piece could have some of the delicious cornmeal biscuit dough with it!

Blueberry Maple Cornmeal Cobbler

The only thing missing from the servings pictured was vanilla ice cream - I didn't think to add it when I first served it but it would have been the perfect addition to cool down and cut the sweetness of the filling a bit.  My sister tried some of the leftovers with ice cream and assured me that it was the way to go - so make sure to serve this with ice cream (and don't forget the baking powder)!

Blueberry Maple Cornmeal Cobbler

Blueberry Maple Cornmeal Cobbler

Adapted from a recipe in Rustic Fruit Desserts

Serves 6-8

Ingredients:

1 teaspoon unsalted butter at room temperature, for greasing the baking dish

Filling:
3 dry pints (2 pounds) fresh blueberries
1/2 cup sugar
3 tablespoons cornstarch
1/4 teaspoon salt
1 teaspoon cinnamon
2 tablespoons fresh lemon juice
1/4 cup pure maple syrup

Biscuit Topping:
1-1/4 cups all-purpose flour
1/2 cup fine cornmeal
2 tablespoons sugar
1 teaspoon baking powder
1/2 teaspoon salt
1/2 teaspoon cinnamon
1/2 cup cold unsalted butter, cubed
1 cup cold heavy cream
1 tablespoon turbinado sugar

Directions:

Preheat oven to 375°F.  Butter a 2 or 3 quart glass baking dish.

To make the filling, wash and drain the blueberries and place in a large bowl.  In a small bowl, whisk together the sugar, cornstarch, salt, and cinnamon.  Toss with blueberries to coat.  Pour in the lemon juice and maple syrup and stir to combine.  Transfer to the prepared dish, using a flexible spatula to scrape down the bowl and get all the juices.

To make the biscuit topping, whisk together the flour, cornmeal, sugar, baking powder, salt, and cinnamon in a large bowl.  Add the butter and use a pastry cutter or your fingers to cut in the butter until the mixture reaches the texture of large crumbs. Pour in the cream and stir just until the mixture comes together (it will be wet).

Drop the dough by large pieces on top of the blueberries, leaving some gaps.  Sprinkle turbinado sugar on top.  Transfer to preheated oven and bake for 45 minutes, or until biscuits are golden and filling is bubbling in the middle.  Serve warm, but let servings sit for a few minutes before eating as the filling will be very hot!  Serving with ice cream will help with this too (and is highly recommended).  Leftovers will keep for a few days at room temperature, covered with a tea towel.

July 12, 2013

Coffee Toffee Banana Bread

Coffee Toffee Banana Bread

Has anyone else been thinking that it’s already July 12th, which means it’s almost halfway through July, which means summer is halfway over already?! I swear summer JUST started (which is practically true considering the weather we had in June), so I'm freaking out that it’s going by way too fast! I think I’ve only managed to make it to the farmer’s market once so far, I’ve hardly made any summer recipes (especially with berries – and I completely missed strawberry season somehow), I’ve only gone to the beach once, and stores are already starting to clear out their summer clothes before I’ve had the chance to look at them! I think I say this every year, but slow down, summer!

With that being said, I’ll try to make the rest of this post short so I can finish my work then make an effort to get outside for a bit this afternoon to enjoy the sunshine :) Our city has a classic car show today where all the classic cars gather in the park for display, then drive down the streets of downtown and park on the sides of the road, so when you walk downtown it feels like you’ve been transported to the 50’s.  Not the most exciting event for someone who doesn’t appreciate cars (like me), but I’m still looking forward to doing something summery!

Coffee Toffee Banana Bread

This banana bread has a subtle coffee taste along with a subtle toffee taste that not only give it a rhyming name, but make it a little more special than regular banana bread. The original recipe included 1/2 cup of melted butter and all white flour, so to lighten it up a bit I increased the amount of banana and used 1/4 cup of olive oil instead of the butter, and replaced half the flour with whole wheat. I also used dark brown sugar instead of regular sugar, and added cinnamon and instant espresso to boost the flavour. The result is a moist banana bread with a fun flavour twist that goes perfectly with your morning coffee!

Hope you all have a great weekend and do something to enjoy summer!

Coffee Toffee Banana Bread

Coffee Toffee Banana Bread


Makes one 9x5-inch loaf

Ingredients:

3 large ripe bananas, mashed (about 1-1/4 cup)
1/2 cup brewed strong coffee
1 cup all-purpose flour
1 cup whole wheat flour
2 teaspoons baking powder
1/2 teaspoon baking soda
1/2 teaspoon salt
1/2 teaspoon cinnamon
1/4 teaspoon nutmeg
1 tablespoon instant espresso
1/4 cup extra-virgin olive oil
3/4 cup packed dark brown sugar
2 large eggs
1-1/2 teaspoons pure vanilla extract
1/2 cup + 2 tablespoons toffee bits (such as Skor or Heath bits, found in stores with the chocolate chips), divided
1/4 cup chopped banana chips (optional)

Directions:

Preheat oven to 350°F and spray a 9 x 5-inch loaf pan with non-stick spray.

Mix banana and coffee in a small bowl.

In a medium bowl, whisk together the all-purpose flour, whole wheat flour, baking powder, baking soda, salt, cinnamon, nutmeg, and instant espresso.

In a large bowl, whisk together the olive oil and brown sugar.  Add eggs one at a time, mixing well after each addition.  Add the vanilla extract and the banana-coffee mixture and stir until combined.

Slowly add the dry ingredients to the wet ingredients, stirring with a wooden spoon or a spatula until just incorporated.  Fold in 1/2 cup toffee bits. 

Pour mixture into prepared loaf pan and bake for 25 minutes.  Remove from oven, sprinkle the top of the loaf with the remaining toffee bits and banana chips, then return to oven for an additional 25 to 30 minutes, until a toothpick inserted in the middle comes out clean.  *Don't worry about getting all the banana chips on top of the loaf if they don't all fit; you don't want to weigh down the top of the loaf too much to make sure it bakes evenly inside.*  Let stand in pan 10 minutes before transferring to a wire rack to cool completely, then slice.

July 09, 2013

Whole Wheat Pasta with Chickpea Sauce, Broccoli, & Tomato

Healthy vegetarian whole wheat pasta with broccoli, tomatoes, and chickpea sauce!

I got back from my little vacation up north almost a week ago now and somehow I still haven’t cooked a meal for myself yet.  Usually I’m dying to get back to cooking my own meals when I return from a trip, but this time I’ve been too busy to go grocery shopping or plan a meal and have therefore been eating a lot of peanut butter and jam sandwiches (thankfully I froze some fresh blueberry chia jam before I left) over the last week!  But seeing as I used up the last of my frozen bread today, I think tonight I’ll finally force myself to go shopping and make some food to get me through the rest of the week!

One of my go-to meals when I need an inexpensive and healthy meal that will give me leftovers for lunches through the week is this chickpea pasta.  A sauce that’s made out of chickpeas may sound a little weird, but it tastes so good!  I want to say it tastes like a white wine cream sauce but I’m sure someone who regularly eats cream sauces will disagree, so I’ll just say that it’s hard to guess it’s a chickpea sauce (unless you’re looking closely at the texture, which is of course a little chunkier than a cream sauce).  

Healthy vegetarian whole wheat pasta with broccoli, tomatoes, and chickpea sauce!

I’ve adapted this Cooking Light recipe over several meals to my own liking, so that in my version I eliminate the raw garlic as I don’t think it’s needed, add cooked onion to the sauce for more flavour, use vegetable broth instead of chicken (not just to make it vegetarian but because I think it tastes better in this dish), and I add broccoli and increase the amount of veggies.  I also like to use whole wheat pasta and have tried shells, rotini, and linguine – they all work.  Feel free to use whatever vegetables you want too – mushrooms, zucchini, peppers, leafy greens – they’d all be great if you want to boost the nutrients even more.  

With the protein in the chickpea sauce, this makes a great vegetarian meal that will fill you up to power you through the rest of the work day, which, along with coffee, I will definitely be needing this week!

Healthy vegetarian whole wheat pasta with broccoli, tomatoes, and chickpea sauce!

Whole Wheat Pasta with Broccoli, Tomato, & Chickpea Sauce

Adapted from Cooking Light

Serves 4-6

Ingredients:

1 tablespoon olive oil
1 small onion, chopped
3 cloves garlic, minced
3/4 teaspoon kosher salt
1/4 teaspoon red pepper flakes
1 (540mL) can chickpeas, drained and rinsed
1-3/4 cups vegetable broth
375g (one box) uncooked whole wheat pasta (any type works)
1 head of broccoli, chopped into florets
1 pint grape tomatoes, halved
1-1/2 tablespoons fresh lemon juice
Grated parmesan cheese for topping
Salt and pepper for extra seasoning

Directions:

Heat oil in a large saucepan over medium heat. Add onion and sauté until softened, about 4 minutes, stirring often. Add garlic and stir for another minute. Add salt, red pepper flakes, chickpeas, and vegetable stock. Bring to a boil, cover, reduce heat, and simmer 15 minutes.

Meanwhile, cook pasta in salted boiling water according to package directions. During the last few minutes of cooking, place broccoli in a steamer and set covered over the boiling water until bright green. Drain broccoli and pasta, reserving 1/4 cup of the pasta water.

Place chickpea mixture in a food processor. Add lemon juice and reserved pasta water and blend until smooth. Season with additional salt and pepper if desired.

Combine chickpea sauce, pasta, broccoli, and tomatoes in a saucepan or large bowl and toss to combine. Serve warm, topped with grated parmesan cheese.  Season again with salt and pepper if needed.

July 04, 2013

Strawberry, Avocado, & Feta Salsa

Strawberry, Avocado, & Feta Salsa

Sorry for the lack of activity around here lately, but I just returned from a wonderful week-long trip to visit family up in Northern Ontario.  I had fully intended to continue posting while I was away, but time went by way too quickly and to be honest, it felt pretty nice to keep my laptop closed for most of the week and spend my time visiting and just relaxing instead.  We also had beautiful weather so I spent a lot of time outside, with plenty of beach time, a few moments of attempting to brave the freezing cold lake water, going for walks, watching some great Canada Day fireworks, and getting eaten alive by bugs!

It was a great week, but now I'm busy trying to catch up on work and everything else I've missed, so today's post will be rather short!  And since the majority of my readers are American and hopefully spending some time outside or visiting with family themselves for July 4th, I'm assuming you won't want to read a long post today either!

Strawberry, Avocado, & Feta Salsa

This is a simple salsa to throw together that celebrates strawberry season by pairing fresh strawberries with diced avocado, feta cheese, basil, lime juice, and a bit of jalapeno for spice.  It might sound a little weird, but everything works together in a wonderful way!

Strawberry, Avocado, & Feta Salsa

This is fantastic eaten as a dip for tortilla chips but works equally well as a fresh summer crostini.  I have a feeling it would also pair well with chicken for a main course, and since I'll likely be making this plenty more this summer, I'll be sure to test it out!

I hope my Canadian friends had a great long weekend this past weekend and that my American friends enjoy their celebrations today!

Strawberry, Avocado, & Feta Salsa

Strawberry, Avocado, & Feta Salsa

Serves a small group as an appetizer; if you’re serving a larger group, double the ingredients

Ingredients:

1 cup diced strawberries
1/2 cup diced ripe avocado
1-1/2 tablespoons minced shallot
1/2 a jalapeno, minced (seeds removed for less spice)
1/3 cup crumbled feta cheese
1/2 teaspoon lime zest
1 tablespoon + 1 teaspoon fresh lime juice
1/4 cup chopped basil leaves
1 teaspoon sugar
Freshly ground pepper

Directions:

Add all ingredients to a bowl and mix to combine.  Taste and adjust any amounts to your liking if necessary.  Serve in a bowl as a dip for tortilla or pita chips, or spread on toasted baguette slices to serve as crostini.

Ingredient Index

Related Posts Plugin for WordPress, Blogger...