July 27, 2012

5 Healthy Summer Quinoa Salads

5 Healthy Summer Quinoa Salads

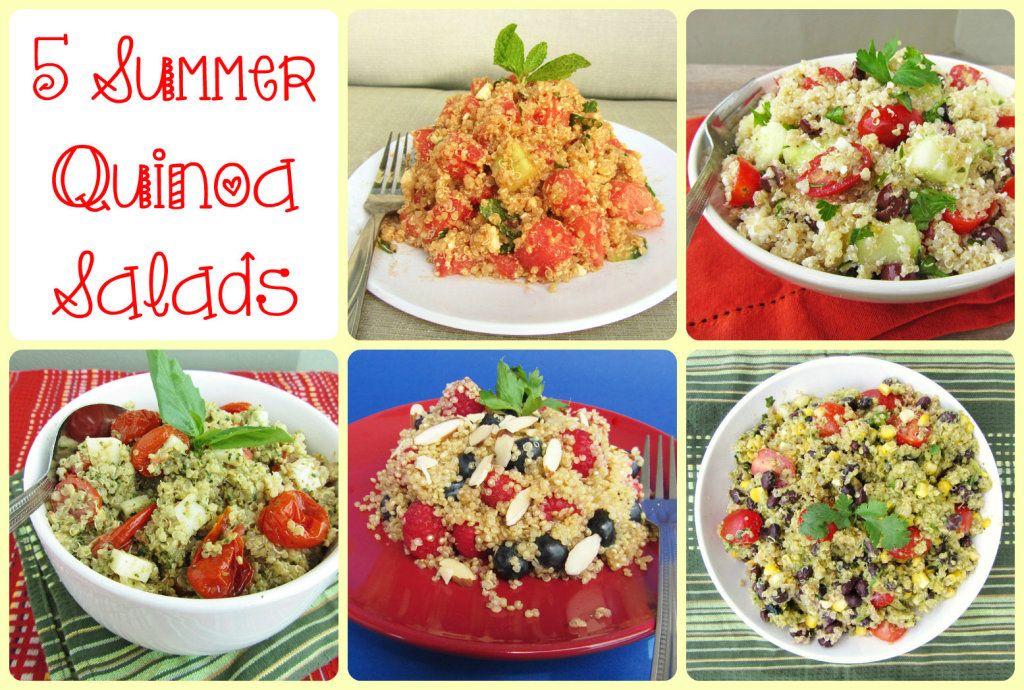
Before I get into today's post, I just wanted to say a quick thank you for all the lovely comments and well wishes you guys gave me on my first blogiversary!  You all made my day and I'm so excited to begin Year 2 of Once Upon a Cutting Board!  And to start it off, I have not one but five delicious quinoa recipes to share with you!

I've been eating a lot of quinoa this summer, so I thought it'd be fun to do a little round-up of some of my favourite quinoa salads I've tried recently. As I'm sure you already know, quinoa is a very versatile seed that's full of nutrition and makes a great base for so many different flavour combinations.  Quinoa is high in protein (with all the essential amino acids), low in fat, and full of vitamins and minerals, plus it's easy to cook and tastes great!

If you're looking for a light and healthy vegetarian main course or side dish to enjoy this summer, give one (or all) of these salads a try!  Each of the recipes below are from other bloggers, so for each one I'll link to the original recipe and add my comments and notes about any changes I made.  I won't bother describing how much I loved each salad because I loved all of them!

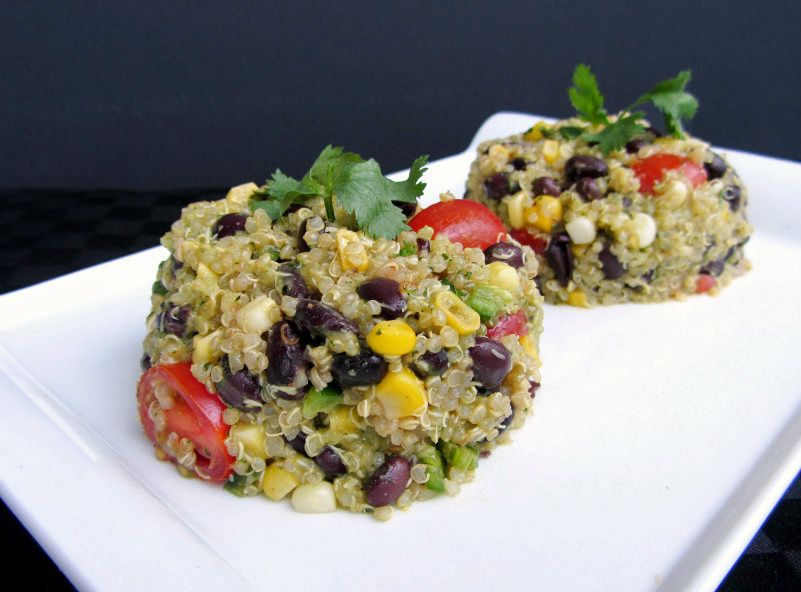
1) Mexican Quinoa Salad with Creamy Avocado Dressing

Mexican Quinoa Salad with Creamy Avocado Dressing

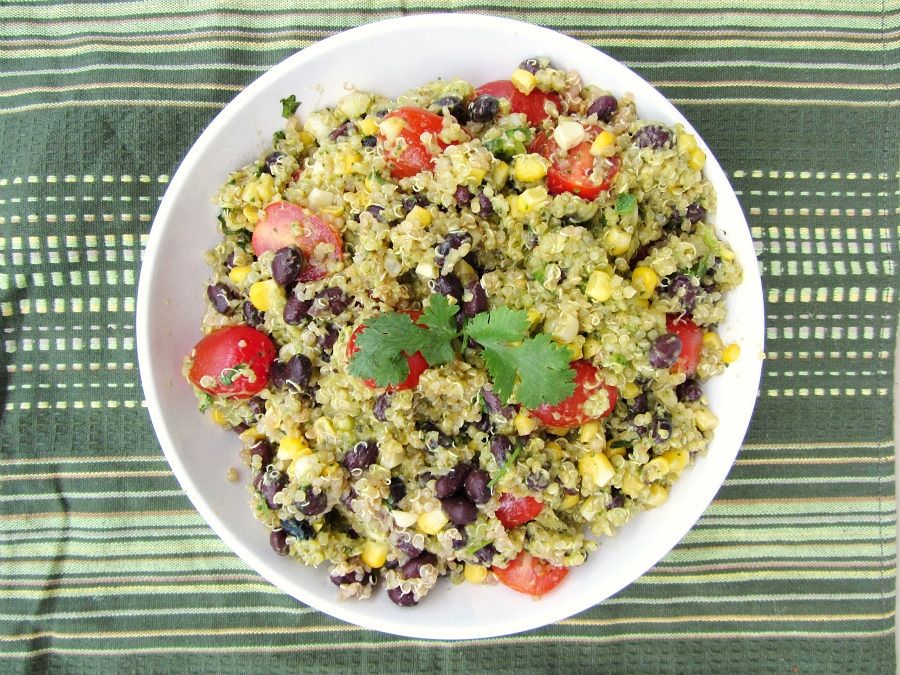
Recipe: The Realistic Nutritionist (guest post by Bake Your Day)

Comments: I love using fresh corn and tomatoes in the summer and with the addition of black beans, jalapeno, cilantro, spices, and avocado, this makes a really flavourful Southwest-style salad with a nice little kick of spice.  It's full of nutritious ingredients and is quite filling with the avocado dressing.  The thick dressing does make the salad clump together a little instead of being light and fluffy, but it infused it with a great flavour and made it easy to form the quinoa into pretty little cakes for a fancier presentation! (see picture below)

My Changes: I used fresh corn instead of canned corn and I left out the green onions (just because I don't like them!)

Mexican Quinoa Salad with Creamy Avocado Dressing

2) Watermelon, Feta, & Mint Quinoa Salad

Watermelon Feta Quinoa Salad

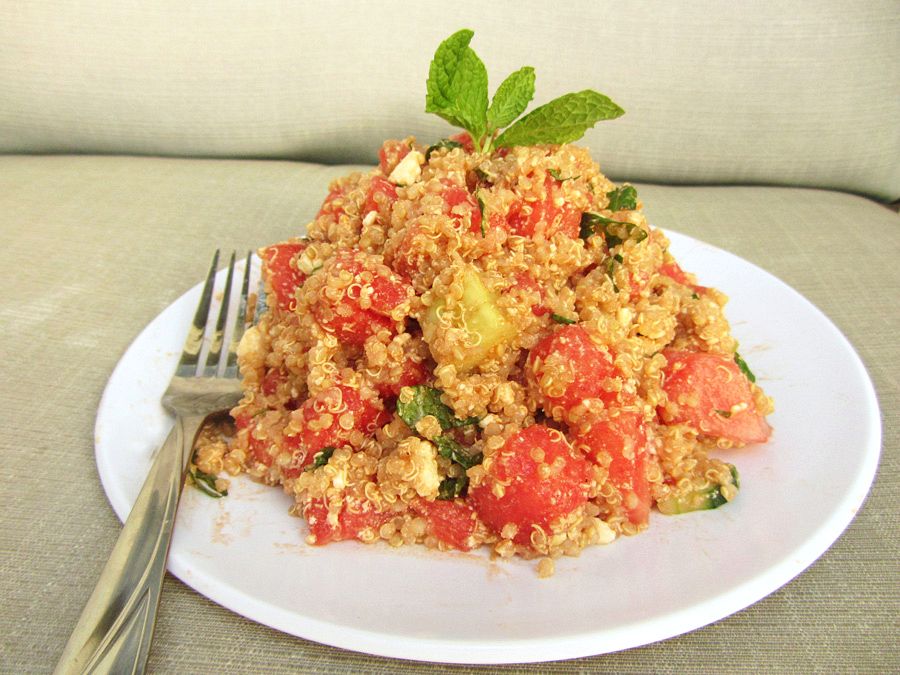
Recipe:  The combination of watermelon, feta, and mint has appeared all over the web!  I used this combination to make up my own recipe, but you could follow some of the various recipes that are already online, like at How Sweet It Is, Annie’s Eats, or Cookin’ Cowgirl

Comments:  If you like the combination of watermelon, feta, and mint, then you'll love this!  I didn't really measure anything for this salad - I just made a big batch of quinoa and threw in what I thought to be an appropriate amount of cubed watermelon, crumbled feta, chopped cucumber, and mint leaves, and tossed it with a balsamic vinaigrette (olive oil, balsamic vinegar, salt, and pepper).  The result was a light and refreshing salad with a good mix of sweet, salty, and minty flavours!  I'm actually not that crazy about mint, so next time I'd use basil instead so it's not too overpowering, but if you love mint then go for it!

3) Greek Quinoa Salad

Greek Quinoa Salad

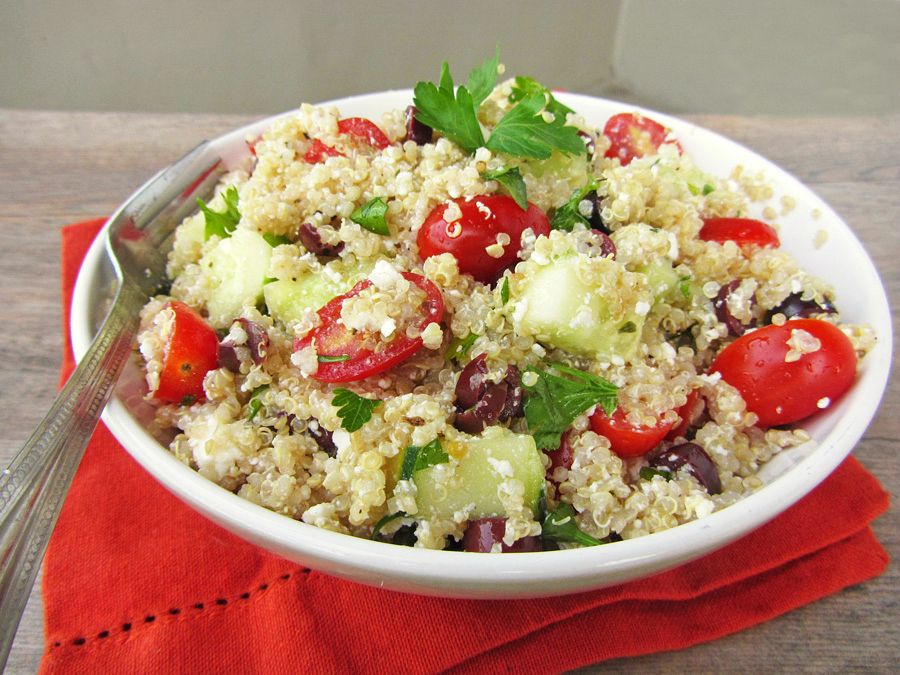
Recipe: Two Peas & Their Pod

Comments: This is just like a traditional Greek salad but with protein-packed quinoa as a base instead of lettuce.  I usually love anything that has feta cheese in it so I knew this would be good, but it really exceeded my expectations and all the components worked together so well.  This would make a great potluck dish because everyone is familiar with Greek salad, but this way it's in a form that's easier to transport and serve and can last a lot longer without worrying about wilted greens!

Changes: I left out the red onions because I don't like them, and I added a handful of chopped parsley, which I would highly recommend!  I also used sliced olives instead of whole olives so they would be more evenly distributed throughout the quinoa (I used 1/4 cup sliced olives).

4) Berry Almond Quinoa Salad

Berry Almond Quinoa Salad

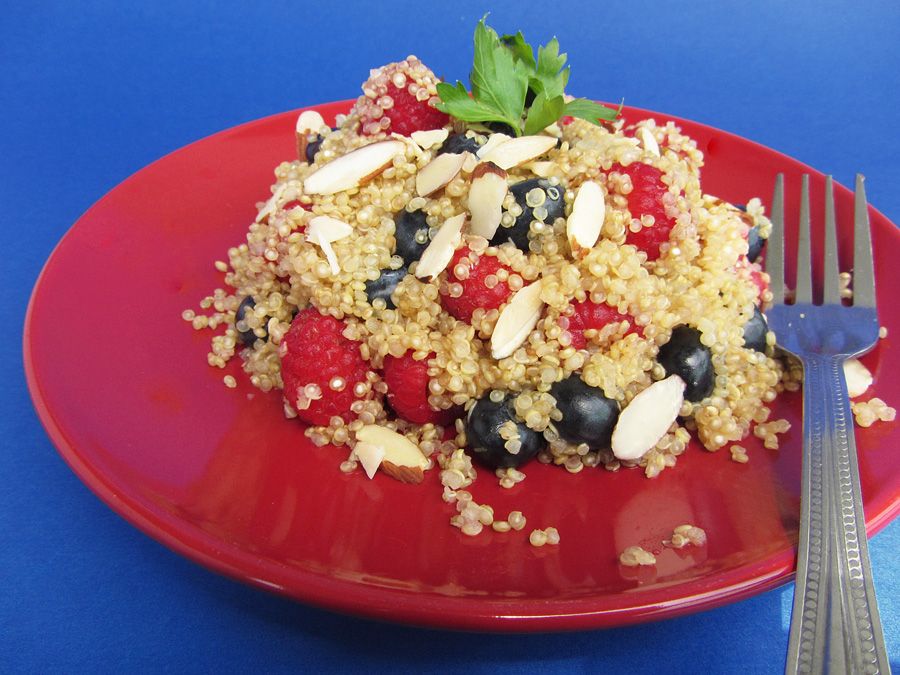
Recipe: Oh She Glows

Comments: This quinoa salad is different from the others in this list because it's more on the sweet side with berries as the main component and maple syrup in the dressing.  This definitely isn't a bad thing though, it actually makes the dish really versatile because you could easily eat it for breakfast, lunch, snacks, dinner, or even dessert!  The vinegar and lime juice in the dressing do cut the sweetness a bit, but if you want to make it more on the savoury side, you could probably add a fresh herb like basil or mint to the quinoa.  My sister has made this dish several times in the past and brought it to a potluck once where it was very popular, so if you have any summer potlucks or picnics coming up, this would be a great addition!

Changes: I didn't have strawberries or cherries on hand when I made this so I used a combination of blueberries and raspberries and it was delicious!  I think you could easily use any berries you like with this.

5) Pesto Quinoa with Roasted Tomatoes

Pesto Quinoa with Roasted Tomatoes and Mozzarella

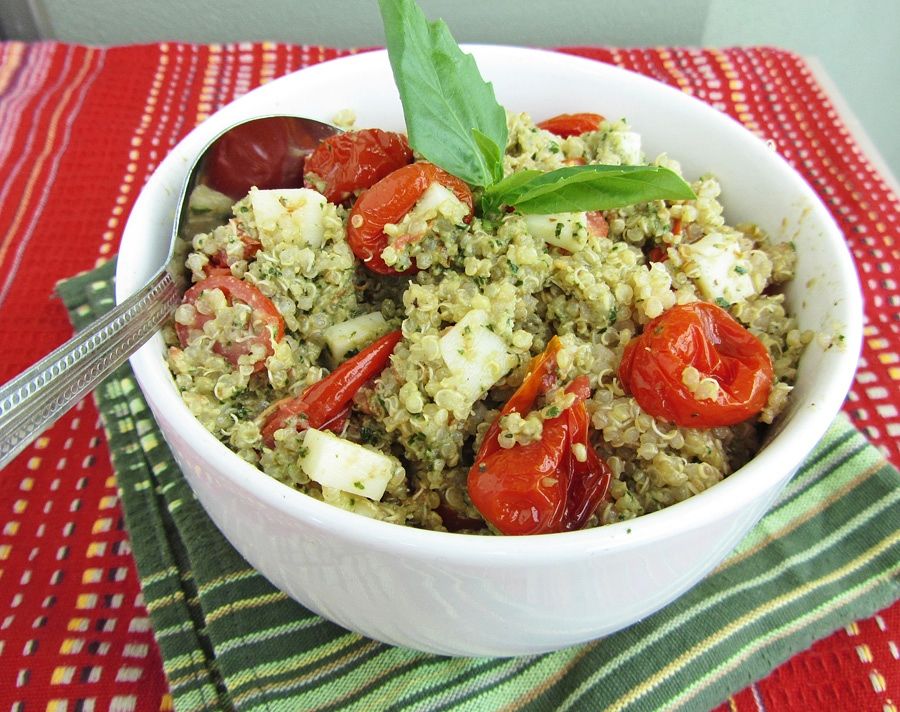
Recipe: Big Girls Small Kitchen

Comments: I saved this one for last because it was my favourite quinoa dish I've tried yet!  I could not stop eating this and cannot wait to make it again.  The quinoa is tossed with an amazing pesto vinaigrette and combined with warm roasted tomatoes and little cubes of mozzarella that make this taste like such a comforting yet summery dish.  I loved warming up my leftovers so the mozzarella would start to melt throughout the quinoa - so good!

Changes: I used grape tomatoes instead of cherry tomatoes, and added some raw halved grape tomatoes in addition to the roasted tomatoes in order to have more textural contrast.  I also added a bit of water to the pesto vinaigrette to thin it out a little, and I unfortunately had to leave the avocado out because mine hadn't ripened on time to use it in this dish, but I think this dish would be even better with the addition of the avocado!


More Summer Quinoa Salads

Here are a few more great looking quinoa salads that I haven't gotten to yet but are on my list to try!

Quinoa guacamole salad from Chasing Some Blue Sky
Quinoa salad with roasted tomatoes, broccoli, and feta from Smells Like Home
Cheesy zucchini quinoa from Running to the Kitchen
Mango blueberry quinoa salad with lemon basil dressing from Veggie Belly
Grilled corn and cheddar quinoa from How Sweet It Is
Summertime quinoa salad from The Fig Tree

What's your favourite quinoa recipe for summer?  Let me know in the comments, I'm always looking for new combos to try!

July 24, 2012

Mini Funfetti Cheesecakes for My 1st Blogiversary!

Mini Funfetti Cheesecakes

One year ago today, I hit 'publish' on my very first post on Once Upon a Cutting Board, making today my 1-Year Blogiversary!

When I started this blog, I wasn't even sure if it would last long enough to see an anniversary.  At the time, I just wanted a place to keep track of the increasing amount of recipes I was trying, and to share my growing love for food photography with others, even if it was just my family reading it.  One year later, I actually have readers beyond my family reading this, and my love for this blog grows stronger every day!

To mark the occasion, I thought I'd briefly look back at the past year through a series of short lists.  And, obviously, cheesecake!  But we'll save that until the end :)

Mini Funfetti Cheesecakes

How My Cooking Has Changed and Improved

Mini Funfetti Cheesecakes

How My Blog Has Changed and Improved

I've learned a lot about the technical side of blogging in addition to cooking, and have made what I think are some big improvements to the blog over the last year.  Let me know what you think!
  • New, cleaner design (I don't even want to show you a screenshot of the old design!)
  • An Ingredient Index for an easy way to find recipes that include a certain ingredient (this took me forever to figure out how to do so I'm quite proud of it!)
  • I joined Facebook, Twitter, and Pinterest - Twitter took me a while to finally join but now I love it!
  • I've added Follow buttons, share buttons, and a print friendly button 
  • New commenting system (which might change again soon, I'm not sure I like this one - thoughts welcome!)
  • Updated my About Me page (this was actually only done recently, so check it out if you haven't yet!)
  • Improving photography (I hope!)

Mini Funfetti Cheesecakes

A Few Highlights from the Last Year

  • My very first Foodgawker acceptance - I will never forget how happy I was that night!
  • My beet hummus being featured on Glamour magazine's website - that was the first huge spike in traffic I had and it was so exciting!
  • My first original recipe being featured in Eat In Eat Out's premiere issue!
  • My first giveaway with Aurora Importing - I loved finally being able to give something back to my readers and working with the lovely people at Aurora!
  • My first time being featured on The Kitchn's Delicious Links - I never thought one of my recipes would be included in their daily picks so I was thrilled to see my popsicles featured recently!

Mini Funfetti Cheesecakes

What I’ve Loved about Blogging

  • Being a part of the food blogging community and talking to other bloggers! I love the friends I've made online and the great advice and opportunities I've received as a member of the Food Bloggers of Canada.
  • All the great food I've tried in the last year because I've pushed myself to try new things in the kitchen (and I've loved sharing that food with others!)
  • The readers!  Knowing that such wonderful people are out there reading my blog makes this all worth it, and every time I received a reader comment, it makes my day!

Mini Funfetti Cheesecakes


So THANK YOU for reading along this past year, I hope you've enjoyed it as much as I have!  If it weren't for you guys then I wouldn't have made it this far, so thank you so much!

To celebrate and show my appreciation, I made these festive little funfetti cheesecakes!  When I tried to think of what I should make to celebrate, I couldn't seem to get sprinkles out of my mind, so I used them (and some funfetti cake batter) to make these individual cheesecakes from Gingerbread Bagels.  They were so good and I loved how they use a Golden Oreo as a base!  They were a big hit with everyone I shared them with, and I'd highly recommend them for any celebrations you may have coming up!

To get the recipe, head over to Gingerbread Bagels!

Thanks again and cheers to another year! :)

July 20, 2012

Key Lime Pie Yogurt Pops

Key Lime Pie Yogurt Pops

If I don't go to the grocery store or market with a shopping list in hand, I always end up with something in my cart that I have no idea what I'll do with, but it was either on sale or looked pretty or was something I've never seen before and was curious about.  The problem is that I always have so many recipes I plan on making, so by the time I get around to using the ingredient that I had no plans for, it has already gone bad (especially if it was fresh from the market).

When I saw key limes for sale at the grocery store a few weeks ago, I bought not one, but two bags.  I had no idea what I would do with them, but they were so cute and little that I couldn't resist!  My sister, who knows me well, thought I was crazy and that I would never use them, so I was determined to put them to use!

Key Lime Pie Yogurt Pops

First I made a batch of key lime pie bars that I had intended on sharing with my lab at school, but they were a miserable failure and I had to throw the whole batch out (I HATE when that happens!!) This just made me even more determined to make good use of the remaining key limes, and I started thinking more creatively beyond key lime pie. 


Because I've been loving making popsicles lately, I came up with the idea of recreating the flavours of key lime pie in a healthy popsicle!  I looked for some recipes online, but the only ones I came across used heavy cream or sweetened condensed milk as the base, which wasn't exactly what I had in mind.  So I decided to make a healthier version using yogurt as a base.  I started with lime yogurt, added some key lime juice and zest, then in order to make it a key lime pie popsicle and not just a key lime popsicle, I added a couple layers of graham cracker crumbs!

Key Lime Pie Yogurt Pops

I absolutely loved these!  They were smooth and creamy from the yogurt, with a strong key lime flavour and a taste of graham cracker in every lick, which really reminded me of key lime pie!  The graham cracker ribbons were actually my favourite part - I loved getting to the bottom of the popsicle and chewing the graham crumbs that were left!


At the time I made these, the only lime flavoured yogurt available in stores was Astro natural lime yogurt, which worked wonderfully.  However, I just noticed the other day that we now have key lime flavoured Greek yogurt available (I can't remember which brand it was, but I believe it was Oikos).  I haven't tested the recipe out with Greek yogurt, but I think it would work just as well!  I know there are plenty of key lime flavoured yogurts available in the United States too, so give these a try with your favourite brand, and just be sure to taste the mixture before freezing, as you may need to adjust the amounts of added lime juice and zest depending on how tart or sweet your yogurt is.

Key Lime Pie Yogurt Pops

I love that I'm getting so much use out of my popsicle mold this summer, first with these banana date popsicles, then the strawberry pineapple lime popsicles, and now these key lime pie pops, which may be my favourite yet!  I do have another recipe coming up soon though which is just as good, so it's getting difficult to choose a favourite!

If you haven't bought a popsicle mold yet this summer, I highly recommend it!  Have a great weekend! :) 

Key Lime Pie Yogurt Pops

Key Lime Pie Yogurt Pops

Recipe by Once Upon a Cutting Board

Makes about 4 popsicles (depending on size of popsicle mold)

Ingredients:

1 cup lime or key lime flavoured yogurt (I used Astro lime natural yogurt)
1 tablespoon + 1 teaspoon fresh key lime juice
1 teaspoon key lime zest
~1/4 cup graham cracker crumbs

Directions:

Mix yogurt, lime juice, and lime zest in a small bowl.  Taste and add more lime juice or yogurt if needed.

Fill each popsicle mold halfway with the yogurt mixture, then sprinkle a spoonful of graham cracker crumbs on top, and fill the rest of the way with the yogurt.  Finish with another thin layer of graham cracker crumbs, then insert popsicle sticks and freeze.

July 16, 2012

Raspberry Cherry Crumb Bars

Raspberry Cherry Crumb Bars

If I had to choose my favourite of all the summer berries, I think I'd have to pick raspberries.  I'm pretty sure there's no better taste than a sweet, plump, fresh local raspberry that you let melt in your mouth because you want to hold on to the flavour as long as you can. I picked some up at the farmer's market a couple of weeks ago that were the best tasting raspberries I've ever had!  Of course, there was a special price if you mixed and matched three different berries, so I grabbed some blueberries, and on a whim, I decided to try out some cherries. 

I've always thought that I didn't like cherries and have always avoided them, but after I tried one, then another, and another, I realized they're pretty darn good!  I think that all this time that I thought I didn't like them was because I associated them with that artificial cherry taste and those overly sweet maraschino cherries from the top of ice cream sundaes.  Real, fresh cherries, however, remind me a lot of plums, which I love!

I immediately started thinking of ways to pair my raspberries and cherries together and came up with these delightful crumb bars!

Raspberry Cherry Crumb Bars

Fruit crumb bars are one of the easiest desserts to make and are such a great way to highlight the wonderful flavours of summer fruits and berries in a light and summery dessert.  And all you have to do is make one sweet buttery dough that you use for the base and topping, then sandwich a gooey layer of sweet berries or fruit in between.  In this case, the middle layer was made up of cherries and raspberries, which is surprisingly a combination that you don't see a lot in recipes.  I don't know why, because they worked so well together!

These bars turned out even better than I'd hoped!  I could have eaten the whole tray myself, but I decided to share, and everyone else loved them too.  Not only do they taste great, but they look stunning with their gorgeous deep red colour from the cherries and raspberries, and they're so easy to make!

Raspberry Cherry Crumb Bars

I only made an 8x8 pan of bars, but the original recipes I based this on were made in a 9x13 pan.  Sometimes cutting bars in half this way doesn't work because an 8x8 pan isn't exactly half of a 9x13 pan, but in this case it worked fine, so if you want to feed more people then you can easily just double the recipe below and bake them in a 9x13 dish.

I'm so sad that raspberry season is ending so quickly after it began here, but if you can't find good raspberries anywhere, I think these would be just as great with a cherry-blueberry filling, or cherry-peach, or peach-blueberry!  The combinations are endless, and there's still plenty of time left of summer to try them all out :)

Raspberry Cherry Crumb Bars

Raspberry Cherry Crumb Bars

Adapted from All Recipes and Beach Bakeaholic

Makes 16 squares in an 8x8 pan

Ingredients:

For the Filling:
1 cup chopped fresh cherries (pits and stems removed)
1 cup fresh raspberries
1/4 cup sugar
1-1/2 teaspoons cornstarch

For the Dough:
1-1/2 cups all-purpose flour
1/4 cup packed brown sugar
1/4 cup granulated sugar
1/2 teaspoon baking powder
1/8 teaspoon salt
1/2 cup unsalted butter, cut into small pieces
1/2 of a large egg (whisk one egg in a bowl then divide in half and use only half)
1/2 teaspoon vanilla extract

Directions:

Preheat the oven to 375°F. Line an 8x8 pan with parchment paper or aluminum foil and spray with non-stick cooking spray.

In a medium bowl, combine the cherries and raspberries with the sugar and cornstarch, and toss to coat.  Set aside while you prepare the dough.

In a large bowl, whisk together the flour, sugars, baking powder, and salt.  Add the butter and use a pastry cutter or food processor to mix in until coarse crumbs form.

In a small bowl, whisk together the egg and vanilla.  Add the egg mixture to the dough and mix until combined (using a fork, spoon, or your hands).

Press half the dough into the bottom of your prepared pan, patting it down evenly in one layer.  Spread the berry mixture evenly over the dough.  Crumble the remaining dough overtop.  Bake in preheated oven for 35-40 minutes, until dough is golden brown.  Let cool completely before cutting into bars.

July 13, 2012

Quinoa-Stuffed Poblano Peppers with Chipotle Sauce

Quinoa-Stuffed Poblano Peppers with Chipotle Sauce

Have you ever had one of those nights where everything seems to go wrong in the kitchen?  This was one of those times.  It started with a blender explosion – I’d made my chipotle sauce in the blender, removed the lid, then thought “I really wouldn’t want a blender explosion right now, I’d better press the Off button again just to make sure it’s really off” (don’t ask why I thought that made sense at the time).  Of course, the 'off' button also doubles as sort of ‘on’ button (who designs blenders?), and my sauce went flying all over the kitchen.  If you follow me on Facebook, you may recall a picture of this little disaster that I posted (yes, it was all the way back in April, but please don’t take that as a reflection of the quality of this dish, it was amazing, I just haven’t had the chance to share it yet!)

Then I realized that the handy little microwavable package of frozen corn I’d bought was in fact not regular corn, but was coated in a LOT of butter sauce.  The butter sauce proceeded to explode out of the plastic bag in the microwave, so not only did I have to clean it out of there, I also had to try to rinse/wipe it off every piece of frozen corn because I didn’t want it to ruin my dish.  Once that was out of the way, I proceeded to dump way too much oil in my pan for cooking the onion, then forgot about the onions so they almost burnt, then sliced all the way through one of my peppers when I was stuffing it so I had to cut it in half …. You get the picture.

After all that, I was praying that this dish wouldn’t also turn out to be a disaster, but it blew away all my expectations and turned out so good! 

Quinoa-Stuffed Poblano Peppers with Chipotle Sauce

I’ve made stuffed green peppers before, but these were so much better.  The poblanos are roasted before stuffing so they’re nice and soft.  They also have a really nice flavor that’s very mild for a hot pepper, so they don’t give off much heat.  And they make the perfect vessel for stuffing, especially with a delicious quinoa, vegetable, and goat cheese mixture!

The filling in these was so flavourful, and I loved that it had a bit of richness from the melted goat cheese.  There wasn’t enough cheese to mask the flavours of the ingredients though, which I really liked.  The chipotle sauce was really spicy, but when you spoon just a little over your pepper, it adds the perfect level of spice (or you can just leave it in the pan if you don’t like spice!) 

All in all, this was a fantastic vegetarian meal that was both healthy and filling, and definitely worth my little series of kitchen disasters!

Quinoa-Stuffed Poblano Peppers with Chipotle Sauce

Quinoa-Stuffed Poblano Peppers with Chipotle Sauce

Adapted from Whole Living

Serves 4

Ingredients:

4 large poblano peppers
2 teaspoons plus 1 tablespoon vegetable oil
1/3 cup dry quinoa, rinsed
1/3 cup vegetable stock (optional)
1 tablespoon chopped chipotle chile in adobo sauce
1 garlic clove
Salt and pepper
1/2 cup fresh cilantro leaves, roughly chopped, plus more for garnish
1 small yellow onion
1 cup frozen corn kernels, thawed (or fresh cooked corn from the cob)
1 can black beans, drained and rinsed
2 roma tomatoes, diced
4 ounces goat cheese

Directions

Preheat oven to 475°F.  Rub poblano peppers with two teaspoons of vegetable oil and place on a parchment paper-lined baking sheet.  Roast in the preheated oven until soft and slightly blackened in spots, about 15-20 minutes, flipping once.  Let cool.

Meanwhile, bring 1/3 cup water and 1/3 cup vegetable stock to a boil in a medium saucepan (I like to use part vegetable stock for quinoa to infuse extra flavour, but it’s not necessary if you don’t have any open vegetable stock, you can use 2/3 cup water instead).  Add quinoa, cover, and reduce heat to medium-low to simmer.  Cook until tender, about 15 minutes.  Remove from heat and let stand 5 minutes, then remove lid and fluff with a fork.

While peppers and quinoa are cooking, prepare the chipotle sauce in a blender.  Combine chipotle chile, garlic, 3/4 cup water, and a dash each of salt and pepper in the blender and blend until smooth.  Add 1/2 cup cilantro and pulse a few times to combine.  Set aside.

In a large saucepan or deep skillet, heat 1 tablespoon oil over medium-high heat.  Add onion and sauté until soft, about 5 minutes.  Add corn, black beans, tomato, and cooked quinoa and stir until heated through, about 2 minutes.  Add 2 ounces goat cheese and stir until it's melted and completely mixed in.  Season with salt and pepper to taste.

Make a small slit down the length of one side of each pepper, being careful not to cut through to the other side.  Carefully remove seeds, leaving stem end intact.  Spoon quinoa mixture into each pepper to fill them.

Pour chipotle sauce into a 9x13-inch baking dish.  Transfer stuffed peppers to the dish, and dot with remaining 2 ounces goat cheese.  Bake until cheese is golden, 15 to 20 minutes.  Cool in pan 10 minutes and serve warm, sprinkled with additional chopped cilantro if desired.

July 10, 2012

Mini Strawberry and Peach Pies

Mini Strawberry Pies


Ryan and I recently went to a barbecue and I wanted to bring a dessert that would feed about 50 people, didn’t require plates or serving utensils, and was appropriate for summer.  I’ve always wanted to try my hand at making mini pies but have been too intimidated in the past, so I decided that now was the time to finally give it a try, because I couldn’t think of a dessert more perfect for the situation than mini pies!

I read a lot of recipes while trying to choose one to follow, and they all scared me off a little with people saying how difficult they are to make.  But I soon realized that most of the problems seemed to stem from working with pie crust – either with problems keeping it cold enough, the bottoms not baking properly, or the lattice strips just not working.  So I decided to try to prevent any such problems by using a simple cream cheese dough that I already knew worked well from my mini pumpkin tarts.  It may not a traditional pie dough, but I knew it tasted good and was really easy to work with.

Mini Peach Pies

For the fillings, I decided to do two different types of pies to please everyone: strawberry and peach.  We still have some local strawberries here in Ontario but we're not quite in peach season yet, but since I know many of you down in the States are already past strawberries and well onto peaches, this combo works out well!  I decided to take a stab at doing lattice tops on the strawberry pies (my first time!) and stick to a simple crumble topping for the peach pies.

By now you’re probably wondering how they turned out, and if you couldn’t already tell from the pictures (which are a bit dull due to poor lighting, sorry!), they were amazing!  I couldn’t get over how adorable they were, especially the strawberry pies with their little lattice tops!  The crust browned up perfectly, there was a good ratio of filling to crust, and each of the fillings was sweet and juicy.  I couldn’t decide which one I liked better - I loved the bright flavours of the strawberry pie and the warm spices in the peach pies.
Mini Strawberry and Peach Pies

The downside is that even with my shortcut on the dough, these took a pretty long time to make!  I think they took about three hours total from start to finish, although not all that time was actively spent in the kitchen. They’re certainly not difficult to make, just time consuming, particularly with forming the dough and the lattice tops.  Of course, I made a LOT of pies, and if you don’t need to feed 50 people, you could easily cut the recipe in half and thus cut your time in half too.  And if you decide to use a crumble topping on all your pies instead of doing the lattice top, you’d cut even more time off.

My suggestions to help the time go faster?  First, don’t get too caught up in measurements.  I saw other recipes with strict measurements for the strips and circles of dough, but I honestly just used my best judgement for both and didn’t bother measuring.  It made everything much less stressful when I wasn’t getting out a ruler and trying to precisely measure each piece of dough (and it still turned out fine)!  Second, get yourself a helper!  Having someone to help shape the dough and make lattice tops with you will make your life so much easier!  Just try not to get too mad at them when they do it wrong :)  Third, listen to some music or watch tv while you work - a lot of the steps are pretty mindless and it helps to have a distraction. 

Mini Strawberry Pies


Now if I haven’t scared you off yet, give these a try for your next gathering!  They’re a perfect little bite-sized treat to feed a crowd without the mess and dishes that full-sized pies would require, and they are so tasty!!   

Mine were a big hit at the barbecue I brought them to - even though I thought I’d made way too many, they disappeared in probably under ten minutes!  Seeing how much everyone loved them definitely made it worth the work :)

Mini Peach Pies


Mini Strawberry and Peach Pies

Dough and crumble topping adapted from these pumpkin tarts, peach filling my own, strawberry filling adapted from Rainy Day Gal

Makes at least 50 mini pies

Ingredients:

For the Strawberry Filling:

4 cups diced strawberries (stems removed)
1/4 cup sugar
1/2 cup brown sugar (not packed)
1/2 cup all-purpose flour
1 tablespoon cornstarch
1 teaspoon vanilla
Dash of cinnamon

For the Peach Filling:

1-1/2 cups diced peeled peaches
1/4 cup brown sugar
2 tablespoons sugar
1/2 teaspoon vanilla
1/3 cup all-purpose flour
2 teaspoons cornstarch
Pinch of salt
1/2 teaspoon cinnamon
1/4 teaspoon nutmeg

For the Peach Crumble Topping:

1/4 cup all-purpose flour
1/4 cup brown sugar
2 tablespoons unsalted butter, softened

For the Dough:

3 cups all-purpose flour
1-1/2 cups unsalted butter, softened
12 oz cream cheese, softened

Directions:

Preheat oven to 375°F.

Mix all ingredients for the strawberry filling in a large bowl.  Set aside.

Mix all ingredients for the peach filling in a second bowl and set aside.

Combine ingredients for the peach topping in a small bowl, using a fork or pastry cutter to mix ingredients until crumbs form.

Prepare the dough:  Mix butter and cream cheese in a large bowl with a handheld mixer until smooth.  Add flour in three additions, mixing slowly after each addition until a smooth dough forms.

Roll dough out on a flat surface (I like to use a sheet of parchment paper for easier clean up) as thinly as possible.  To assemble the pies, I found it easier to just tear off a small piece of dough, flatten it between my palms so it’s as thin as it can get without tearing, then press it into a tin of a 24-cup mini muffin pan, making sure it’s pressed down evenly in the bottom and up the sides of the tin.  Then I tear off any excess dough around the edges.  If you like though, you could use a two-inch cookie cutter to cut out circles of dough and press them into the tins, then continue rerolling the scraps and cutting out more circles.  I just found it easier without having to worry about getting the dough as thin as I could with a rolling pin and then cutting out exact circles.  You should have enough dough to make at least 50 mini pies with lattice crusts. 

First we’ll do the strawberry pies.  Spoon strawberry filling into each of the 24 pie crusts, trying to make sure you use plenty of strawberries and not just the liquid.  Roll out some more dough as thinly as possible and use a pizza cutter to cut out thin strips of dough to form the lattice tops.  Use four small strips of dough, about the length of each muffin well, and weave them to form a lattice crust over each pie.  Pinch the edges of each strip into the base dough.  This isn’t difficult, but will take a long time, so try to find a helper!

Bake strawberry pies for 25-30 minutes, until crust is lightly golden brown.  Remove from oven and let cool for just a minute or two, then use a butter knife to pop each pie out of the muffin tin and transfer to a wire rack to finish cooling.  They should come out easily.

Wash and dry the muffin tin, then repeat the process of forming the pie crusts, but this time fill with the peach filling.  Top each pie with the crumble topping, and bake for 25-30 minutes, following the same process as before.

At this point, I had leftover dough and some leftover strawberry filling.  I would have had enough dough to form lattice crusts on the peach pies instead of using a crumble topping, but I found the crumb topping much easier and I thought it paired with the pies really well.  Instead, you should have enough ingredients to make at least 12 more mini strawberry pies with lattice tops, if desired.  I already had enough pies so I ended up just using my dough and strawberry filling to make a quick turnover instead, which was delicious!

July 06, 2012

Smashed Pea, Dill, and Feta Crostini

Smashed Pea, Dill, and Feta Crostini

Don't you hate when a book (or cookbook) you've heard great things about and decide to shell out the money for ends up being a disappointment?  I don't often purchase books to own because I'm always worried I'll waste my money on something I don't like.  Instead, I usually borrow books or end up taking risks picking up books in clearance sections, figuring that if I don't end up loving them, it won't be such a big disappointment.  Sometimes, these books are in the clearance section for a reason, but other times the risk pays off with a big reward, as was the case when I picked up The Modern Vegetarian.  It's a vegetarian cookbook that has some of the most unique and creative recipes I've ever seen, like watermelon curry with black beans and paneer, or lemongrass, ginger, and lime leaf chocolate tart.  It's definitely a great example of how vegetarian food doesn't have to be boring!

I started off with one of the easier recipes in the book, this smashed pea, dill, and feta crostini, because fresh peas are in season in Ontario right now (June-July), and I'd been wanting to make a pea crostini for a while!

Smashed Pea, Dill, and Feta Crostini

This turned out wonderfully.  Fresh sweet green peas are combined with tangy lemon and dill and salty feta on a piece of toasted bread for a light and fresh summer appetizer that's bursting with bright flavour. 

The original recipe didn't call for cooking the peas first, but if you've ever tried to smash a fresh pea, it's not easy!  Every time I pinned a little pea under my pestle and tried to press down, it would invariably end up escaping and flying across the kitchen.  So I decided to give the peas a quick blanch followed by a dunk in ice water so they'd maintain their bright green colour, and this made them much easier to smash! (sorry little peas, you can't escape me!)   I also left out the parmesan from the recipe because I didn't want to overwhelm the peas' flavour too much, and made a few minor adjustments to some of the ingredient amounts.

Smashed Pea, Dill, and Feta Crostini

This would make a great elegant appetizer to impress guests, even though it's so easy to make.  Or you could just eat it all yourself for lunch like I did! 

With the weekend coming up, and with peas in season (at least where I live), this is a perfect snack to eat while sitting outside on the patio - if you can handle the crazy heat outside!  I'm loving the hot weather but hoping the suffocating humidity tones itself down a bit for the weekend!

 Hope you all have a great weekend :)

Smashed Pea, Dill, and Feta Crostini

Smashed Pea, Dill, and Feta Crostini

Adapted from The Modern Vegetarian cookbook

Serves 4-6 as an appetizer

Ingredients:

1 ciabatta baguette, sliced into thin (~1/2 inch) pieces (you probably won’t use the whole loaf)
5 oz fresh shelled green peas (around 3/4 cup peas, from around 40 pea pods)
1 small garlic clove
2 tablespoons fresh dill, minced
Sea salt
1-2 tablespoons olive oil
2/3 cup crumbled feta cheese
1 tablespoons fresh lemon juice
Pepper

Directions:

Preheat oven to 350°F.  Brush ciabatta slices with olive oil or spray with cooking spray, place on a baking sheet, and bake for 5-10 minutes until toasted.

Bring a medium pot of water to a boil and blanch peas for 2-3 minutes.  Drain into a colander or sieve, then place the colander/sieve in a large bowl of ice water to immediately stop the cooking.

Place garlic, dill, and a pinch of salt in a mortar and smash with a pestle until crushed.  Transfer to a small bowl.

Add peas to mortar in a few batches (depending how big your mortar is), adding a small pinch of salt and drizzle of olive oil to each batch and smashing with a pestle.

Transfer smashed peas to a medium bowl and add the dill-garlic mixture, feta, and lemon juice.  Mix with a fork and season with additional salt and pepper to taste, if desired.  Top ciabatta slices with the smashed pea mixture and serve.

July 03, 2012

Buffalo Chicken Burgers

Buffalo Chicken Burgers

I had a great long weekend this past weekend, including a Canada Day party, fireworks, plenty of time in the sun relaxing with family and Ryan, and lots of great food!  The best thing I ate this weekend had to be these buffalo chicken burgers that are one of Ryan and my favourite meals.  And with 4th of July barbecues likely in store for many of my American readers tonight and tomorrow, I thought this would be a great recipe to share today!

These are ridiculously easy to make, and Ryan and I always love them every time we make them.  We’re both big fans of anything buffalo wing flavoured, so infusing that flavour into a juicy homemade chicken burger with fresh toppings and lots of sauce makes for a pretty amazing dinner, and so much better than any storebought frozen chicken burgers, which we have not had good experiences with!

Buffalo Chicken Burgers

I know the pictures of this burger don’t do it justice, but this was one of those times when I just wanted to eat my dinner while it was still hot, without having to worry about styling it, finding good lighting to photograph it in, taking a million shots to get the best angle, and then reheating it before eating because by that time it would be ice cold.  Instead, I took a few quick pictures right before I ate it, so they’re not great but at least you know I didn’t spend forever making my burger look as pretty as possible but not at all how it would look in real life.  What you see is what you get!  (Well, except that when I took the pictures, I’d forgotten to add the extra buffalo sauce, which for me is a must!)

If you’re looking for a new and exciting way to eat chicken burgers this summer, or a healthier alternative to a beef burger, give these a try!  If you’re a buffalo wing fan, you won’t be disappointed! 

And happy Independence Day to my friends south of the border!

Buffalo Chicken Burgers

Buffalo Chicken Burgers

Adapted from How Sweet It Is

Serves 4

Note: I have made these many times as both chicken and turkey burgers - both work!

Ingredients:

For the burger patties:

1 lb (450g) ground lean or extra-lean chicken (or ground lean turkey may also be used!)
1/2 teaspoon salt
1/2 teaspoon pepper
1/2 teaspoon italian seasoning
1/2 teaspoon paprika
1/4 cup buffalo wing sauce or Frank's red hot sauce
1/4 cup breadcrumbs
1/4 cup grated parmesan cheese

For the rest of the burgers:
4 whole wheat burger buns
Lettuce
Tomato
Buffalo sauce
Low-fat ranch or blue cheese dressing
Cheddar cheese (optional)

Directions:

Mix up all ingredients for the chicken (or turkey) patties in a large bowl (using a fork, potato masher, or clean hands) until well blended, but being careful not to overmix. Form into four patties and press a small indentation in the center of each patty. Always be sure when making burger patties not to press hard on the meat or you will end up with tough patties - be as gentle as possible with every step!

If cooking on the barbecue: Preheat grill to medium to medium-high heat and lightly oil or spray. Grill for 4-5 minutes per side, or until the internal temperature reaches 165°F. In the last couple minutes of cooking, place cheese on burger to melt, if desired.

If cooking on the stovetop: Preheat two large non-stick skillets over medium-high heat. Cook the patties in the skillets for about 8-10 minutes total, flipping halfway, until cooked through. In the last couple minutes of cooking, place cheese on burgers to melt, if desired.

Place burgers on buns and top with lettuce, tomato, and desired sauces.

I like to serve these with baked sweet potato fries or as pictured above, Emeril Lagasse's oven baked parmesan paprika fries.

Ingredient Index

Related Posts Plugin for WordPress, Blogger...