Showing posts with label roasted red pepper. Show all posts

September 10, 2013

Portabella Mushroom Burgers with Provolone, Caramelized Onions, & Roasted Red Peppers

Portabella Mushroom Burgers with Provolone, Caramelized Onions, & Roasted Red Peppers

This is the last recipe that I made during summertime but hadn’t shared yet, and it’s appropriate that I waited to post it until today considering the high is 34°C (93F) here, with a humidex of over 40°C (104F) – it feels hotter today than most days we had during real “summer”!  Not that I’m complaining, because it’s lovely to get one more blast of heat before it likely cools down for good. And I’m ready for that too – football started this past weekend (go niners!), my sister went apple picking, and there was a chill in the air but still sunny skies, all of which got me pretty excited for fall!

And while burgers are usually seen more as summertime food, the earthy, smoky flavours in this particular burger make it great for this transition period into fall!

Portabella Mushroom Burgers with Provolone, Caramelized Onions, & Roasted Red Peppers

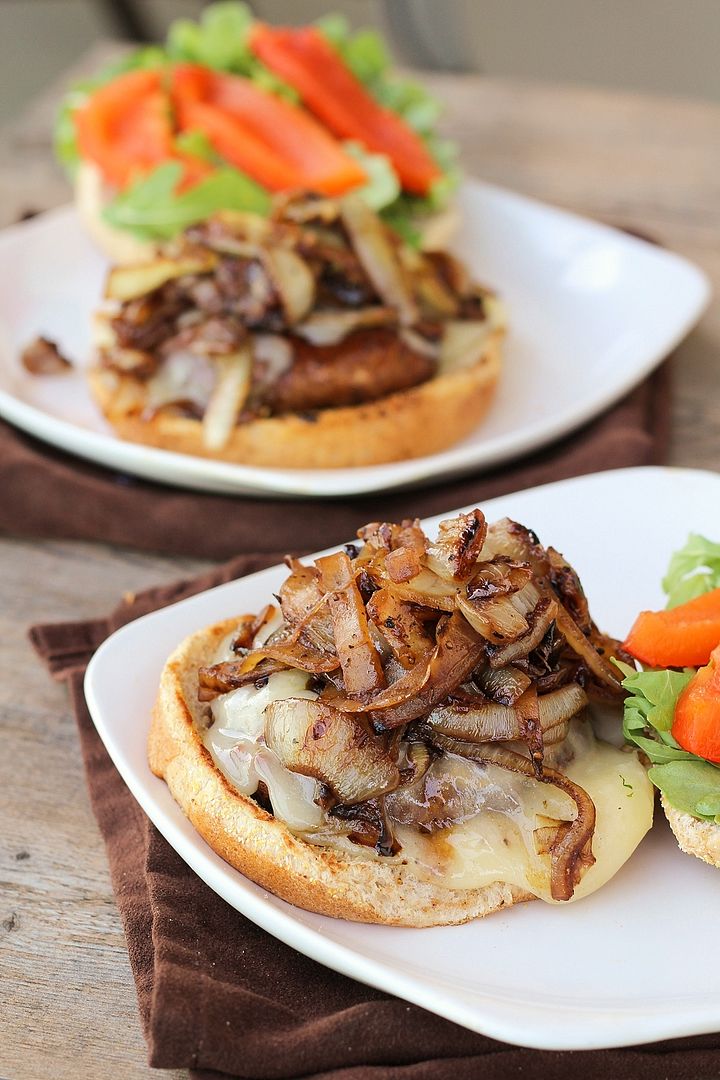
I’ve eaten portabella (or portobello, if that’s how you like to spell it) burgers a few times before but had never made one myself until now. Portabella mushrooms make a great vegetarian substitute for burgers because they have a meaty texture and earthy taste, but without the fat that usually comes along with meat burgers!

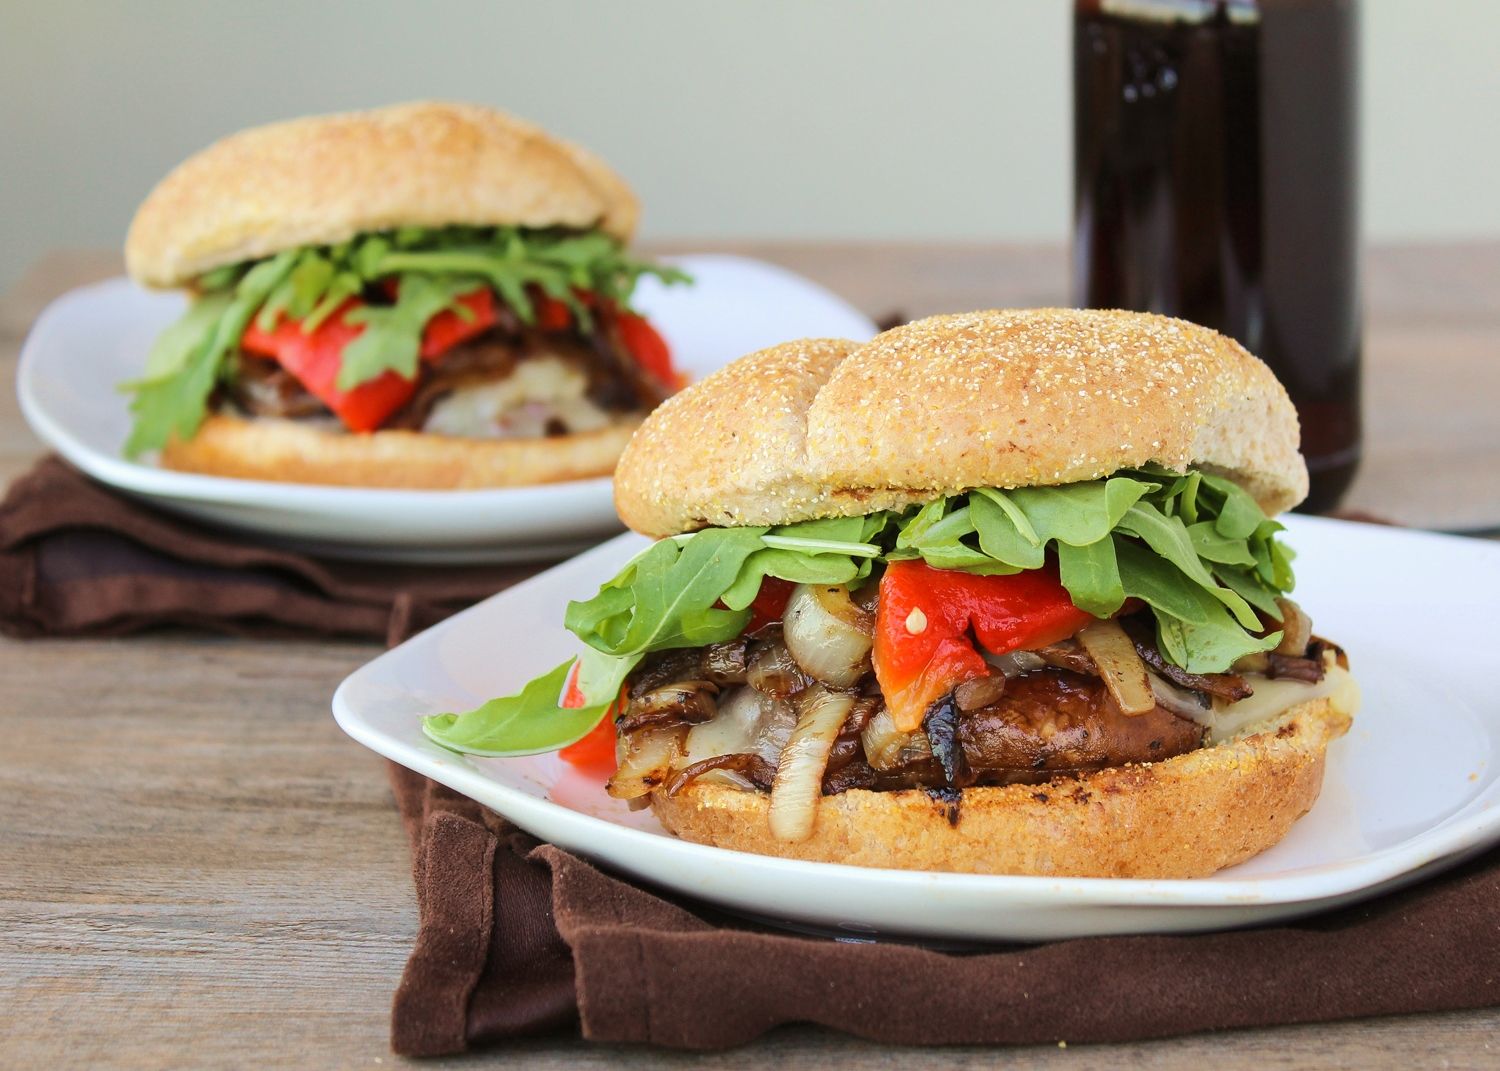
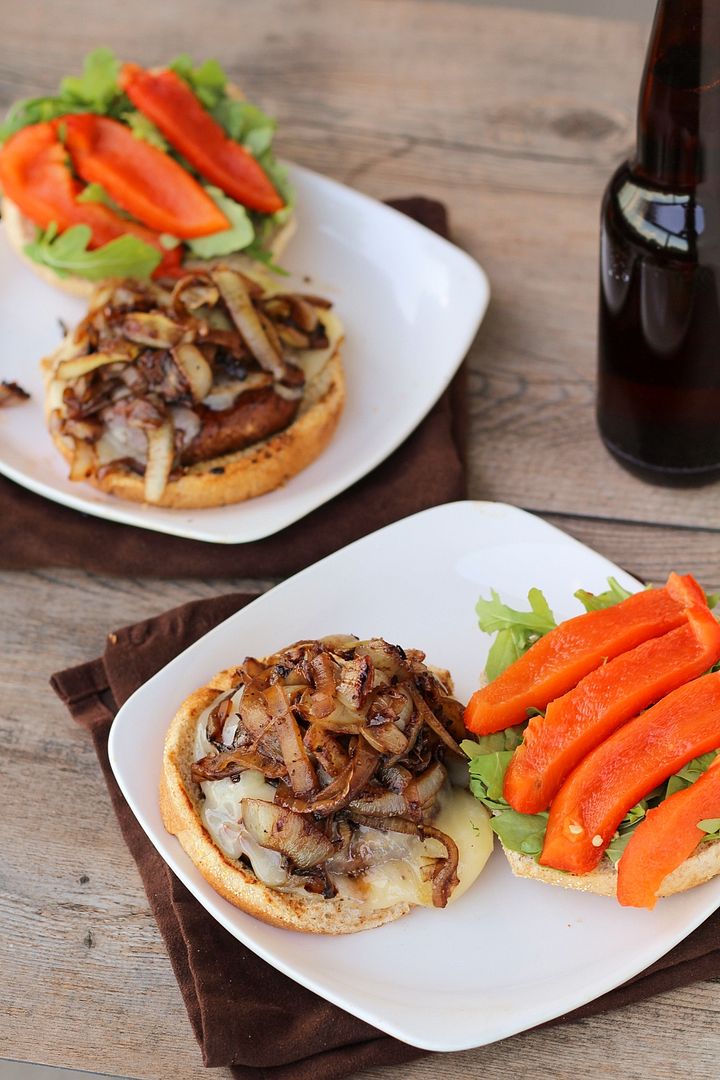
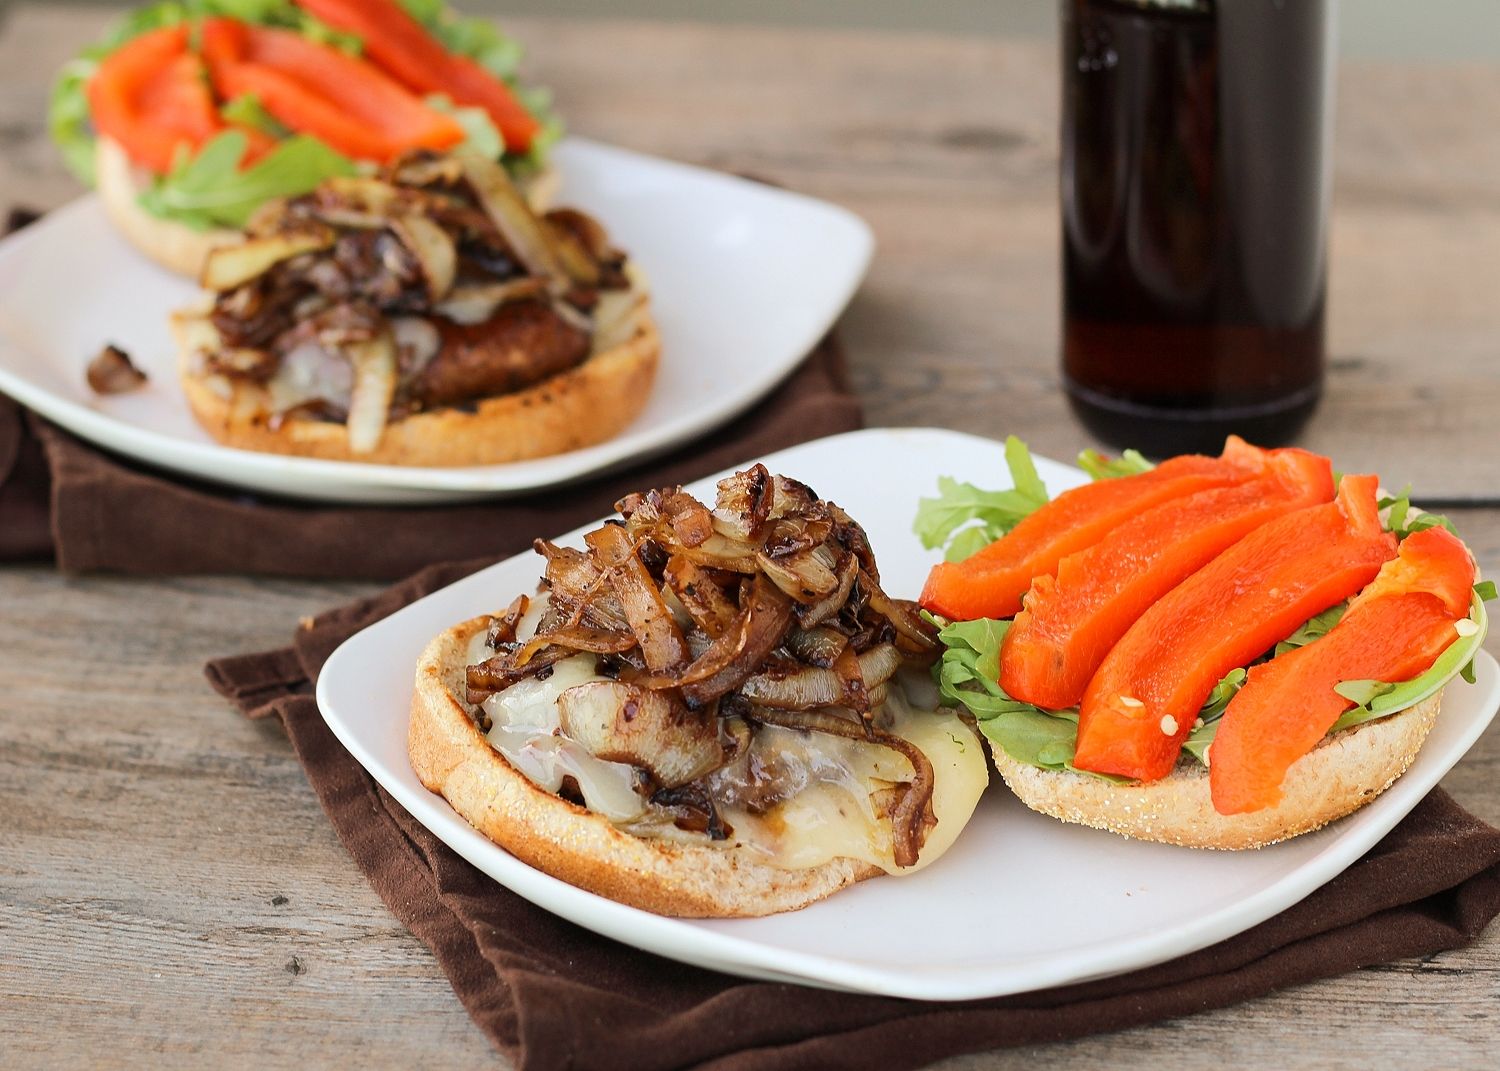
Plus mushrooms make a great canvas for piling on flavourful toppings. For my version, I decided to complement the smoky, savoury flavour of the mushrooms with caramelized onions and a little provolone cheese, which I then balanced out with sweet roasted red peppers and peppery fresh arugula.

Portabella Mushroom Burgers with Provolone, Caramelized Onions, & Roasted Red Peppers

Not only was this burger pretty healthful, but it was also packed with flavour – I devoured mine and then immediately scolded myself for not making portabella burgers earlier!

A few tips I learned along the way: 1) Marinating the mushrooms beforehand gives them extra flavour, as otherwise mushrooms on their own can be somewhat bland; 2) Be sure to spray or oil your grill/pan because the mushrooms can be somewhat sticky!; and 3) Mushrooms shrink as they cook and release moisture – I chose large buns based on their size pre-cooking, but as you can see, they didn’t fill the bun after cooking, so smaller buns would have been a better choice!

Portabella Mushroom Burgers with Provolone, Caramelized Onions, & Roasted Red Peppers

Don’t wait as long as I did to try these if you haven’t yet; and if you’re already a mushroom burger fan, feel free to share your own cooking tips or favourite recipes!

If you’re having as great as weather as we are here today, hope you get a chance to get outside and enjoy it!

Portabella Mushroom Burgers with Provolone, Caramelized Onions, & Roasted Red Peppers

Portabella Mushroom Burgers with Provolone, Caramelized Onions, & Roasted Red Peppers

Makes 2 burgers

Ingredients:

For the Mushrooms:
2 portabella mushrooms
2 tablespoons balsamic vinegar
1 tablespoon olive oil
Pinch each dried basil and oregano
1 clove garlic, minced
Salt & Pepper

For the Toppings:
1 red bell pepper
1 tablespoon olive oil, divided
1 large or 2 small yellow onions, peeled and sliced into half moons
Salt and pepper
Splash of balsamic vinegar
2 large slices of provolone cheese (enough to cover the two mushrooms)
2 handfuls of baby arugula
2 whole wheat hamburger buns

Directions:

Preheat oven to broil.

Remove stems of mushrooms and scrape out the gills, if desired.  Whisk together the vinegar, oil, basil, oregano, garlic, and a bit of salt and pepper in a small bowl.  Add mushrooms and marinade to a bowl, tossing mushrooms to coat well.  Leave to marinate for 20-30 minutes.

Rub red pepper with a teaspoon of olive oil (don’t use extra virgin olive oil as it has a lower smoke point.  Vegetable or canola oil would also work.)  Place on foil-lined baking sheet on the top rack of the oven.  Broil until dark blotches begin to appear on one side, then turn with tongs and repeat until all sides have black patches.  Amount of cooking time will vary depending on your oven and the size of your pepper; mine took around 15-20 minutes total.  When done, remove from oven and place in a bowl.  Cover tightly with saran wrap to let pepper steam (and loosen the skin) for about 15 minutes or until slightly cooled, then remove the skin, cut pepper in half, scrape out the seeds and membranes, and slice into strips.  
*Note: If you’re short on time, you can use storebought roasted red peppers in a jar.  I preferred to make my own to use less oil; it does take some time, but it can be done while you’re marinating/cooking the mushrooms and caramelizing the onions so everything finishes in roughly the same amount of time.

Meanwhile, heat 2 tablespoons of oil in a large non-stick skillet over medium heat.  Add sliced onions, stir to coat with oil, and season with salt and pepper.  Spread onions out evenly across the pan and let cook, stirring occasionally, until onions are soft and caramelized, about 25-30 minutes. Don’t stir the onions too often so they can brown, but don’t leave them alone long enough to burn or stick to the pan. Add a splash of balsamic vinegar about 20 minutes into cooking to deglaze the pan and darken the onions.  When done, set aside in a small bowl.

When mushrooms are done marinating, heat a grill or indoor grill pan over medium heat.  Brush grate with oil or spray grill pan to prevent sticking, then place mushrooms on grill with gill sides up first.  Grill for 5-7 minutes per side or until tender, brushing with the marinade a few times.  In last 2 minutes of cooking, add provolone cheese on top of each mushroom to melt.  If desired, toast buns on grill for 1-2 minutes as well.

Assemble burgers by topping the provolone mushrooms with the caramelized onions, roasted red peppers, and arugula on whole wheat buns.  Season with additional salt and pepper if desired.

September 14, 2012

Eggplant & Zucchini Pasta with Chickpeas and Feta

Eggplant & Zucchini Pasta with Chickpeas, Olives and Feta

Because it's Friday, I'm sure you guys would rather hear me talk about something entertaining rather than making this entire post about pasta, right?  If you answered no, then skip down towards the end where I will tell you all about this lovely pasta dish, but if you answered yes, then you are about to hear about my first adventure in celebrity stalking!

Last Saturday, my sisters and I went to the vegetarian food festival in Toronto (which my sister Genevieve wrote all about on her blog Vanilla & Spice, if you're interested).  The Toronto International Film Festival (TIFF) also happened to be on, which is a pretty big deal and draws lots of celebrities.  Before we left for Toronto in the morning, I quickly researched if any big celebs would be there at the same time as us, and noted the time for a Johnny Depp red carpet!  We ended up heading over there half an hour early, thinking we would have a great spot if he did show up, but little did we know that people show up super early to these things, and it was already packed!  I knew I would never see anything down on the ground, so I found a lovely spot up a bit higher, in the middle of a bush.  Literally, I stood in the middle of a bush, in a pile of mud, with branches in my hair, and a guy blowing cigarette smoke directly in my face from beside me, for half an hour, waiting to catch a glimpse of Johnny Depp.  And guess what?  It paid off!  I got to see him (and Natalie Maines from the Dixie Chicks) from about 15-20 feet away and took lots of pics - it was so exciting being part of a big crazy screaming crowd and being so close to such a big celebrity!

I guess celebrity stalking is addicting, because my sister and I decided to head back to Toronto Monday evening after we heard that Ben Affleck was going to be at a red carpet premiere.  We arranged it so that we would take a Greyhound that would arrive in Toronto at 5:30, we'd walk a block to one premiere where we would arrive in plenty of time to see Bill Murray and Laura Linney before their movie premiering at 6:30, then walk another block to the 7:00 premiere featuring Ben Affleck and Rachel McAdams, then head back home.  It involved a lot of bus riding, but we knew it would be worth it!

Eggplant & Zucchini Pasta with Chickpeas, Olives and Feta

Unfortunately, this plan didn't work out so well.  The bus ended up being an hour late arriving in Toronto.  ONE WHOLE HOUR!!  I was fuming!  So when we finally pulled in at 6:30 (after leaving our home over 3 hours earlier), we sprinted past the first theatre, which already had no one left outside, and continued on to Ben's theatre, praying we didn't miss him.  There was still a humongous crowd, which was a good sign!  As I stood balanced against a filthy pole (which I didn't realize was staining my butt until later), we overheard others in the crowd talking about how they had already seen Bill, Laura, and Rachel, but that Ben still hadn't arrived, so we were counting on him to save our night and make this trip worth it.  We waited .. and waited ... and waited .. until we were pretty much the only ones left waiting and realized that Ben had decided not to show up after all. 

Our friend in Toronto ended up saving our night by taking us out for a delicious feast of all-you-can-eat sushi, but we were still pretty disappointed about Ben.  I'm veeeery tempted to go back tonight to see Matthew McConaughey, who is supposed to be making an appearance, but I'm too worried that things won't work out again (especially trying to get to Toronto with Friday rush hour traffic), so I think I'll play it safe and spend the weekend resting and recovering from this cold!

Eggplant & Zucchini Pasta with Chickpeas, Olives and Feta

My story really didn't have a point except to distract you from your work for a while, and it has nothing to do with this pasta either, so I'm not even going to try to connect the two here!

If you just want to hear about this pasta, here's what you need to know: This is a fresh and healthy vegetarian dish that you may think is just an ordinary pasta, but a few unusual ingredients like chickpeas, olives, and feta, make this unique and flavourful.  It might look like a few more steps than a regular pasta, but it's worth it (especially for the amount of leftovers, if you're cooking for one like me!), and it's a great way to use up some of that end-of-summer zucchini and eggplant you might still have in your garden!

Has anyone else been celebrity stalking at TIFF (or elsewhere)?  I'd love to hear your stories!

Eggplant & Zucchini Pasta with Chickpeas, Olives and Feta

Eggplant & Zucchini Pasta with Chickpeas, Olives, and Feta

Adapted from Clean Eating magazine, April/May 2012

Serves 4-6

Ingredients:

2 medium zucchinis
1 small eggplant
2 tablespoons olive oil
Salt & Pepper
1 pound tri-colour vegetable rotini pasta (or whole wheat rotini)
1 (398mL) can fire-roasted diced tomatoes
1 (340mL) jar roasted red peppers (or 2 roasted red peppers), drained and rinsed, chopped
1/2 teaspoon dried basil
Pinch red pepper flakes (optional)
1 (540mL) can chickpeas, drained and rinsed
1/2 cup sliced green olives
4-5 oz low-fat feta cheese, crumbled
1/4 cup chopped parsley

Directions:

Preheat oven to Broil.  Quarter zucchinis lengthwise, then cut into 1/4-inch thick slices.  Cut eggplant into ½-inch rounds, then slice into bite-sized pieces.  Toss chopped zucchini and eggplant with olive oil, and season with salt and pepper.  Spread into one layer on a foil-lined baking sheet and broil in the top-third of the oven for 10-15 minutes, tossing halfway through, until golden brown and soft.

Bring a large pot of salted water to a boil, and cook pasta according to package directions.  Drain and rinse, reserving a bit of pasta water.

Meanwhile, add diced tomatoes, roasted red peppers, basil, and red pepper flakes to a medium saucepan, bring to a simmer, and cook over medium-low heat while the pasta is cooking, about 10 minutes.  Season to taste with salt and pepper.  Transfer to a blender, remove plastic stopper from lid, cover loosely with a kitchen towel, and puree briefly into a slightly chunky sauce.  Add a bit of the pasta water to thin out the sauce, if necessary.

Combine cooked pasta, roasted vegetables, tomato sauce, chickpeas, and olives in a large saucepan and cook over low heat 1-2 minutes to heat through.  Serve and top each portion with 1 oz crumbled feta and 1 tablespoon chopped parsley.  Season with additional pepper, if desired.

February 13, 2012

Heart-Shaped Personal Pizzas (with heart-shaped toppings!)

Four heart shaped personal pizzasHappy Valentine's Day!

If you're still looking for last minute meal ideas to make for your loved one(s) tomorrow, I've got the perfect idea for you: heart-shaped personal pizzas with heart-shaped toppings!

I say "idea" because I'm not actually providing a recipe here - pizza's one of those things that you don't really need measurements in a recipe to make (unless you're making your own dough, in which case, I can't help you there because I just bought a refrigerated storebought pizza dough for these).

All you have to do for these adorable little guys is divide a regular-sized pizza dough (storebought or homemade) into four, then shape each portion into a heart. This part was a lot easier than I expected; my hearts weren't perfect, but you can definitely tell they're hearts! If you're having difficulty shaping the dough, just let it rest a while longer until it's easier to work with. For a few of the hearts, I had to cut off some of the dough from the top part in order to get the heart right, but they all held their shape pretty well.

Once you have your dough shaped into four personal-sized hearts, then you can top each one according to individual tastes and bake them (I baked two at a time). In order to make my pizzas extra special, I topped each one with different heart-shaped toppings! Check out my topping ideas below:

1) Pepperoni Hearts:

heart shaped pepperoni personal pizzaThis one was one of the easiest - I just bought sliced pepperoni and cut each slice into a heart using a knife. You can even stack the pepperoni slices on top of each other to cut multiple hearts at a time, so this pizza takes no time at all to prepare. I paired the pepperoni with simple tomato sauce and mozzarella cheese.

2) Tomato Hearts:

heart shaped tomato personal pizzaTomato is my favourite pizza topping, and combined with mozzarella and basil, it makes for my very favourite pizza! The tomatoes were the hardest of all the toppings to cut into hearts, and they probably made the least obvious looking hearts, but I think they still turned out cute! I placed each heart on top of a slice of mozzarella instead of shredding the cheese first, but either works!

3) Red Bell Pepper Hearts:

heart shaped red pepper personal pizzaI thought these were the most fun because the red pepper was the least obvious ingredient to turn into a heart. All you have to do is slice a red bell pepper and line up two slices together to form a heart shape (you'll have to trim the ends off to get the right angle for your heart). I combined my red pepper slices with spinach and goat cheese, and while I'm not usually a fan of peppers on pizza, this was one of my favourites!

4) Roasted Red Pepper Hearts:

heart shaped roasted red pepper personal pizzaThis was one of those last minute ideas I had that I wasn't very sure about, but it ended up being one of the best looking pizzas! I bought a jar of roasted red peppers, then just pulled out a big slice and cut it into small hearts using a paring knife. You could also roast your own red pepper if you have the time; I was just lazy. You could pair roasted red peppers with any other toppings you want but I kept it simple with just mozzarella cheese and tomato sauce.

If you don't like any of the above ideas, here are a few more ideas for toppings you could shape into hearts, which I didn't have enough dough to try with:

- Roasted red beets
- Roasted sweet potatoes
- Plain cheese with hearts drawn on in bbq or tomato sauce (for picky kids)
- Strawberries or apples (for the more adventurous types!)

I was so happy with how these turned out - not only did they look adorable, but they tasted amazing (what's not to like about pizza?!) and were the perfect size for one person.

And don't think that these can only be made on Valentine's Day! Save this idea and make heart-shaped pizzas any time you want to show your family, friends, or partner (or just yourself!) some love - they're guaranteed to put a smile on anyone's face :)

Ingredient Index

Related Posts Plugin for WordPress, Blogger...