Showing posts with label cheese - mozzarella. Show all posts

March 12, 2014

Turkey & Kale Whole Wheat Pasta Bake

Turkey & Kale Whole Wheat Pasta Bake

I mentioned in my most recent monthly recap that I've been having to make a lot of quick and easy meals lately, often just throwing together whatever I can find in my fridge or pantry.  This sometimes means that my meal is missing a key component though, like a protein or vegetables.

But when I know I have a busy week ahead and I actually take the time to make sure I have something more substantial but also healthful around to eat, this turkey and vegetable pasta bake is usually my go-to meal!

Turkey & Kale Whole Wheat Pasta Bake

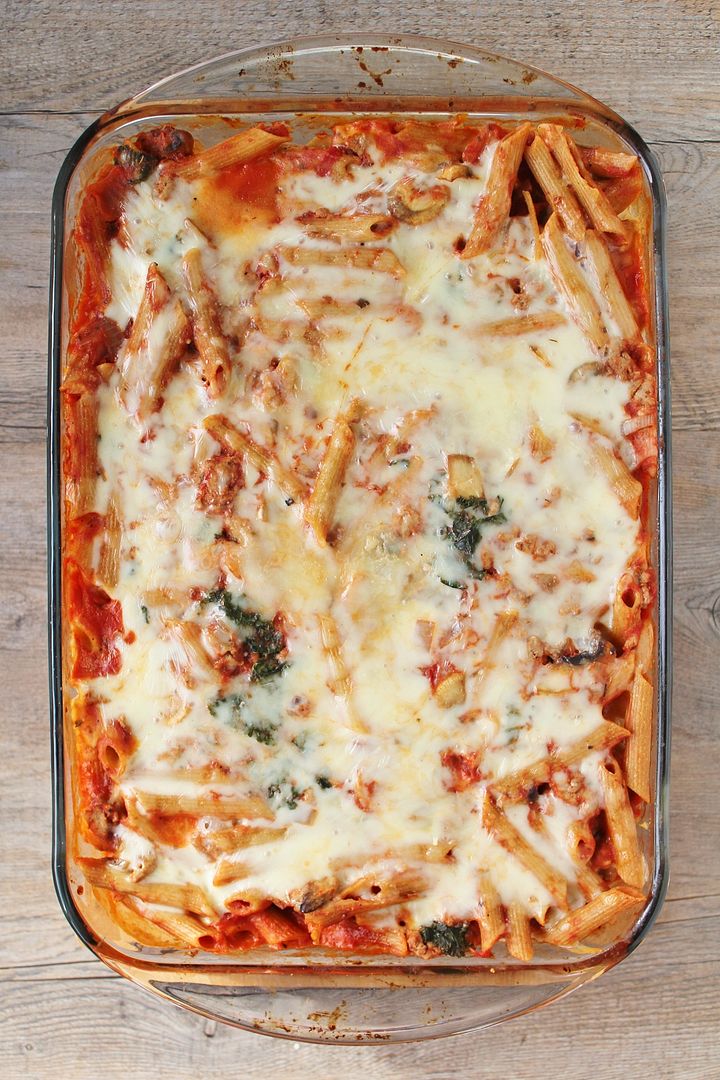
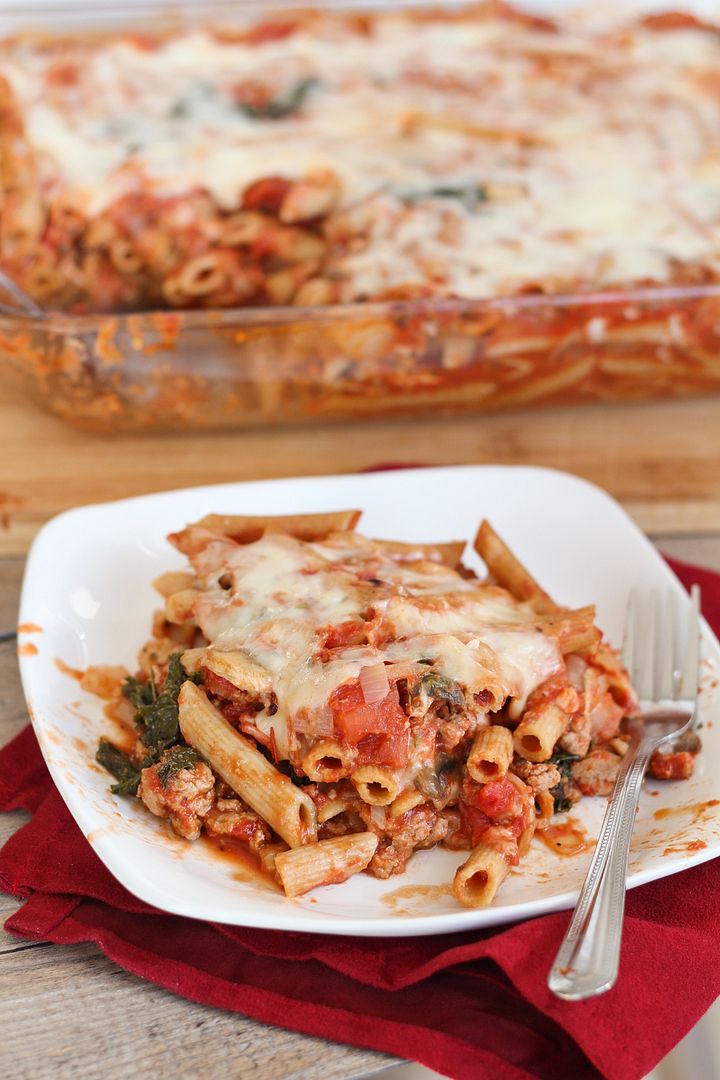
This easy pasta dish is made by tossing together some whole wheat pasta, sauteed veggies (including onion, mushrooms, and kale) and seasonings, lean ground turkey, canned tomatoes, and just enough cheese, then baking it in the oven, which is the most time consuming (but hands-off) part. 

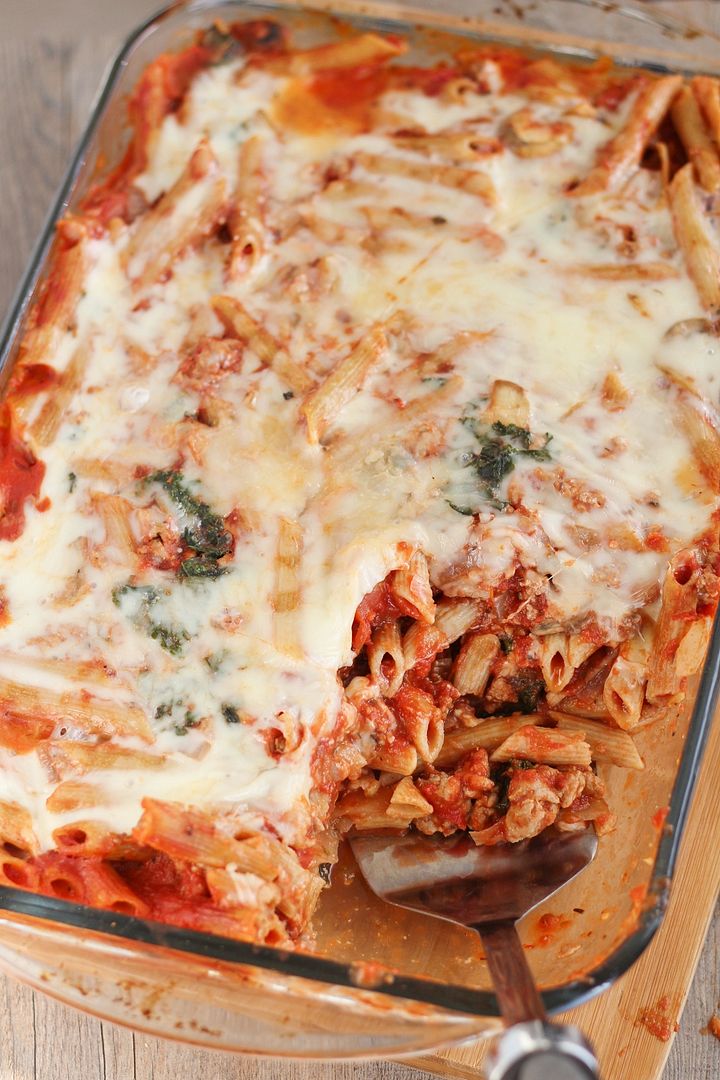
You end up with a well-balanced meal with plenty of whole grains, fiber, protein, and nutrients, that's hearty and filling!  I've reduced the amount of cheese that I used when I first made this dish (so it has much less than many baked pasta dishes) and find there's still plenty of cheese to satisfy me.  And if you're vegetarian, I think you could easily throw in some black beans or chickpeas instead of the turkey for added protein.

Turkey & Kale Whole Wheat Pasta Bake

I love that this is a baked pasta because I can just cover the dish with saran wrap and throw it in the fridge, then I can easily cut out a square of pasta to throw in a container for lunch the rest of the days of the week.  The pictures I took here were right after this pasta came out of the oven; it does firm up afterwards.

I've made this many times already and I'm sure I'll make it many more times until I get sick of it :)  If you have any great go-to meals to have around for busy weeks, feel free to share as I'm finding I need them more and more!

Turkey & Kale Whole Wheat Pasta Bake

Turkey & Kale Whole Wheat Pasta Bake

Adapted from ifoodreal

Serves 6-8

Ingredients:

1 (375g or 13oz) box of whole wheat penne, rotini, or fusilli
1 teaspoon olive oil
1 lb lean ground turkey
2 cloves garlic, minced
1 yellow onion, chopped
2 cups sliced white or cremini mushrooms
4 cups (packed) chopped kale
1 (28oz) can crushed tomatoes  (I don’t use the whole can; maybe around 3 cups) OR 1 jar of your favourite pasta sauce (I've used this one)
1 (14oz) can diced tomatoes (I usually use a seasoned variety)
1 tablespoon Italian seasoning
Salt and pepper
1/2 teaspoon crushed red pepper flakes
2 cups shredded part-skim mozzarella cheese
1/4 cup grated parmesan cheese

Directions:

Preheat oven to 375°F.  Bring a large pot of water to a boil and cook pasta to al dente, according to times on package directions.  I’ve used penne, rotini, and fusilli for this before and all work fine.  Drain when finished.

Meanwhile, heat oil in a large saucepan over medium-high heat.  Add turkey, season lightly with salt and pepper, and use a wooden spoon to break it up as you cook, letting cook until evenly browned (around 5 minutes).  Remove turkey and set aside in a bowl.  Using the same saucepan, add your garlic and onion and cook until slightly softened for a few minutes.  You can add a small amount of oil to the pan first if needed.  Add mushrooms and continue to cook until mushrooms are browned, another 5-7 minutes.  Add the kale and cook until wilted, stirring often.  Add the cans of tomatoes, Italian seasoning, red pepper flakes, a pinch each of salt and pepper or to taste, along with the turkey and the cooked pasta to the pan.  Stir and let cook over low-medium heat for a few minutes.  Add half of the mozzarella cheese (1 cup) and all of the parmesan cheese and stir.

Spray a 9x13 glass baking dish with non-stick cooking spray.  Pour the pasta mixture into the pan and top with remaining mozzarella cheese (1 cup).  Cover with aluminum foil and bake in preheated oven for 25-30 minutes.  Remove foil and bake for another 3-5 minutes.  Remove from oven and let sit for at least 5 minutes before serving (this is important!).

*Note: If you want to use spinach instead of kale, use about a 5oz container of baby spinach and stir in to the mixture when you add the turkey and pasta.

January 18, 2014

Avocado Green Goddess Grilled Cheese

Avocado Green Goddess Grilled Cheese / Recipe: http://www.onceuponacuttingboard.com/2014/01/avocado-green-goddess-grilled-cheese.html

A simple grilled cheese sandwich with melted cheese oozing out of buttered toasty bread is pretty much perfection on its own, but sometimes it's also fun to get creative and mix things up a bit.  I'm not sure where the line is drawn between grilled cheese becoming basically a grilled sandwich, but I think this version retains the key elements of a grilled cheese, just kicked up a notch!

Avocado Green Goddess Grilled Cheese

In this version, I whipped together an avocado green goddess dressing, with a ripe avocado, a bit of light sour cream, and lots of herbs.  You could stop right now and just use this as a veggie dip (and indeed you can do that with your leftovers!), but we're going to keep going...

Avocado Green Goddess Grilled Cheese

And spread that sauce on some fresh sourdough bread, adding sliced mozzarella cheese to a second slice and throwing in some spinach for some extra green colour and a boost of nutrition!

Avocado Green Goddess Grilled Cheese

Then we put it all together and grill it up so everything gets warm and toasty, and we have our avocado green goddess grilled cheese sandwich ready to eat!

Avocado Green Goddess Grilled Cheese

I loved the bright flavour of the herbs paired with the creamy avocado and melted cheese, and the sourdough bread was the perfect choice to sandwich it all together.

I used part-skim mozzarella cheese for its mild flavour, which let the green goddess sauce really take over, but if you want to be able to taste the cheese more, you could definitely use something a little stronger like a white cheddar, provolone, or maybe an herbed havarti.  You could also leave out or increase the amount of spinach in this sandwich, or use something like arugula for a bit of peppery bite.  There are so many ways to customize this!

Avocado Green Goddess Grilled Cheese

If you're into football, this would also make a great game day snack for this Sunday, especially if you'll be cheering for the 49ers along with me!  I actually made this with San Francisco in mind, as it's the birthplace of green goddess dressing and is famous for its sourdough bread (and the 49ers mascot is named Sourdough Sam!).

But of course, if you don't care about or even hate football, you can still enjoy this for your Sunday lunch before you do something much more productive with your day than I will be :)

Have a great weekend!

Avocado Green Goddess Grilled Cheese

Avocado Green Goddess Grilled Cheese

Idea inspired by Kenny Callaghan on Today; Recipe adapted from Panini Happy and my green goddess salmon sliders

Makes 4-8 sandwiches

Ingredients:

For the avocado green goddess sauce:
1 ripe avocado, flesh scooped out
1/4 cup light or non-fat sour cream
1/4 cup roughly chopped parsley
3 tablespoons chopped chives
1 clove garlic, minced
1/2 to 1 tablespoon fresh lemon juice
1/4 teaspoon salt
1/4 teaspoon pepper
Dash of Worcestershire sauce (optional, omit for vegetarians)

For the sandwiches:
8-16 slices of fresh sourdough bread, sliced about ½” thick
~4-8oz part-skim mozzarella cheese (or your cheese of choice, such as white cheddar, provolone, Havarti..)
Spinach – a few leaves per sandwich, depending on your preference
Margarine or butter for toasting the bread, if desired

Directions:

To make the sauce, add all ingredients to the bowl of a food processor or blender and mix until smooth.  Start with only 1/2 tablespoon of the lemon juice and add the rest after tasting, if desired.  Adjust other amounts as well, if desired. 

Heat a large non-stick pan over medium heat.  Prepare sandwiches: Spread 2 tablespoons to 1/4 cup of sauce on a slice of bread, per sandwich.  I used 1/4 cup per sandwich which is a lot of sauce, so if you don’t want the sauce to be overpowering, use only 2 tablespoons to spread a thin layer.  Note that there is 1 cup of sauce total, so using 1/4 cup per sandwich will allow for 4 sandwiches, and using 2 tablespoons will make enough for 8 sandwiches.  Season with a little extra salt and pepper, if desired.

Add desired amount of sliced cheese to other slice of bread and top with spinach leaves.  Combine two slices of bread to form a sandwich and very lightly butter one side of the bread.  Place that side face down in preheated skillet and cook until golden brown.  Butter other side of bread and flip until cooked.  Remove from heat and eat warm.

September 05, 2013

Cauliflower Crust Pizza with Corn, Zucchini, & Goat Cheese

Cauliflower Crust Pizza with Corn, Zucchini, & Goat Cheese

If you read blogs regularly or look at food on Pinterest, you've probably noticed at least a few recipes for cauliflower crust pizza before.  I've been seeing it all over the place for a while now and keep adding it to my list of things I need to try, but for some reason it took me until now to finally make it.  I admit I was skeptical that this was another fad that people go crazy for because it sounds good but in reality tastes disgusting (*cough*egg baked in an avocado*cough*), but I'm happy to report that this tastes as good as it sounds! (unless you think it sounds gross, like a certain boyfriend who shall remain unnamed, in which case you are wrong!)

If you have no idea what I'm even talking about when I refer to cauliflower crust pizza, I'll give a quick explanation of what it is.  Basically it's a breadless pizza crust that's made by mixing pulverized cauliflower with cheese, egg, and spices (if you like) to form a "crust" that is then baked and topped with any pizza toppings you like.  So it's healthier than pizza in the sense that there is actually some nutrition in the crust instead of empty carbs, but I should be clear that it's also not some sort of miracle calorie-free pizza because there is a lot of cheese in the crust, if that's what you're concerned about!

Cauliflower Crust Pizza with Corn, Zucchini, & Goat Cheese

There are lots of different recipes for cauliflower crust floating around, but I used one from The Lucky Penny Blog (with a few small changes), which Jessica from How Sweet It Is recently affirmed is the best cauliflower crust pizza recipe around, and though I haven't tried any other versions, this one worked so well that I know I won't need to (though she does have a cheese-free version if you're interested in trying it)!

Making the crust is pretty simple.  You start by pulsing your cauliflower florets in a food processor until you get a bowl of fluffy snow-like "crumbs":

Making cauliflower crust pizza

You then cook the "crumbs" in the microwave, let them cool, then transfer them to a towel to wring out all the water.  This is probably the most important step, as it will help make sure your crust stays together later.  You'll be surprised at how much water comes out - and you'll get a bit of an arm workout during the process!

Making cauliflower crust pizza

After you wring out all the moisture, the cauliflower will look completely different and if you smoosh it together with your hands it should actually stay together in clumps:

Making cauliflower crust pizza

You then mix in your cheese, egg, and seasonings (if you like - I added dried basil, oregano, salt, pepper, and nutritional yeast for added cheesy flavour).  Then you pat the mixture into a pizza crust shape:

Making cauliflower crust pizza

You'll need to prebake your crust, during which time you can get all your toppings ready, then return the pizza to the oven with the toppings, wait very impatiently for it to be ready, and eat!

Cauliflower Crust Pizza with Corn, Zucchini, & Goat Cheese

I decided to keep my toppings light and summery with corn, zucchini, and basil.  Even though the air is definitely getting chillier around here, it's still summer and there's still lots of corn and zucchini available!

I didn't use a sauce or cheese except for the goat cheese on top, as there's already cheese in the crust and I didn't want this to be too heavy.  Everything worked so well together and tasted fresh, which I loved!

Cauliflower Crust Pizza with Corn, Zucchini, & Goat Cheese

The crust was also way better than I expected!  It definitely doesn't taste anything like traditional pizza crust, so if that's what you're expecting then you'll be sadly disappointed.  Instead, it's chewy and flavourful and cheesy, and I think I actually might like it even better than regular crust!

Not that this will be replacing regular pizza for me as there's definitely still a time and place for that, but it's nice to have an alternative!

Cauliflower Crust Pizza with Corn, Zucchini, & Goat Cheese

The only problem some people have noted is that the crust isn't super sturdy, so it can be hard to pick it up and eat it with your hands like regular pizza.  I found that I could still pick up the slices of pizza (see picture below for an idea - sorry it's so dark, I didn't think to take a picture until I'd already started eating), but because I chose corn as a topping, it was a bit hard to keep everything in place!  But as long as you don't mind getting a bit messy, it's worth it!  (and you can always eat with a knife and fork if you prefer!)

Cauliflower Crust Pizza with Corn, Zucchini, & Goat Cheese

Cauliflower Crust Pizza with Corn, Zucchini, & Goat Cheese

Crust recipe adapted from The Lucky Penny

Serves 2-3

Ingredients:

For the Crust:
1 medium head of cauliflower
1 cup grated part-skim mozzarella cheese
1/2 teaspoon dried basil
1/2 teaspoon dried oregano
1/2 teaspoon salt
1/4 teaspoon pepper
1 teaspoon nutritional yeast (optional)
1 large egg

For the Toppings:
1 small zucchini, sliced into thin rounds
1 ear of corn, kernels removed
2 oz herbed goat cheese (or plain goat cheese)
A few leaves of fresh basil, sliced thinly

Directions:

Preheat oven to 450°F and line a baking sheet with parchment paper.

Chop the cauliflower into florets (try to remove the stems).  Place in the large bowl of a food processor and pulse for about 30 seconds, just until all of the florets have been pulsed into very fine crumbs.  You should have about 3 cups of crumbs.  Transfer to a microwave safe bowl, cover, and microwave on high for 4 minutes.  Remove and let cool slightly.  Transfer to a clean tea towel (don’t use paper towels - they will shred), wrap up tightly in the towel, and wring all the water out of the cauliflower over the sink.  You will be surprised at how much water comes out!  Keep wringing to get as much water out of the cauliflower as you can – this will prevent the crust from crumbling.  Combine dried cauliflower with the cheese, basil, oregano, salt, pepper, nutritional yeast, and egg.  Mix to combine (I just used my hands).  Transfer to prepared baking sheet and form into a 10” thin circle.  Bake in preheated oven for 10-11 minutes.

Once crust has precooked, remove from oven and top with zucchini, corn, and goat cheese (you might not be able to fit all of the zucchini or corn kernels, depending on how big the zucchini and ear of corn were).  Top with crumbled goat cheese.  Return to oven and bake for another 15-20 minutes.  Remove from oven, top with sliced basil, season with additional pepper if desired, and serve!

Note that this is best eaten fresh - it doesn't keep very well.

May 10, 2013

California Omelette

California Omelette with avocado, tomato, pesto, mozzarella

There were two dishes I ate during my trip to Boston last March that I was determined to try for myself once I returned home.  One was fish tacos, which I seemed to get a version of at every restaurant I went to because they were all so good, and the other was a California omelette that I treated myself to for breakfast at Sauciety in our hotel on the last morning.

When I looked up California omelette recipes later, it seemed that there are about a million different versions of them, but the one ingredient that appears to be common to them all is avocado.  The version I'd tried also included pesto, tomatoes, and mozzarella, and since I loved the combination of those four ingredients so much, I decided to just stick with them and create my own version off memory.

California Omelette with avocado, tomato, pesto, mozzarella

And I wouldn’t have wanted this any other way – it is so good!  I loved it when I had it in the restaurant but I think I loved it even more at home, where I could control the proportions of ingredients to my own liking (and of course, if you make this yourself at home you should do the same, taking the amounts I listed as a guide).

I've never been able to get the whole omelette technique down pat, and as you can tell from the pictures, my omelette certainly isn’t the prettiest thing in the world, but the flavour more than made up for it! 

California Omelette with avocado, tomato, pesto, mozzarella

With Mother’s Day coming up this weekend, I think this would be a great savoury brunch offering to serve her!  We are still menu planning for our own mom’s special meals – we’re still figuring out dinner and dessert, but for brunch we’re going towards the sweet side and are leaning towards either banana blueberry pancakes or this strawberry rhubarb baked French toast.  If you're also searching for menu ideas for Mother’s Day, you can check out what we made for our mom last year in this post. 

I hope all the moms out there have a fantastic Mother’s Day!

California Omelette with avocado, tomato, pesto, mozzarella

California Omelette (with mozzarella, pesto, tomatoes, and avocado)

Serves 1

Ingredients:

2 large eggs (fresh, good quality eggs are better)
1-2 tablespoons water (optional)
Salt & pepper
1 teaspoon butter or olive oil
A few slices of mozzarella cheese (about 1 oz)
2 slices of tomato
Half a ripe avocado, sliced
1-2 tablespoons pesto
Chopped parsley or herbs for sprinkling on top, if desired

Directions:

In a small bowl, beat the eggs, water (if using; I think it makes them fluffier but some prefer to leave out any liquid), and a pinch each of salt and pepper until mixed.

Heat butter or olive oil in an 8- or 9-inch non-stick skillet over medium-high heat.  Pour in the egg mixture.  Let sit for a few seconds until edges of omelette begin to set, then use a flexible heat-proof spatula to gently stir the eggs in a circular motion until thickened.  Gently push any cooked portions of egg toward the center of the skillet and tilt the skillet to allow uncooked egg to flow into empty spaces. 

When eggs are almost set on surface, layer the mozzarella, tomato, avocado, and pesto over half the omelette.  Gently fold the other half over the filling, and slide the omelette out onto a plate.  Serve sprinkled with chopped parsley or herbs and an additional drizzle of pesto, if desired.

March 26, 2013

Breakfast Naan Pizzas for Easter (or Anytime!)

Breakfast Naan Pizzas

This past weekend wasn't so successful for me in the kitchen.  First I attempted my first ever (vegetarian) cabbage rolls and they all completely fell apart on me, and didn't even taste that great either.  Then I decided to make whole wheat dinner rolls shaped like baby chicks and bunnies.  They were so adorable in my mind, and were pretty darn cute before they went in the oven, but then almost all my chicks came out headless (except for two whose heads sort of ended up growing out the sides of their bodies) and my bunnies turned out more like gremlins/Pikachus. At least these ones still tasted good, but now I have an awful lot of buns to eat by myself because I'm not going to give headless animals or gremlins to anyone else to eat!

Oh, and as a warning to others, if you've seen that picture floating around Pinterest of cute little bunny buns made with just two snips of kitchen shears, don't fall for it!  I found out later (thanks to Kelli's sleuthing) that the picture is a fake, and the original buns are actually a Japanese pastry, so save yourself the time and effort and just make regular buns (unless you're a big Pokemon fan, then they might actually work)!

Fortunately, there was one good - no, great! - thing that came out of my kitchen this weekend, and it's still very Easter appropriate!

Breakfast Naan Pizzas

These breakfast naan pizzas are ridiculously easy to make and surprisingly tasty!  I've never had an egg on a pizza before so I was a bit nervous about how it would turn out, but it cooked up beautifully in the oven and when you slice it open to reveal that runny yolk, it's pretty heavenly!

Because naans are kind of shaped like eggs and I was putting eggs on my pizza, it only made sense to decorate my naan pizzas like Easter eggs!  I used peppers and green onions to make decorative patterns on my pizzas, which also made a delicious topping paired with the cheese and eggs.

Breakfast Naan Pizzas

All you have to do to make these is take some storebought naan (I used whole wheat), top it with some cheese and peppers, crack an egg on top, then bake them for about 12 minutes.  So easy, and you could easily double the recipe to feed your family on Easter morning.  Try using different coloured peppers or other toppings like asparagus, tomatoes, or onions, to make each egg unique!

Even though they look pretty cute as Easter eggs, I know I'll be making these all year long!

Breakfast Naan Pizzas

(Easter Egg Shaped) Breakfast Naan Pizzas

Serves 2

Ingredients:

2 whole wheat naan breads
~1/2 cup mozzarella cheese (cheddar, pepper jack, or your favourite cheese would also work)
~2 tablespoons parmesan cheese (optional)
Bell pepper slices (red, yellow, orange, or green) – you will only need about 8 thin slices total, depending on the design you want to make
2 large eggs
Salt and pepper
1 green onion, thinly sliced

Directions:

Preheat oven to 400°F.  Spray a baking sheet with non-stick cooking spray and lay 2 naans on the baking sheet.  Cover each naan with mozzarella cheese, leaving a thin border around the edge (you may want to use more mozzarella, depending on the size of your naan – just use your best judgment).  Sprinkle with a bit of parmesan cheese.  Lay bell pepper slices in a decorative pattern to resemble an easter egg.  Crack one egg onto the center of each naan.  Season with salt and pepper.  Bake in preheated oven for around 12 minutes, until egg is set.  Sprinkle with green onion (also in a pattern, if desired) and serve immediately.

Note: Try mixing up the toppings and cheese for different flavour combinations!  You could also add a light sauce on the base if you like - I've tried them with barbeque sauce which I loved!

Breakfast Naan Pizzas

March 07, 2013

Shamrock Personal Pizzas for St. Patrick's Day

Shamrock Personal Pizzas for St. Patrick's Day

Last year, I made these heart-shaped personal pizzas with heart-shaped toppings for Valentine's Day, and I loved them so much that I decided to try to do the same thing for St. Patrick's Day, but with shamrock pizzas and shamrock toppings!

These follow the same method as the heart-shaped pizzas - just divide a ball of pizza dough in four, shape each piece into a shamrock, then top each one with desired St. Paddy's themed toppings, depending on individual tastes!

Let's start with the dough.  You can either buy a storebought ball of dough, which is what I did with the heart-shaped pizzas, or make your own.  For these ones, I made Martha Stewart's whole wheat pizza dough.  I cut the recipe in half, which made enough to form 4 personal pizzas.  I skipped the freezing step, and went ahead and baked them two at a time, for 15 minutes at 450°F.  Here's my attempt at showing how to form each ball of dough (after it had risen) into a shamrock shape - it's super easy!

 Making shamrock shaped pizzas

Let's move on to the toppings!  I tried four different topping ideas, which I'll describe below.  If the pictures are too small to read, just right click and 'view image' to see them larger.

Shamrock Personal Pizzas for St. Patrick's Day

The green pepper pizza was my favourite visually.  It was a little tricky to cut the green pepper into shamrock shapes, and mine certainly weren't perfect, but you can at least tell what they're supposed to be!  Just cut a green pepper in half, remove the seeds and membranes, cut each half in two, flatten your four pieces, and cut them into shamrock shapes.  You won't need the whole pepper, but this gives you a little space to work with in case you make a mistake!

 Shamrock Personal Pizzas for St. Patrick's Day

I thought this was my most creative idea - combining green olive slices and stems to form shamrock shapes - but the finished product didn't look quite as nice as it did before it was baked.  The olives slid around a little during baking (probably because I used way too much cheese), so I had to try to put them back in place afterwards.  Next time, I might just wait to place the olives on the pizza after baking so they don't get covered up by cheese and you can tell what they're supposed to be!

 Shamrock Personal Pizzas for St. Patrick's Day

This one's really easy because you can just use kitchen scissors to cut a leaf of lettuce, spinach, or basil into a shamrock shape!  I paired mine with a pesto spread (to keep it green) and tomatoes, and I had intended to add goat cheese but then realized I didn't have any, so just picture it on there!

 Shamrock Personal Pizzas for St. Patrick's Day

This was my attempt at a healthier pizza, and instead of using shamrock shaped toppings, I covered the whole thing with green ingredients!  I spritzed the dough with olive oil, topped it with a bit of mozzarella (but gruyere would be good too), then put it in the oven for 10 minutes.  Next, I added a layer of chopped brussels sprouts and broccoli, seasoned it with salt and pepper, and popped it back in the oven for 5 minutes until the greens were just starting to brown on the edges.  The result was a crisp and light pizza that was actually my favourite!

Shamrock Personal Pizzas for St. Patrick's Day

These made the perfect individual sized pizzas and I loved having a different one to eat each day for leftovers!  The clover shape actually breaks perfectly into three "slices", which makes them easy to eat.  If you have other ideas for green toppings that would work on these, feel free to share them in the comments!

January 22, 2013

Pizza Stuffed Breadsticks

Pizza Stuffed Breadsticks

So it looks like I chose a pretty good year to be a Niners fan!  Let me rewind a bit .. With the NHL lockout earlier this year, my boyfriend decided to get into football more, and I decided it would be a lot more fun for me if I joined him.  I always watch the Super Bowl and sometimes playoff games, so I knew the basics of the game and who all the teams were, but I had never payed much attention to the regular season or had a favourite team.  So we each decided, before the season started, to choose a team to root for, and I chose the San Francisco 49ers.  I watched (almost) every game of theirs this season and discovered that football is probably the only sport I can watch on tv and actually enjoy every minute - it's so entertaining!

This past Sunday was especially exciting with the 49ers in the NFC Championship game (which they won, yay!), so I decided to make some football food to go along with the game.  Enter these pizza stuffed breadsticks!

Pizza Stuffed Breadsticks

These are super easy and super tasty - you really can't go wrong with pizza dough and cheese.  Most cheese-stuffed breadstick recipes have you wrapping individual pieces of dough around cheese, but I went the lazy route with these. All you have to do is roll pizza dough into a rectangle, top it with marinara sauce and shredded cheese, add a top layer of dough (brushed with an egg wash, seasonings, and parmesan), then bake and slice it into breadsticks.  Served with marinara sauce for dipping, you get something that tastes like pizza but is more fun to eat!

Between eating these and watching the game, I was a happy girl on Sunday!  Now I can't wait for the Super Bowl!

Pizza Stuffed Breadsticks

Pizza Stuffed Breadsticks


Makes about 20 breadsticks

Ingredients:

1 ball of storebought frozen or refrigerated pizza dough (or 1 homemade pizza dough)
1/4 – 1/3 cup pizza/marinara sauce
200g brick of pizza mozzarella, shredded (about 2 cups)
1 large egg
2 tablespoons milk
2 tablespoons parmesan cheese
2 cloves garlic, minced
3/4 teaspoon dried basil
3/4 teaspoon dried oregano
Extra marinara sauce for dipping

Directions:

Preheat oven to 425°F.

Let pizza dough come to room temperature if using storebought dough.  Divide ball of dough in half.  Roll each half into a rectangle approximately 15”x10” on a floured surface.   If the dough won’t stay stretched, let it rest then try again.  Transfer one dough rectangle to a greased or parchment-lined 15x10-inch baking sheet, stretching as needed to meet edges of pan.  Brush pizza sauce over the surface, then sprinkle evenly with mozzarella.  Place second dough rectangle over top, and fold the edges under the bottom layer of dough, pinching to seal all around.

Use a pizza cutter to cut dough into 20-21 breadsticks (I cut it crosswise into thirds first, then cut each third into 7 breadsticks).  Do not separate the breadsticks.

Mix egg, milk, parmesan, garlic, basil, and oregano in a small bowl.  Use a pastry brush to brush over the tops of the breadsticks.  You won’t need to use all of it.  Bake in preheated oven for 15-20 minutes, until puffed and golden.  Recut along seams to separate breadsticks and serve warm with extra marinara sauce for dipping.

Note: Mennonite Girls Can Cook has some great step-by-step photos of her breadsticks if the above directions aren't clear - mine just used storebought dough, added marinara sauce in the middle layer, and used a little less cheese, but otherwise the steps were the same!

Note 2: (thanks to Genevieve for pointing this out in the comments): We loved these as is, but it could also be fun to try out different versions with various toppings stuffed in the middle!  I imagine that diced pepperoni or veggies would make fun variations!

October 25, 2012

Halloween Mummy Potatoes with Meatballs

Halloween Mummy Potatoes with Meatballs

Every time a holiday rolls around, I promise myself I'll create lots of themed recipes to celebrate and my head starts filling up with ideas, but then I either get too busy (holidays often come with lots to do!) or I realize that every possible holiday-themed recipe has already been done and give up trying to think of something original.

This almost happened for Halloween - there are already so many fantastic recipe ideas out there that I didn't think I could possibly contribute something creative of my own.  But I was still determined to share a Halloween recipe so I gave up trying to think of something original and started looking for ideas that just weren't as common.  As soon as I found these "terrifying twice-baked mummies" from Betty Crocker, I knew I'd found a winner!  Not only were they something I'd never seen before, they sounded like they would actually taste good too, unlike some recipes that are more for show (or are too creepy to eat)!

Halloween Mummy Potatoes with Meatballs

As an added bonus, they turned out to be super easy to make too!  All you have to do is bake then hollow out some potatoes, fill them with meatballs, bandage them up with cheese, add a couple olives for eyeballs, and voila!  The cutest little mummies you've ever seen!

The original recipe included pickles for feet, but I thought the mummy's feet should be wrapped up with the rest of it's body, plus I didn't really want pickles with my meatballs anyway!  I also used black olives for the eyes instead of green pimiento stuffed olives so they would look more like hidden mummy eyes than bulging monster eyes, and I used string cheese so it would be easier to slice and bend around to form the bandages.  If you want the mummy to be more enclosed in its coffin, you could only slice a bit off the top of a potato instead of halving it, as it looks like the original recipe did in its photo, but then you'd have to double the amount of potatoes you use, so it's up to you!

Halloween Mummy Potatoes with Meatballs

I was a little hesitant of how meatballs and potatoes would taste together, but they were actually delicious!  Every bite had a bit of baked potato, meatball, tomato sauce, and cheese - so comforting and enough to fill your belly for a night of trick or treating or partying!

I'm hoping to find time to make one more Halloween recipe before the big day, but until then, you can also check out my Pinterest board for some inspiration!

Halloween Mummy Potatoes with Meatballs

Mummy Potatoes with Meatballs

Adapted from Betty Crocker

Serves 4 (makes 8 mummies)

Ingredients:

4 large russet potatoes
16-24 small cooked meatballs in sauce - I made a batch of Giada's mini turkey meatballs* but you could use your own favourite storebought or homemade meatballs or veggie balls.  The amount you need will depend on how many can fit in each potato (2-3)
6-8 part-skim mozzarella cheese strings (stringable cheese)
16 black olive slices
Extra sauce and parmesan for serving, if desired

Directions:

Preheat oven to 375°F.  Wrap each potato in foil and bake for about an hour, or until fork-tender.  Let stand about 10 minutes until cool enough to handle.  

Meanwhile, heat meatballs in sauce over medium-low heat on the stove.  Slice each cheese string into as thin of slices as possible to use for the mummy "bandages".

When potatoes are done, cut each one in half lengthwise.  Cut a thin (about 1/4 to 1/2 inch) border around the potato and scoop out the insides.  I found it easiest to use my knife to cut out chunks of potato for better control because my ice cream scoop was too large.  Reserve the potato you scoop out for another use.

When meatballs are heated through, transfer 2-3 meatballs to each hollowed out potato half, depending on how many fit.  Wrap meatball "body" in cheese slices to resemble bandages, crossing cheese back and forth and tucking the ends into the potato.  Add 2 black olive slices for the eyes at one end (see pictures). 

Return potatoes and meatballs to the oven for 2-5 minutes so that cheese slightly melts.  Serve immediately, with extra pasta sauce and parmesan cheese if desired.

----------
*Note: I made a few changes to Giada's meatball recipe: I squeezed the moisture out of the onion after I grated it, I added an extra 1/4 cup of seasoned breadcrumbs, reduced the salt, left out the Pecorino Romano, added a dash of Worcestershire sauce, and used lean ground turkey instead of dark turkey.  They were quite good!  I made them a day ahead so the potatoes came together easily the next day, and I also had leftover meatballs.

February 13, 2012

Heart-Shaped Personal Pizzas (with heart-shaped toppings!)

Four heart shaped personal pizzasHappy Valentine's Day!

If you're still looking for last minute meal ideas to make for your loved one(s) tomorrow, I've got the perfect idea for you: heart-shaped personal pizzas with heart-shaped toppings!

I say "idea" because I'm not actually providing a recipe here - pizza's one of those things that you don't really need measurements in a recipe to make (unless you're making your own dough, in which case, I can't help you there because I just bought a refrigerated storebought pizza dough for these).

All you have to do for these adorable little guys is divide a regular-sized pizza dough (storebought or homemade) into four, then shape each portion into a heart. This part was a lot easier than I expected; my hearts weren't perfect, but you can definitely tell they're hearts! If you're having difficulty shaping the dough, just let it rest a while longer until it's easier to work with. For a few of the hearts, I had to cut off some of the dough from the top part in order to get the heart right, but they all held their shape pretty well.

Once you have your dough shaped into four personal-sized hearts, then you can top each one according to individual tastes and bake them (I baked two at a time). In order to make my pizzas extra special, I topped each one with different heart-shaped toppings! Check out my topping ideas below:

1) Pepperoni Hearts:

heart shaped pepperoni personal pizzaThis one was one of the easiest - I just bought sliced pepperoni and cut each slice into a heart using a knife. You can even stack the pepperoni slices on top of each other to cut multiple hearts at a time, so this pizza takes no time at all to prepare. I paired the pepperoni with simple tomato sauce and mozzarella cheese.

2) Tomato Hearts:

heart shaped tomato personal pizzaTomato is my favourite pizza topping, and combined with mozzarella and basil, it makes for my very favourite pizza! The tomatoes were the hardest of all the toppings to cut into hearts, and they probably made the least obvious looking hearts, but I think they still turned out cute! I placed each heart on top of a slice of mozzarella instead of shredding the cheese first, but either works!

3) Red Bell Pepper Hearts:

heart shaped red pepper personal pizzaI thought these were the most fun because the red pepper was the least obvious ingredient to turn into a heart. All you have to do is slice a red bell pepper and line up two slices together to form a heart shape (you'll have to trim the ends off to get the right angle for your heart). I combined my red pepper slices with spinach and goat cheese, and while I'm not usually a fan of peppers on pizza, this was one of my favourites!

4) Roasted Red Pepper Hearts:

heart shaped roasted red pepper personal pizzaThis was one of those last minute ideas I had that I wasn't very sure about, but it ended up being one of the best looking pizzas! I bought a jar of roasted red peppers, then just pulled out a big slice and cut it into small hearts using a paring knife. You could also roast your own red pepper if you have the time; I was just lazy. You could pair roasted red peppers with any other toppings you want but I kept it simple with just mozzarella cheese and tomato sauce.

If you don't like any of the above ideas, here are a few more ideas for toppings you could shape into hearts, which I didn't have enough dough to try with:

- Roasted red beets
- Roasted sweet potatoes
- Plain cheese with hearts drawn on in bbq or tomato sauce (for picky kids)
- Strawberries or apples (for the more adventurous types!)

I was so happy with how these turned out - not only did they look adorable, but they tasted amazing (what's not to like about pizza?!) and were the perfect size for one person.

And don't think that these can only be made on Valentine's Day! Save this idea and make heart-shaped pizzas any time you want to show your family, friends, or partner (or just yourself!) some love - they're guaranteed to put a smile on anyone's face :)

July 26, 2011

Eggplant, Tomato & Mozzarella Stacks

eggplant, tomato, mozzarella stacks
If I had to pick my favourite summer vegetable, I think it would have to be the tomato. And for those who say a tomato is a fruit, I think it still beats out any other summer fruits too. I can't think of any flavour that's better than a plump, juicy tomato, sprinkled with salt and pepper and drizzled with a little balsamic vinegar. Mmmm, I'm drooling just thinking about it. When I picked up some monster tomatoes and a giant bunch of basil at the farmers' market the other week (I'm pretty sure I made the whole bus smell like basil on the way home, but in my opinion I did the bus a favour), I knew I had to make a caprese salad.

However, I'd promised myself earlier that I would use that pesky eggplant I'd had for a while and didn't know what to do with. That's when I remembered seeing a recipe for eggplant, tomato and mozzarella stacks on Eating Well - problem solved! The recipe called for pesto to be added to the stacks, which I'm sure would be delicious, but I decided to leave it out so it wouldn't overpower the taste of the tomato, which I wanted to be the star of the dish.

The stacks were exactly what I was looking for, and I can't wait to make them again! I ate three as a light meal since I was just cooking for myself, but they would be ideal as a side dish to a main course. It almost seems unnecessary to post a recipe since the ingredients are clearly visible from the picture, but here goes anyway!

Eggplant, Tomato & Mozzarella Stacks
Adapted from Eating Well

Makes 4 stacks

Ingredients

2 large tomatoes (I used about one and a half - amount may vary according to their size)
1 eggplant (I used about half of one)
About 8 oz mozzarella, or 8 slices
Handful of basil leaves
Balsamic vinegar
Salt & pepper

Directions

Slice the eggplant into 1/4 to 1/2 inch thick slices, using the smaller end of the eggplant so the size of the slices will roughly match the tomato slices. Line a baking sheet with aluminum foil and spray with non-stick cooking oil. Lay the eggplant slices in a single layer on the baking sheet. Spray the tops with cooking oil and season with salt and pepper. Broil until tender and golden brown on both sides (mine took about 5 minutes a side). Alternately, use your favourite method to cook the eggplant - grilling, pan frying, or baking should all work.

Slice the tomatoes and mozzarella. Arrange stacks by placing the largest slices of eggplant on the bottom, followed by a tomato slice, a bit of salt and pepper, mozzarella, and basil leaves. Repeat, finishing with a basil leaf on top.

Drizzle balsamic vinegar over the stacks. If you want a slightly sweeter taste, make a balsamic reduction first by bringing the balsamic to a boil then simmering until syrupy and reduced by about half.

Ingredient Index

Related Posts Plugin for WordPress, Blogger...